Custom Query Reports Hub
Custom Query Reports (CQR)
Custom Query Reports Overview
Custom Query Reports can be custom-built to produce the output and columns you want specifically.
- A Default Report is System delivered for each Custom Query Report.
- They all operate in the same way but pull specific information for that particular Query Report.
- Custom Query Report Filters can be saved, shared, held temporarily, or scheduled to run at a specific time.
- The output can be exported to a CSV/Excel or PDF file or sent to a Worklist.
- The Custom Query Reports can be added to your Favorite Reports or to Period End Reports.
- Custom Query Reports can be used to report on Custom Fields.
- All Financial reports look at Encounters/Payments/Adjustments that were posted in the selected Post Date range.
- The Payments posted are not necessarily connected to Charges posted in that same month.
- The Charge might have been posted in a previous month, but the Payment posted in the current month. (Date Range: 06/01/24 to 06/30/24)
- The Payment will be on the Report, but the Charge will not.
There are 5 Custom Query Reports.
- Custom Encounter Query (CEQ): Encounter data
- Custom Receipt Query (CRQ): Receipt data
- Custom Transaction Query (CTQ): Transaction data
- Custom Patient Query (CPQ): Patient data
- Custom Appointment Query (CAQ): Appointment data
Use the checkboxes to Add to My Favorite Reports and/or to add to your Period End Report.
- This adds the Custom Query Report to the Favorites or Period End panel with all of the Saved Filters you have created.
- This provides easy access to Custom Query Reports.
Filters and Columns
Choose Filters to determine the specific desired query results and select the Columns to display on the Report.
"Contains" versus "Includes"
Contains looks at any part of the value.
- For example, if you have a patient with the last name of Smitherman, the value is "Smitherman."
- If you use Contains = "smith," the last name of Smitherman will return since "smith" was part of the value.
Includes looks at the entire value.
- For example, if you have a patient with the last name of Smith or Jones; the value is Smith or Jones.
- If you use Includes = "smith" all Patients with the last name Smith will return, but Smitherman will not since "smitherman" is not a value.
- If you use Includes = "Jones," all Patients with the last name Jones will return.
- If you use Includes = "Smitherman," all Patients with the last name Smitherman will return.
"Share" versus "Copy"
- Share a Report: This shares a report with other Users and is can be accessed using the Save icon in the Report Filter Criteria.
- Sharing can be undone by Saving the Report using the Save icon and deselecting Users to whom the report was shared.
- Copy a Report: This copies a report to another User and is accessed using the Copy button.
- This cannot be undone. Once it is copied to a User, it cannot be uncopied.
Filter Criteria Menu
For documentation on the Filter Criteria icons, see Report/Table Filter Criteria. You have options to Export, Save, Remove Saved Filter, Clear Filters, Hold and Schedule a report to run.
Learn More
Custom Query Report/Table Filters and Criteria
Create a Custom Query Report
Copy a Report that is not a Custom Query to another User
Export to CSV
Export to PDF
Export to Worklist
Create a Job to Run a Custom Query Report
Save an Existing Filter or Save as New
Reorder the Saved Filters
Total-By Options
Custom Query Reports can be custom-built using specific Filters and Criteria and grouping by specific categories.
- The selected parameters can be Saved with the option to Share with other Users.
- With the ability to save and share, your preferred Reports are accessible without recreating them.
- Use the Filters to build your report and group by a specific category.
Articles
Filters and Criteria for Custom Queries and Tables
My Favorite Reports & My Reports Panel
- Select Reports on the Left Side Menu.
- Select one of the Query reports.
Custom Encounter Query (CEQ)
Custom Receipt Query (CTQ)
Custom Transaction Query (CTQ)
Patient Panel
Custom Patient Query (CPQ)
Scheduling Panel
Custom Appointment Query (CAQ)
Create a New Custom Query Report
In the Filter Criteria panel, select an existing saved report.
Select the Minus sign to delete criteria that you do not need.
Select the Columns
Choose the Columns to display on the Report Output.
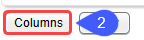
Select the Columns button.
Enter search word(s) in the Search field; or
Use the Plus symbols to open a specific category.
Select the columns.
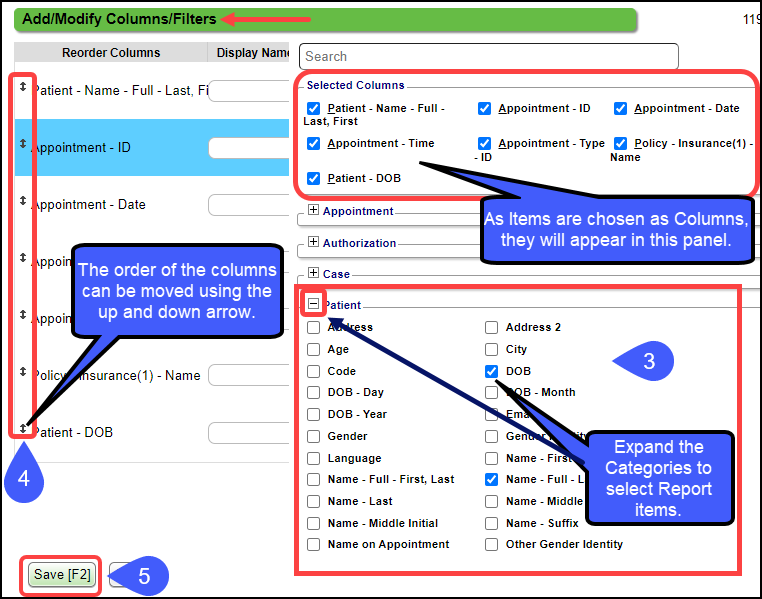
As you select columns, they will show in the Reorder Columns pane on the left.
In the Selected Columns panel, deselect any items that are not needed as Columns.
Rename the Columns Headings to appear as you want them on the report.
Use the up-down arrow in the Reorder panel to drag and drop the columns to change how they will display on the report.
Select Save (F2).
Select the Filters
Select the Plus symbol beside "And" to add Filters.
Use the Select Columns Panel to select a Filter to define the outcome of the Report; or
Select the checkboxes from the lists below the Select Columns Panel.
Repeat Step 1 and 2 until all pertinent Filters have been selected.
Or use the checkboxes to select the Filters under the specific categories.
Enter or choose the Criteria for the Filters.
Select the Run button.
Save a Custom Query Report
Save an Existing Report
Select the Save icon.
Name and Description: Defaults to the name and Description of the report that you started with.
Select the Save radio button.
This will overwrite the original report.
Select the Save [F2] button.
Save a New Report
Select the Save icon.
Enter a new Name and Description.
Select Save As New.
Select Save [F2].
Use a Date Range
In the Filter Criteria panel:
Select the Plus icon.
Select Procedure - DOS from the Selected Columns Panel or from the list.
Repeat steps 1 and 2.
For the first Date, choose Greater than or equal to.
Enter the start date.
For the second Date, choose Less than or equal to.
Enter the end date.
Select Run after you have finished choosing all of your criteria.
Run a Self-Pay Patient Report using the Query Reports
Select the Plus button before AND.
Select Insurance (1) - ID.
For Policy - Insurance(1) - ID, select Equals.
Enter the word, Patient, in the Lookup field.
Select Run after all other criteria have been chosen.
Learn More
Custom Query Report/Table Filters and Criteria
Create a Job to Run a Custom Query Report
Save an Existing Filter or Save as New
Custom Encounter Query
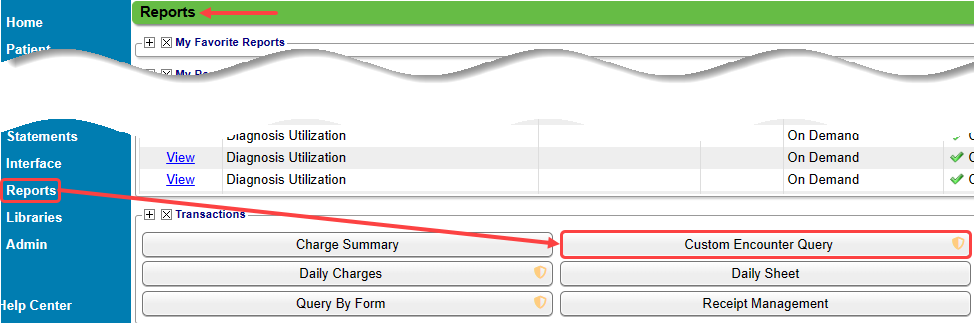
Access the CEQ Report by selecting Reports on the left side menu.
Select Custom Encounter Query in the Transactions panel.
Build a Custom Encounter Query
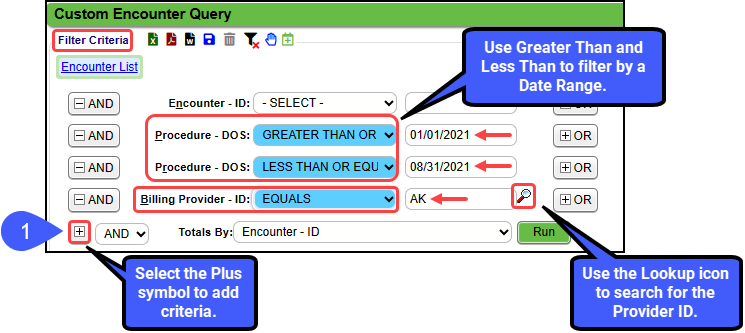
Filter Criteria: Add your filter criteria by selecting the Plus symbol beside "And".
The filters you choose will determine the specific parameters to obtain the desired query results.
Example: A specific Encounter Date Range for a specific Provider.
Add Columns to the Report by clicking the Columns button.
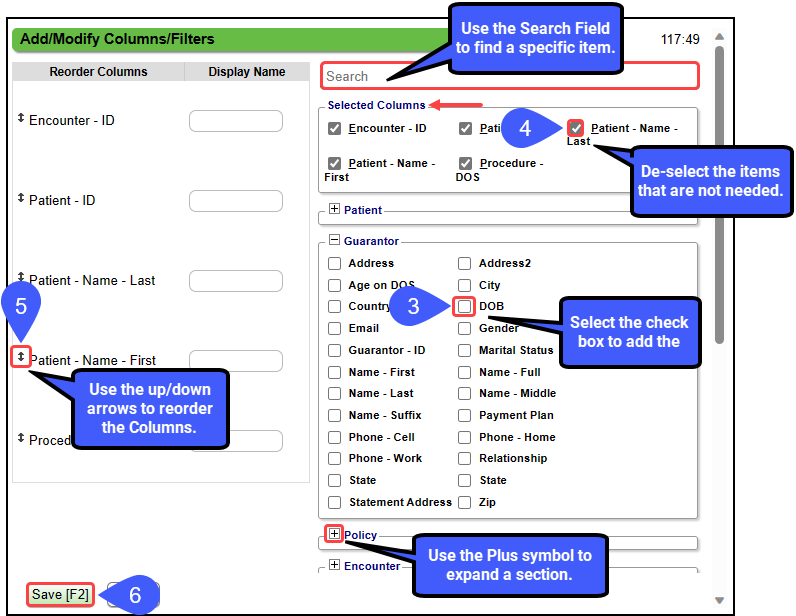
Use the Search Field to find a specific item, or expand the sections using the Plus symbol.
Use the check boxes to choose the items to use as Columns on the report.
In the Selected Columns panel, deselect any items that are not needed as Columns.
As you select columns, they will show in the Reorder Columns pane. Click and drag the columns to reorder how they will show on the report (the top column will be the furthest left column in the report).
Save the Report.
Select Save [F2] to save an existing report;
Select Save As New to save a new report.
Select the Run button.

Save the report using the Save Icon
Select Save to save the existing Report.
Select Save as New to save a new Report.
Learn More: Save a Custom Query Report
Date Range
Use Greater Than and Less Than with a DOS filter to create a Date Range.
Example: Use Less than or equal to and Greater than or equal to with the Procedure - DOS filter to create a date range from 01/01/2018 through 11/10/2021.
The start and end dates are included in the date range.
Total-By
Total-By Options: The Totals By will display as 1 row per entity showing totals for each column for that entity.
Count Column
This uses the same logic used in other reports to report the number of Encounters that have taken place during the reporting period (Service Facility Visits).
Each Visit/Encounter = 1
'Reversed' Encounter = 1
Created as a clone to replace the Encounter in the original period.
'Reversal' Encounter = -1
This is the Offset (negative values) mirror image of the Encounter that was Reversed.
Encounter that has no charge lines = 0
Encounter that was created by 'rolling up' other encounters = 0
The Reversal = -1 and the New Encounter = 1, so they net to 0 new Encounters.
Where to Find Most Recently Used
Policy Panel
Claim Status
Insurances (1-4)
Policy Numbers
Encounter Panel
UB/Institutional Claims: Is Institutional
Count (Encounter): Count
First Billed - Date
Is Incomplete
Is Reversed
Is Self Pay
Most Recent Statement
Tags
Procedure Panel
Procedure Code (CPT): CPT - ID
Diagnosis Codes (ICD-10): Diagnosis 1, etc.
DOS
Fee
NDC: NDC - Number
Transaction Panel
Adjustments
Allowed
Charges
Copay
Insurance Payments
Patient Payments
Write-Offs
Balance Panel
Collection
Insurance
Insurance by aging categories
Patient
Patient by aging categories
Total
Build a Self-Pay Patient Report using the CEQ
Select the Plus button before "AND".
Select Insurance (1) - ID.
For Policy - Insurance(1) - ID, select Equals.
Enter the word, Patient, in the Lookup field.
Select the Run button after all other criteria have been chosen.
Patient has not been seen in X Days/Years
Use the CEQ to pull a list of Patients that do not have a Date of Service for an X number of days.
Best Practice: If you are using the Calendar, it is best to use the Recall Feature and the Recall Report.
Example 1: List of Patients that had an Annual Exam (AE) that do not have an Appointment for another Annual Exam after 365 days.
Filters
Patient - Next Appointment Date: EQUALS blank (leave the field blank)
Patient -Most Recent DOS - Days: Greater Than or Equal To 365.00
Can also use a Less Than or Equal To Days to define a smaller subset of Patients, such as 400.00
Linked Appointment - Appointment Type: EQUALS AE (Annual Exam)
Totals By: Patient ID (Must select Patient ID)
Example 2: List of Patients that do not have a Post Op Appointment for 2 weeks from the Surgery DOS.
Filters
Patient - Next Appointment Date: EQUALS blank (leave the field blank)
Patient - Most Recent DOS - Days: GREATER THAN OR EQUAL TO 14
Patient - Most Recent DOS - Days: LESS THAN OR EQUAL TO 20
Linked Appointment - Appointment Type: EQUALS SURGERY
Totals By: Patient ID
These Reports can also be run in the Custom Appointment Query using the Most Recent DOS.- Days filter.
Use the CEQ to Query Custom Fields
The Custom Encounter Query can be used to query Custom Fields from the following screens:
Patient Registration
Modify Patient
Add/Modify Employer (Employer/Attorney Library)
Add/Modify Note
Add/Modify Policy (Insurance Management)
Add/Modify Insurance (Insurance Library)
Post Charge
Add/Modify Diagnosis Code (ICD Code Library)
Add/Modify Procedure Code (Procedure Code Library)
Add/Modify Case
Add/Modify Billing/Rendering/Supervising Provider (Billing/Rendering/Supervising Provider Library)
Add/Modify Referring Provider (Referring Provider Library)
Add/Modify Service Facility (Service Facility Library)
Modify Pay To Location (Pay To/Billing Location Library)
Learn More
Custom Query Report/Table Filters and Criteria
Create a Job to Run a Custom Query Report
URL:
Custom-encounter-query-ceq
Path:
Help Center
Reports
Custom Query Reports
Custom Encounter Query
Tags: encounter list,Custom Encounter Query,self pay report,custom encounter query,ceq,custom field report
The Custom Receipt Query is driven by entered/posted Receipts. This report will match the Receipt Management report if it is run by the same parameters:
Total By - Receipt - Number
Receipt - Is Registered Type = Yes
Post Date Range
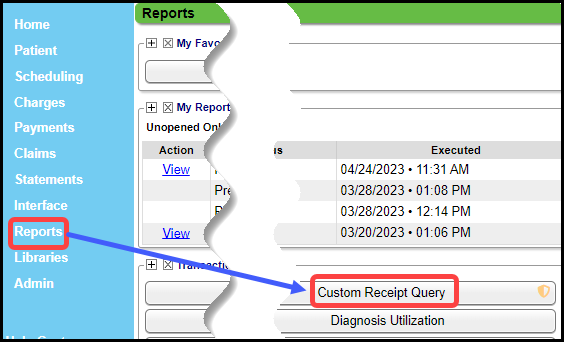
Reports > Transactions panel > Custom Receipt Query
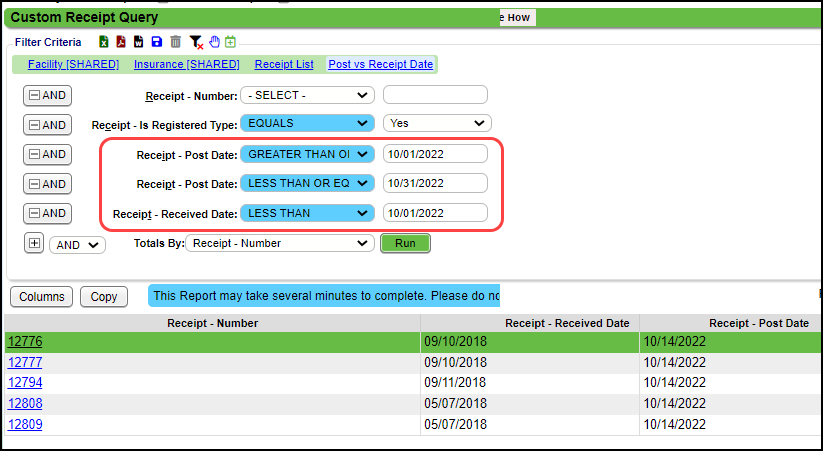
Received Date vs Posted Date
Example:
Date Range: Run by Received Date less than 10/01/22 and Post Date Greater Than or Equal To 10/01/22 and Less Than or Equal To 10/31/22 shows Deposits made in a specific time period but were posted outside of that time period.
Receipt - Is Registered Type
Yes: Receipts for Patient, Insurance, and Invoice Payments
No: Receipts for Reversals, Self-Pay Discounts, Mass Write-offs, etc.
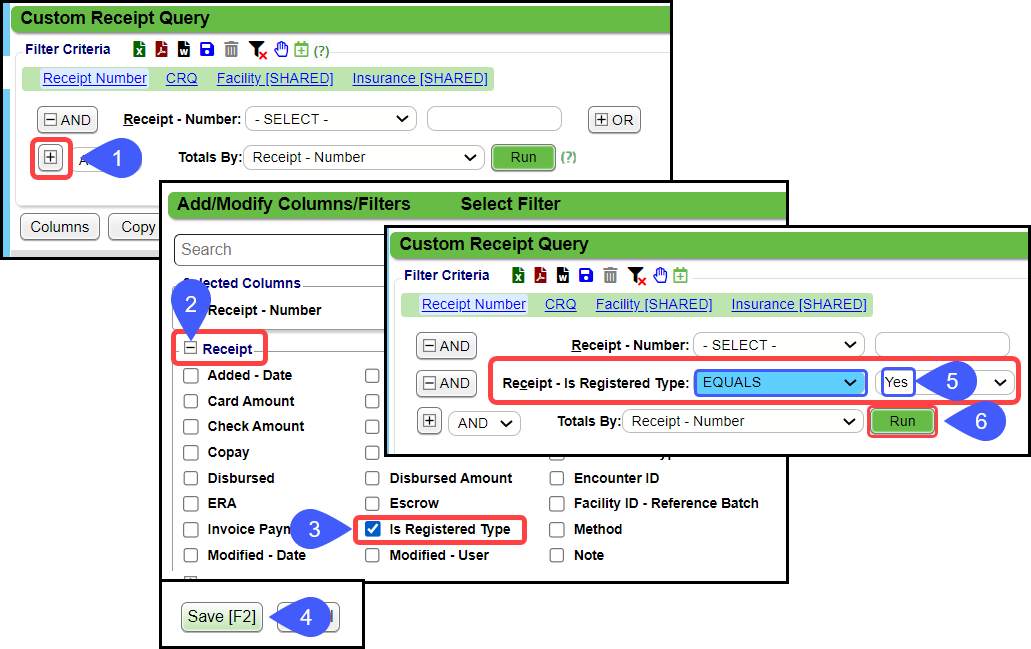
Example:
Select the Plus symbol next to the And dropdown.
Expand the Receipt section.
Select the Is Registered Type check box.
Select Save [F2].
Set Receipt - Is Registered Type to Equals.
Select Yes in the dropdown.
Select Run.
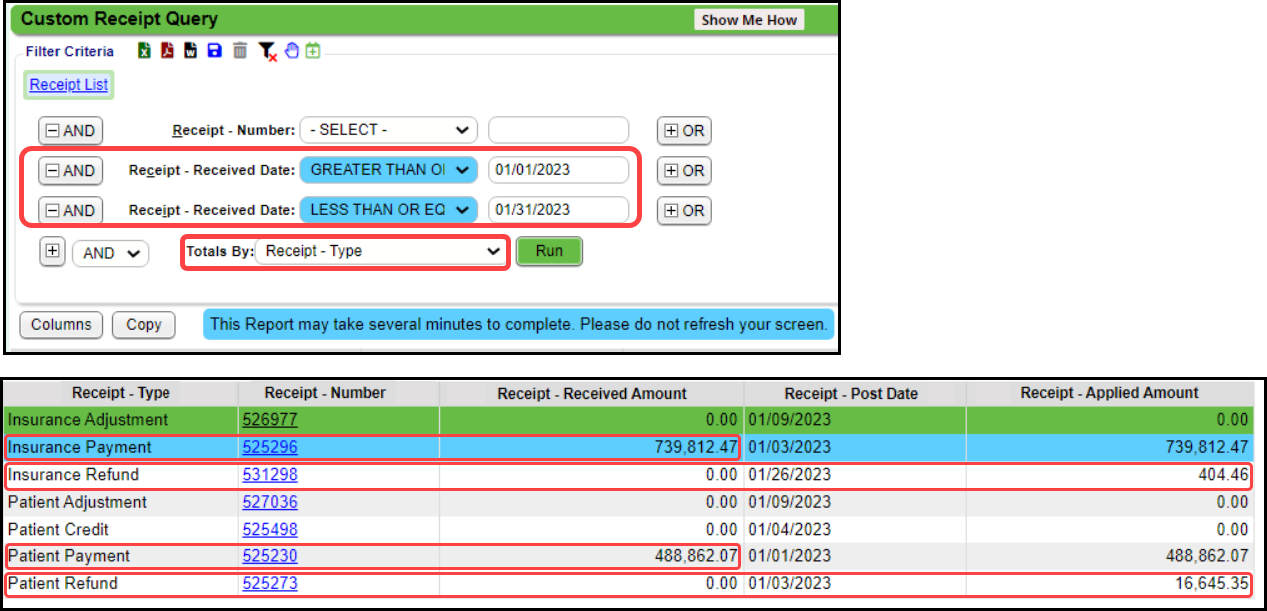
Totals By Criteria
Select a Totals By option in the dropdown menu to determine what the Report is grouped by.
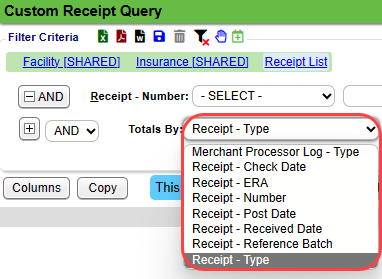
Example: Select Receipt - Type in the Totals By dropdown menu to report the data by the Receipt Type.
Receipt - Type appears as the first Column on the Report.
Use the CRQ to Query Custom Fields
The Custom Receipt Query can be used to query the Custom Fields that have been added to the following screens:
Add/Modify Receipt
Patient Registration
Modify Patient
Add/Modify Employer (Employer/Attorney Library)
Add/Modify Note
Add/Modify Service Facility (Service Facility Library)
Add/Modify Billing/Rendering Provider (Billing/Rendering Provider Library)
Learn More
Custom Query Report/Table Filters and Criteria
Create a Job to Run a Custom Query Report
Custom Transaction Query (CTQ)
The Transaction Query Report is driven by the Posted Transactions. This Report will match the Payments & Adjustments Report if they are run by the same parameters.
Transaction Query Report Criteria
Reports > Custom Transaction Query (CTQ)
Totals By: Choose how you want the Report Totaled By. Posted Transactions - Line is the Default.
Match to the Payments and Adjustments Report using Totals By: Posted Transactions - Code
Add the Post Date range:
Posted Transactions - Post Date Greater Than or Equal To (Date).
Posted Transactions - Post Date Less Than or Equal To (Date).
Add Procedure Billable Equals Yes.
Add Posted Transactions - Significant Transactions Equals Yes.
Totals By: Posted Transaction - Detailed Code
Detailed Adjustments must be chosen on the Payments & Adjustments Report.
Select Run.
Examples
Custom Transaction Query
Payments and Adjustments
Use the CTQ to Query Custom Fields
The Custom Transaction Query can be used to query Custom Fields that have been added to the following screens:
Post Charge
Add/Modify Receipt
Patient Registration
Modify Patient
Creating a Reference Batch
Add/Modify Employer (Employer/Attorney Library)
Add/Modify Note
Add/Modify Procedure Code (Procedure Code Library)
Add/Modify Policy (Insurance Management)
Add/Modify Insurance (Insurance Library)
Add/Modify Service Facility (Service Facility Library)
Add/Modify Billing/Rendering Provider (Billing/Rendering Provider Library)
Add/Modify Referring Provider (Referring Provider Library)
Custom Patient Query (CPQ)
The Custom Patient Query report is located in the Patient panel on the Reports screen and is built by the User. The content of this report is Patient related.
For instructions on building a Custom Query Report, see Create a Custom Query Report.
Demographic Filters
Using the Demographic filters, a Patient mailing list can be created and exported to a csv file (Excel) to do a mail merge.
When a Conversion is done, this report is helpful when comparing the old system information with the new System. (Conversion Accuracy Report)
Other Info in the Demographic Panel
DOB
Date of Death
Email
Ethnicity
Race
Gender
Marital Status
Phone numbers
SSN
Patient Panel
Reportable Items
Active status
PCP, Referring Provider, Assigned Provider and Facility (if entered on the Demographic screen)
Charge Amount and Count; Escrow - Patient; Collection Status; Statement, and Dunning Count
Patient ID and Chart #
Recall
Emergency Contact
Employer
Facility
First Appointment, Most Recent Appointment, and Next Appointment
Most Recent DOS
Modification Date and User
Notes
Reminder Preference
Submission Name
Custom Fields on the Patient Registration screen
Policy Panel
Accept Assignment
Insurance
To report by Self Pay only, use Policy > Insurance ID > Patient.
Policy, Policy Holder, Policy Number, Group Number, Plan, Product
Appointment information
Guarantor Panel
Name, Address, and Phone
DOB
Relationship
Email
Gender
Text Notification, Paperless, and Voice Notification
Balance Panel
Collections
Guarantor and Patient A/R Days
Insurance and Patient Balance
Worklist Panel
Pull Patients from a Custom Worklist.
Example: An Appointment Worklist could pull addresses for mailing letters or phone numbers for making calls.
When selecting Worklist Type, the filter criteria should be Contains instead of Equals.
Panel Items:
All Appointment Lists and Open Appointment Lists
All Encounter Lists and Open Encounter Lists
All Patient Lists and Open Patient Lists
Worklist Description
Worklist Type
Report Example
Patients Who have the Same Insurance
The Custom Patient Query can be used to pull Patients who have the same Insurance.
Example: Pull all Patients who have original Medicare as their Primary Insurance.
Filter: Policy - Insurance (1) - ID > Equals > MCR
Columns: Select the Columns you want on the report.
In the example, these columns were selected:
Patient - ID
Patient - Name - Last
Policy - Insurance (1) - ID
Patient - Most Recent DOS
Report Output
Learn More
Custom Query Report/Table Filter Criteria
Custom Encounter Query (CEQ) Report
Custom Transaction Query (CTQ)
My Favorite Reports & My Reports Panel
The Custom Appointment Query (CAQ) report can be customized to query Appointment information.
This report can be used for:
A Scheduling List for the day, which gives more detail than the Appointment List Report; and
A Custom Query can be used to build your own report to output additional Appointment Detail, such as a No Show report, an Eligibility Report within a Date Span, etc.
The CAQ is exportable to CSV, PDF, and Worklist.
Build the CAQ Report
Specific columns and filtering criteria can be used to build your custom report.
There are four ways to access the CAQ:
Enter CAQ in the Navigation Search field.

Scheduling > Reports Panel > Custom Appointment Query

Scheduling > Calendar > Checked in/Reports Tab > CAQ

Reports > Scheduling panel > Custom Appointment Query

Add the Columns to Display on the CAQ
Use Columns to determine what data is displayed on the Report.
From Reports on the Left Side Menu, choose Custom Appointment Query.
One of the other methods listed above can also be used to access the CAQ.
Select the Columns button to choose the columns to display on the report.
The items that are selected will appear at the top of the Add/Modify Columns/Filters screen. You can choose to add these as Filters as well.
Use the up and down arrows to move the Columns to the desired order.
Select Save [F2].
Add the Filter Criteria
Filters narrow the search to populate the report with the exact data and will eliminate unwanted data.
Add the Filter Criteria by using the Plus icon to the left of the And.
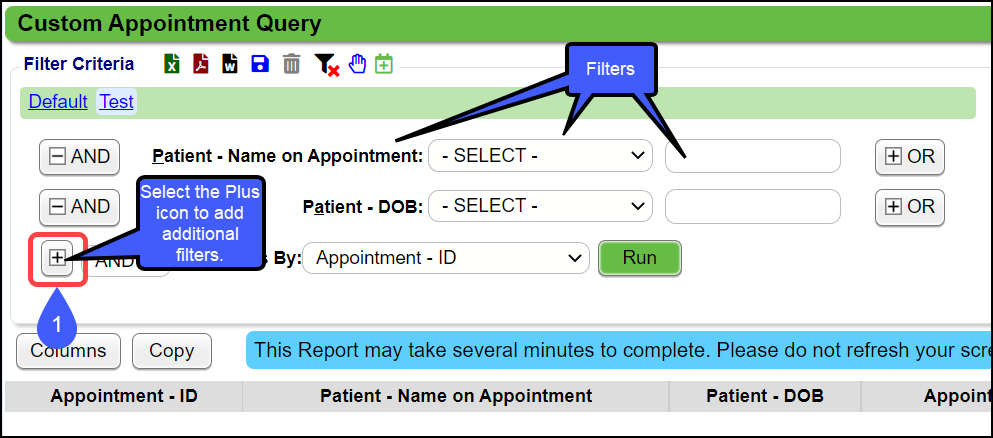
Choose the Filter Criteria by using the Search field, the selected Columns, or from the list.
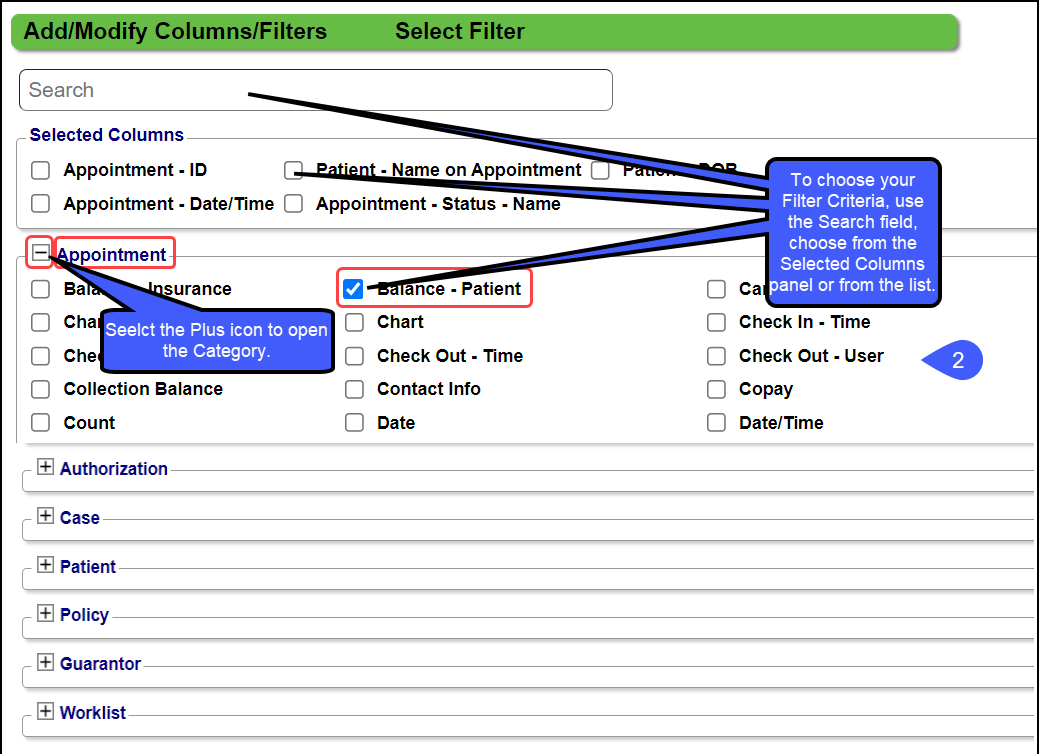
Use the dropdown on each Filter to define the criteria further.
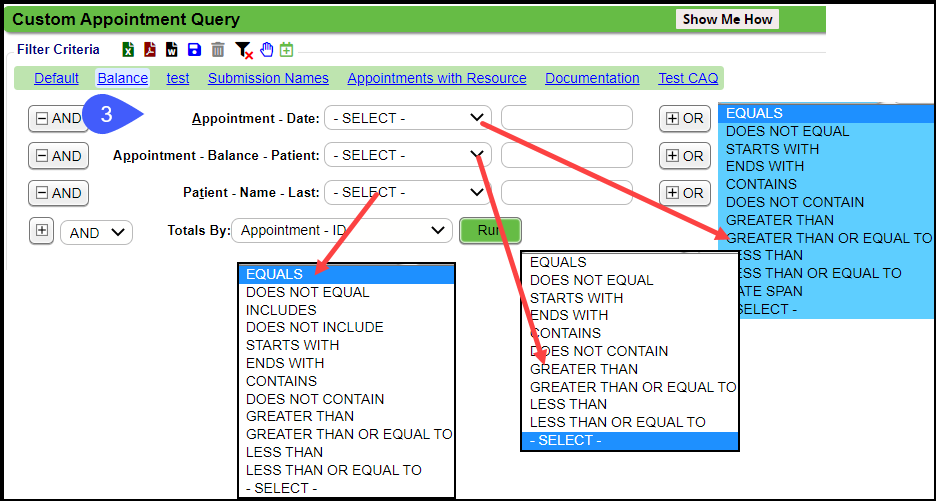
Choose the criteria for your Filters.
Totals By: Choose how to total the Report.
Select Run.
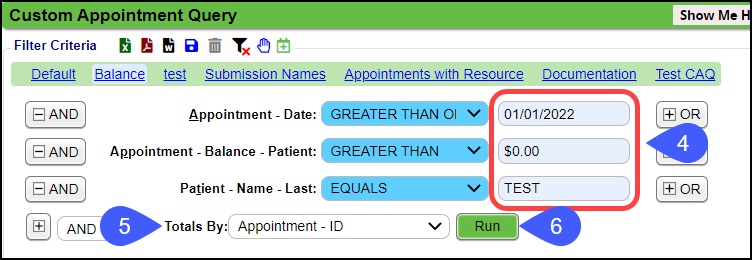
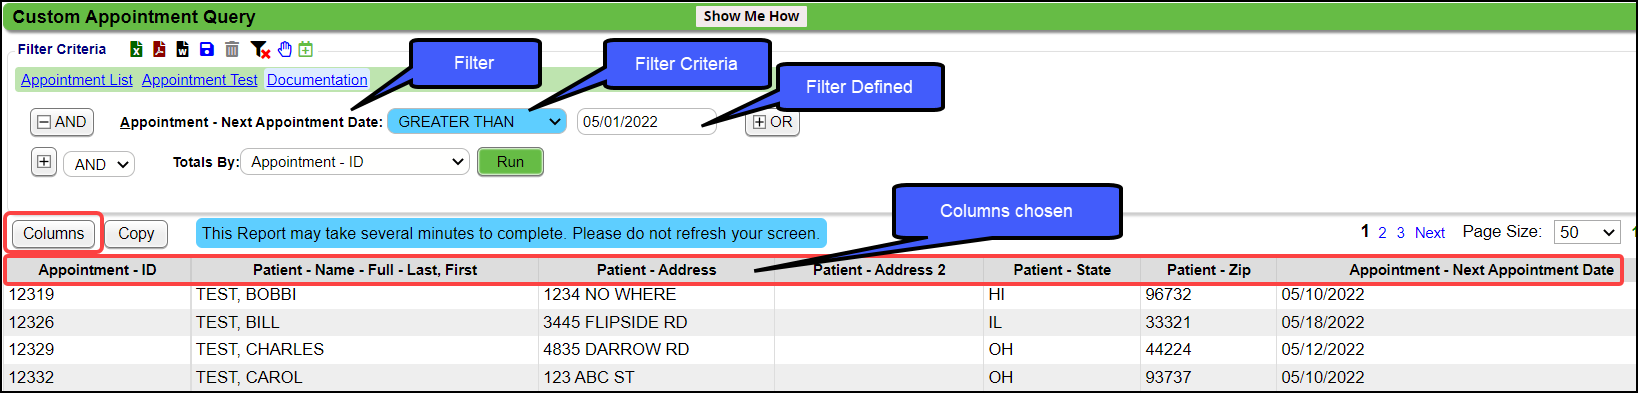
Example:
Columns:
Appointment - ID
Patient - Name - Full - Last, First
Patient - Address
Patient - Address 2
Patient - State
Patient - Zip code
Appointment - Next Appointment Date
Filtered by Next Appointment Date: Greater than or equal to 05/01/22.
Save and Copy the Query
Save and Copy the report by selecting the Save icon.
Enter a Name for the Report.
Check the Default box if you want to make this report your Default.
If Default is selected, the Filter Criteria will automatically populate when the CAQ is accessed.
Other Reports can still be saved if a Report is saved as a Default.
Enter a Description.
Select Share to copy this report to other users or roles.
Share to: Select Users or Roles from the dropdown.
Use the Plus icon to expand the Users or Roles to choose who you want to see this report.
Choose Save to overwrite the current report; choose Save As New to create a new report.
Select Save [F2].

Copy the Query Without Saving
Use the Copy button to copy the report to other users
Using the dropdown, choose a User.
Select Save [F2].
Run an Eligibility Report using the Custom Appointment Query
Eligibility Statuses :
Eligible
Not Eligible
N/A
Self Pay
Unknown
The output of this report mirrors the values seen on the Calendar.
Batch Eligibility runs Primary Insurance Eligibility only.
There are two ways to work this Report:
Use Ctrl + Select to open a new tab for the Patient Dashboard.
Export the output to a Worklist.
Suggested Eligibility Report Filters
Run a No Show Report
If you want to run a No Show Report for a specific period:
Add Filters:
Select Appointment > Date
Select Appointment > Status - Name or Status - ID
Select the specific Filter Criteria:
For Appointment - Date, select Date Span from the dropdown.
Select the specific Date Span.
For Appointment - Status - Name or Appointment - Status - ID
Enter No Show for Name or select N from the dropdown for ID.
Selections depend on your Status Setup.
No Show Report Example
It is Monday, and you want to run a No Show Report for the previous Friday. Your office is open Monday through Friday and closed on Saturday and Sunday.
For the Date Span, select Previous Weekday.
The System logic will use Friday as the previous weekday.
Use the No Show Report in the Job Scheduler
Save the Report.
Select the Calendar icon to add to the Job Scheduler.
Patient has not been seen in X Days/Years
Use the CEQ to pull a list of Patients that do not have a Date of Service for an X number of days.
Best Practice: If you are using the Calendar, it is best to use the Recall Feature and the Recall Report.
Example 1: List of Patients that had an Annual Exam (AE) that do not have an Appointment for another Annual Exam after 365 days.
Filters
Appointment - Type - ID: EQUALS AE (Annual Exam)
Appointment - Most Recent DOS - Days: Greater Than or Equal To 365.00
Appointment - Most Recent DOS - Days: Less Than or Equal To 420.00
Use Less Than or Equal to define a smaller subset of Patients.
Appointment - Next Appointment Date: EQUALS blank (leave the field blank)
Totals By: Patient ID (Must select Patient ID)
Example 2: List of Patients that do not have a Post Op Appointment for 2 weeks from the Surgery DOS.
Filters
Appointment Type - ID: EQUALS SURG (Surgery)
Appointment - Most Recent DOS - Days: GREATER THAN OR EQUAL TO 14
Appointment - Most Recent DOS - Days: LESS THAN OR EQUAL TO 20
Appointment - Next Appointment Date: EQUALS blank (leave the field blank)
Totals By: Patient ID (Must select Patient ID)
The CEQ (Custom Encounter Query) can also be used to find Patients that have not been seen in X amount of days.
Learn More
Custom Query Report/Table Filters and Criteria
Create a Job to run a Custom Query Report
My Favorite Reports and My Reports Panels
Related Articles
Custom Transaction Query (CTQ)
The Transaction Query Report is driven by the Posted Transactions. This Report will match the Payments & Adjustments Report if they are run by the same parameters. Transaction Query Report Criteria Reports > Custom Transaction Query (CTQ) Totals By: ...Custom Receipt Query (CRQ)
The Custom Receipt Query is driven by entered/posted Receipts. This report will match the Receipt Management report if it is run by the same parameters: Total By - Receipt - Number Receipt - Is Registered Type = Yes Post Date Range Reports > ...Custom Query Reports Overview
Custom Query Reports Overview Custom Query Reports can be custom-built to produce the output and columns you want specifically. A Default Report is System delivered for each Custom Query Report. They all operate in the same way but pull specific ...Custom Appointment Query (CAQ)
The Custom Appointment Query (CAQ) report can be customized to query Appointment information. This report can be used for: A Scheduling List for the day, which gives more detail than the Appointment List Report; and A Custom Query can be used to ...Create a Custom Query Report
Select the Custom Query Report There are five Custom Query Reports. Select the one that you want to use. Transactions Panel Custom Encounter Query (CEQ) Custome Receipt Query (CTQ) Custom Transaction Query (CTQ) Patient Panel Custom Patient Query ...