Custom Encounter Query (CEQ)
The CEQ is a Custom Query that queries Encounter Data.
- Access the CEQ Report by selecting Reports on the left side menu.
- Select Custom Encounter Query in the Transactions panel.

Build a Custom Encounter Query
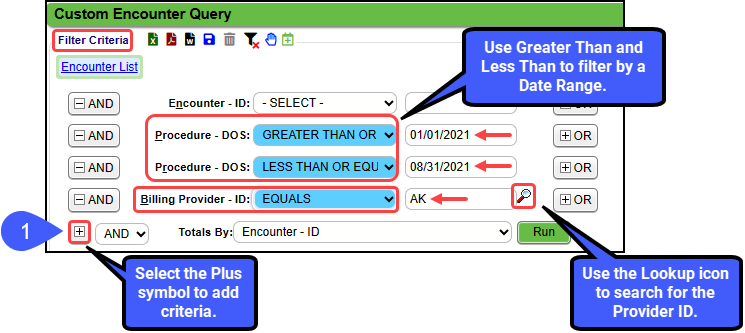
- Filter Criteria: Add your filter criteria by selecting the Plus symbol beside "And".
- The filters you choose will determine the specific parameters to obtain the desired query results.
- Example: A specific Encounter Date Range for a specific Provider.

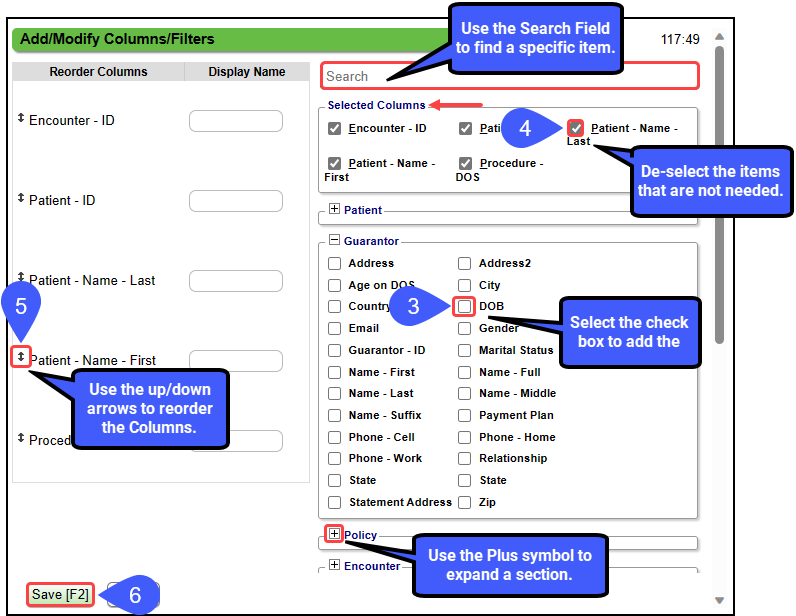
- Add Columns to the Report by clicking the Columns button.
- Use the Search Field to find a specific item, or expand the sections using the Plus symbol.

- Use the check boxes to choose the items to use as Columns on the report.
- In the Selected Columns panel, deselect any items that are not needed as Columns.
- As you select columns, they will show in the Reorder Columns pane. Click and drag the columns to reorder how they will show on the report (the top column will be the furthest left column in the report).
- Select Save (F2).

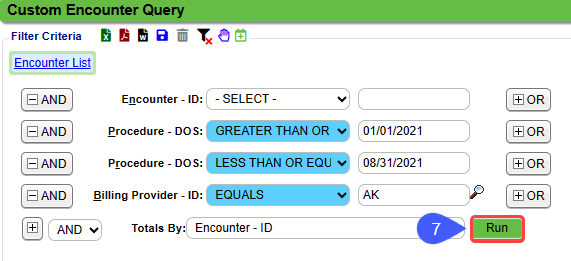
- Select the Run button.

Date Range
Use Greater Than and Less Than with a DOS filter to create a Date Range.
- Example: Use Less than or equal to and Greater than or equal to with the Procedure - DOS filter to create a date range from 01/01/2018 through 11/10/2021.
- The start and end dates are included in the date range.
Total-By
Total-By Options: The Totals By will display as 1 row per entity showing totals for each column for that entity.
Count Column
This uses the same logic used in other reports to report the number of Encounters that have taken place during the reporting period (Service Facility Visits).
- Each Visit/Encounter = 1
- 'Reversed' Encounter = 1
- Created as a clone to replace the Encounter in the original period.
- 'Reversal' Encounter = -1
- This is the Offset (negative values) mirror image of the Encounter that was Reversed.
- Encounter that has no charge lines = 0
- Encounter that was created by 'rolling up' other encounters = 0
- The Reversal = -1 and the New Encounter = 1, so they net to 0 new Encounters.
Where to Find Most Recently Used
- Policy Panel
- Claim Status
- Insurances (1-4)
- Policy Numbers
- Encounter Panel
- UB/Institutional Claims: Is Institutional
- Count (Encounter): Count
- First Billed - Date
- Is Incomplete
- Is Reversed
- Is Self Pay
- Most Recent Statement
- Tags
- Procedure Panel
- Procedure Code (CPT): CPT - ID
- Diagnosis Codes (ICD-10): Diagnosis 1, etc.
- DOS
- Fee
- NDC: NDC - Number
- Transaction Panel
- Adjustments
- Allowed
- Charges
- Copay
- Insurance Payments
- Patient Payments
- Write-Offs
- Balance Panel
- Collection
- Insurance
- Insurance by aging categories
- Patient
- Patient by aging categories
- Total
Build a Self-Pay Patient Report using the CEQ
- Select the Plus button before "AND".
- Select Insurance (1) - ID.
- For Policy - Insurance(1) - ID, select Equals.
- Enter the word, Patient, in the Lookup field.
- Select the Run button after all other criteria have been chosen.
Patient has not been seen in X Days/Years
Use the CEQ to pull a list of Patients that do not have a Date of Service for an X number of days.
Best Practice: If you are using the Calendar, it is best to use the Recall Feature and the Recall Report.
Example 1: List of Patients that had an Annual Exam (AE) that do not have an Appointment for another Annual Exam after 365 days.
- Filters
- Patient - Next Appointment Date: EQUALS blank (leave the field blank)
- Patient -Most Recent DOS - Days: Greater Than or Equal To 365.00
- Can also use a Less Than or Equal To Days to define a smaller subset of Patients, such as 400.00
- Linked Appointment - Appointment Type: EQUALS AE (Annual Exam)
- Totals By: Patient ID (Must select Patient ID)
Example 2: List of Patients that do not have a Post Op Appointment for 2 weeks from the Surgery DOS.
- Filters
- Patient - Next Appointment Date: EQUALS blank (leave the field blank)
- Patient - Most Recent DOS - Days: GREATER THAN OR EQUAL TO 14
- Patient - Most Recent DOS - Days: LESS THAN OR EQUAL TO 20
- Linked Appointment - Appointment Type: EQUALS SURGERY
- Totals By: Patient ID
These Reports can also be run in the Custom Appointment Query using the Most Recent DOS.- Days filter.
Use the CEQ to Query Custom Fields
The Custom Encounter Query can be used to query Custom Fields from the following screens:
- Patient Registration
- Modify Patient
- Add/Modify Employer (Employer/Attorney Library)
- Add/Modify Note
- Add/Modify Policy (Insurance Management)
- Add/Modify Insurance (Insurance Library)
- Post Charge
- Add/Modify Diagnosis Code (ICD Code Library)
- Add/Modify Procedure Code (Procedure Code Library)
- Add/Modify Case
- Add/Modify Billing/Rendering/Supervising Provider (Billing/Rendering/Supervising Provider Library)
- Add/Modify Referring Provider (Referring Provider Library)
- Add/Modify Service Facility (Service Facility Library)
- Modify Pay To Location (Pay To/Billing Location Library)
Learn More
Create a Custom Query Report
Custom Query Report/Table Filters and Criteria
Create a Job to Run a Custom Query Report
Custom Fields Overview
Tags: encounter list,Custom Encounter Query (CEQ)self pay report,custom encounter query,ceq,custom field report
Related Articles
Custom Query Reports Hub
Custom Query Reports (CQR) Custom Encounter Query = CEQ Custom Receipt Query = CRQ Custom Transaction Query = CTQ Custom Patient Query = CPQ Custom Appointment Query = CAQ Overview Filters and Criteria Create a CQR CEQ CRQ CTQ CPQ CAQ Overview Custom ...Create a Custom Query Report
Select the Custom Query Report There are five Custom Query Reports. Select the one that you want to use. Transactions Panel Custom Encounter Query (CEQ) Custome Receipt Query (CTQ) Custom Transaction Query (CTQ) Patient Panel Custom Patient Query ...Custom Appointment Query (CAQ)
Custom Appointment Query (CAQ) The Custom Appointment Query (CAQ) report can be customized to query Appointment information. This report can be used for: A Scheduling List for the day, which gives more detail than the Appointment List Report; and A ...Reports Criteria Overview
Most Reports default to the Post Date which is controlled by the date used in the Reference Batch. My Reports Panel: The Reports that the User has run are shown in this Panel. You can choose to see Unread reports only. Report History: This is the ...Custom Receipt Query (CRQ)
The Custom Receipt Query is driven by entered/posted Receipts. This report will match the Receipt Management report if it is run by the same parameters: Total By - Receipt - Number Receipt - Is Registered Type = Yes Post Date Range Reports > ...