Reports Criteria Overview
- Most Reports default to the Post Date which is controlled by the date used in the Reference Batch.
- My Reports Panel: The Reports that the User has run are shown in this Panel.
- You can choose to see Unread reports only.
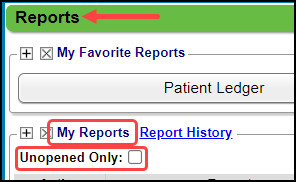
- Report History: This is the History of all Reports that have been run in the last 3 months.
- Access to this screen is controlled by Permissions.
- It is a comprehensive view of all reports generated with the ability to filter by Report Name, User, Period, Method, File Type, Status, Dates, File Type, and other specific Report Parameters.
- The View link opens the Report.

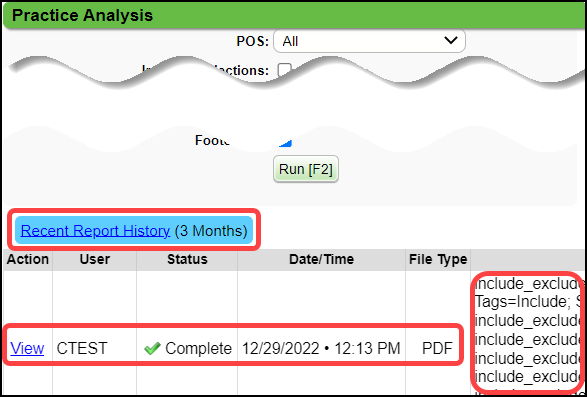
- The Individual Reports also have a Report History panel at the bottom of the each Report Criteria screen.
Filter By Date Types
Post Date: All Transactions with Post Dates in the Date Range will be reported. The Payments in this Post Date range do not necessarily correspond to the Charges in the same Date Range.
- Example: A Charge is posted in the previous month, but the Payment is posted in the current month.
- The Payment is on this month's report, but the Charge was on last month's Report.
- Service Date: All Charges in the Service Date range will be reported, along with ALL payments and adjustments that have been applied against those Charges, regardless of their Post Dates.
- Reference Batch: The report will include information from the Charges, Payments and Adjustments in the selected Reference Batch(es), regardless of the Service/Post dates.
Filter by Date Span
This Report feature adds the flexibility for Users to create their own Date Spans.
- "Previous X" options have been added to the Date Span dropdown for day, week, month, quarter, and year.
- The Input field allows the User to customize the number of days, weeks, months, quarters, and years.
- Example: “Previous X weeks” is selected in the Date Span dropdown. In the field to the right of the dropdown, enter the number of weeks that you want to report.
- The value entered updates the label in the dropdown.
- Days should always be relative to the day that the report is being run.
- Previous 7 days: If today is Wednesday, the report would include the previous Wednesday through Tuesday. It does not include today.
- The selection of Previous X Weeks runs for a period of Monday through Sunday.
- Previous 1 week: Today is Wednesday, February 22.
- The report would run Monday, February 13, to Sunday, February 19.
Include/Exclude Filters
If the filter field is left blank, the Report will report all in that category, such as, all Facilities, Billing/Rendering Providers, Insurances, etc.
- To Include specific items only, start typing in the field or use the Lookup icon to choose each item from the dropdown.
- To Exclude specific items, select inc in the Filter field to Exclude.
- inc will change to exc.
- Choose items you want to exclude by using the Lookup icon or typing in the field and then choosing the item.
- Multiple items can be selected.
- A range of items can be chosen, such as, 99211 - 99215 which will appear as 99211 to 99215 in the CPT field.
- Choose the first item of the range
- Enter a "dash" (-).
- Choose the last item of the range.
- Individual items and ranges can be used together.
Output Options
Reports can be exported as:
- PDF format: The PDF is the cleanest output and is easily shared and printed.
- To preserve the formatting of a report with a lot of columns, change the PDF to Landscape (instead of Portrait) or select a smaller font size.
- CSV Text File: A .csv text file is a plain text, comma delimited file and is mostly used for importing and exporting information to and from a database.
- Even though this file looks like an Excel spreadsheet, it is actually a text file with the components separated by commas.
- One key difference: If the file is saved as a .csv file, changes made to it will be lost.
- Example: The columns are made wider on the .csv file and saved. When the file is reopened, the columns revert to the original format.
- To save changes, it must be saved as an MS Excel document (XLS).
- Spreadsheet Format (XLS and XLSX): Tabular with rows and columns.
- The amount of data exported to xls is limited to 65,635 rows.
- If your report is larger, export as a .csv text file and save as an Excel file.
Save a Report
Multiple Reports can be saved. The list of saved Reports is on the right side of the Filter Criteria or below the Criteria.
- Set up the Criteria and Run the Report that you want to Save.
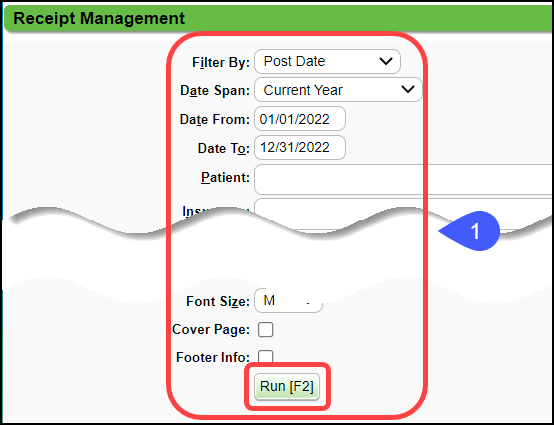
- Select the Save link.
- Enter the Name of the Report
- Select Save [F2].
Save a Report as New
Use Save Report as New to make changes to the parameters of a saved Report.
- Select the Report that will be modified under Saved Report Filters.
- Make the desired changes.
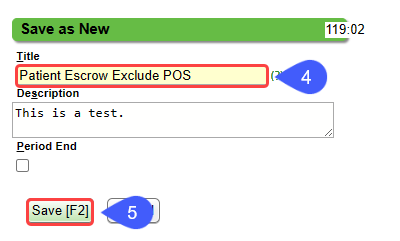
- Select Save as New.
- If Save is selected, the criteria of the selected Report will be overridden.

- Enter the Name of the new Report.
- Select Save [F2].
Copy a Report to Another User
This cannot be undone. Once copied to another User, it cannot be uncopied.
- Highlight the saved Report that you want to Copy.
- Select the Copy link.
- Choose the User from the dropdown menu.
- Select Save [F2].
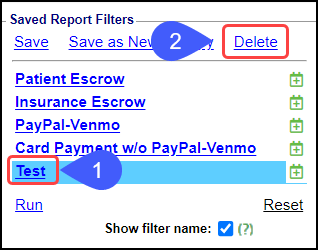
Delete a Saved Report
- Highlight the Saved Report that you want to Delete.
- Select Delete link.
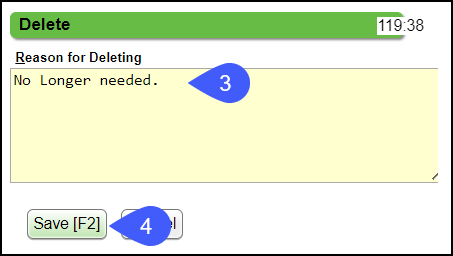
- Enter a Reason for the deletion.
- Select Save [F2].
Schedule Reports using the Job Scheduler
Reports can be scheduled to run automatically.
- Date Span options allow for relative options, such as, Yesterday, Current Week, Previous Month, Period End, Previous X days, weeks, months, years, etc.
- For Example:
- If the report is set up to always run Previous Month, the Date will never need to be changed.
- It can be added to the Job Scheduler to run on the first day of the month, and it will always run the previous month.
Basic Report and A/R Accounting Logic
- Credit: When a Credit Transaction is applied to an outstanding Balance, the Balance is reduced
- Debit: When a Debit Transaction is applied to an outstanding Balance, the Balance is increased
- Transfers: Represents the movement of A/R from one party to another. This does not affect the overall A/R but does affect the A/R of a specific Payer.
- Movement between Insurances: When the Primary Payment is posted, the remaining Balance is transferred to the Secondary. This is a Transfer-out and Transfer-in, and does not affect the A/R Grand Totals, but if only looking at the Primary Insurance on a Report, the transfer lowers the A/R when the Balance is moved to the Secondary. The Secondary's A/R is increased.
- Example: AARP is always secondary to Medicare, no charges are actually entered against AARP. Charges are entered against Medicare. Once Medicare adjudicates, the balance is transferred to AARP. Commonly, examples like this have NO charges entered, but lots of Transfers-IN. Medicare, on the other hand, gets most of it's A/R through charges, with a NET of transfers OUT to other payers. Transfers should always net to $0. The money is moved FROM one place to another, but it is the same dollar amount on both sides of the Transaction.
Aging By
The Aging By filters show different facets of the Revenue Cycle Management. When comparing Reports, use the same filters.
- Bill Date: Most recent date billed to responsible party.
- Responsibility Date: Date this party became responsible.
- Post Date: Derived from the Reference Batch - Most of our A/R reports default to this date.
- Date of Service (DOS): The specific date the Patient received treatment.
- Added Date: The day the Encounter was created in the System.
Run a Self-Pay Report
Any report where you can select an Insurance ID, you can run a Self-Pay report.
- On Custom Query Reports & Cash Flow Report
- Under the Policy panel, select Insurance (1) ID.
- Select EQUALS from the dropdown.
- Enter PATIENT in the Lookup field.
- On Financial, A/R, and Patient Reports
- Enter Patient in the Insurance Field.
- Choose PATIENT from the dropdown.
Security Options for Reports that may contain PHI
A PHI flag is displayed on each report that may contain PHI. The User will be able to run or view these reports depending on their Permissions in User Maintenance and the Login Security that you have set up in the Security Roles.
In the Report History Panel, a check mark will be displayed in the PHI column for Reports that contain PHI.
Admin > User Maintenance
- Select the User.
- For Two Factor Authentication, select Every 1 day.
- Select Save [F2].
Admin > Security Roles > Login Security
The following settings are not activated by default. You must manually change them.
- “Require MFA Login to Access PHI Reports”
- Multi-Factor Authentication must also be chosen for the User in User Maintenance.
- “Require Password to access PHI Reports”
The User must sign into the System using the MFA to activate these settings.
Learn More
Receipt vs. Payment information
System Delivered Disbursement Codes
Daily Reports
Interactive Aging: Real-Time A/R View
Encounters by Status Report (See Encounters by Status List)
Custom Appointment Query (CAQ)
Custom Transaction Query (CTQ)
End-of-Month or End-of-Period Reports
Payment and Adjustments Report
Revenue Cycle Management Reports (RCM)
Schedule Reports using the Job Scheduler
Related Articles
Custom Query Reports Overview
Custom Query Reports Overview Custom Query Reports can be custom-built to produce the output and columns you want specifically. A Default Report is System delivered for each Custom Query Report. They all operate in the same way but pull specific ...Custom Query Reports Hub
Custom Query Reports (CQR) Custom Encounter Query = CEQ Custom Receipt Query = CRQ Custom Transaction Query = CTQ Custom Patient Query = CPQ Custom Appointment Query = CAQ Overview Filters and Criteria Create a CQR CEQ CRQ CTQ CPQ CAQ Overview Custom ...Aging by Patient Report
Aging by Patient Report The Aging by Patient Report can be used for outstanding Patient/Insurance balances, Patient/Insurance credits, and Escrow. This is similar to the Unresolved Claims Report and Interactive Aging. Patient Escrow is highlighted in ...Interactive Aging: Real-Time A/R View
Interactive Aging: Real-Time A/R View This report is not meant to balance to the Period End Report. The Interactive Aging Report is a real-time A/R Report. It can be grouped and aged dynamically. If the Bill Date is chosen as the Aging Date, and ...My Favorite Reports and My Reports Panels
My Favorite Reports Panel Any of the Report Buttons on the Reports Dashboard can be saved in the My Favorite Reports panel, making it easier to find the reports that you often use. Selecting a Report Button opens the Report Criteria screen. At the ...