Custom Appointment Query (CAQ)
The Custom Appointment Query (CAQ) report can be customized to query Appointment information.
- This report can be used for:
- A Scheduling List for the day, which gives more detail than the Appointment List Report; and
- A Custom Query can be used to build your own report to output additional Appointment Detail, such as a No Show report, an Eligibility Report within a Date Span, etc.
- The CAQ is exportable to CSV, PDF, and Worklist.
Build the CAQ Report
Specific columns and filtering criteria can be used to build your custom report.
- There are four ways to access the CAQ:
- Enter CAQ in the Navigation Search field.
- Scheduling > Reports Panel > Custom Appointment Query
- Scheduling > Calendar > Checked in/Reports Tab > CAQ
- Reports > Scheduling panel > Custom Appointment Query
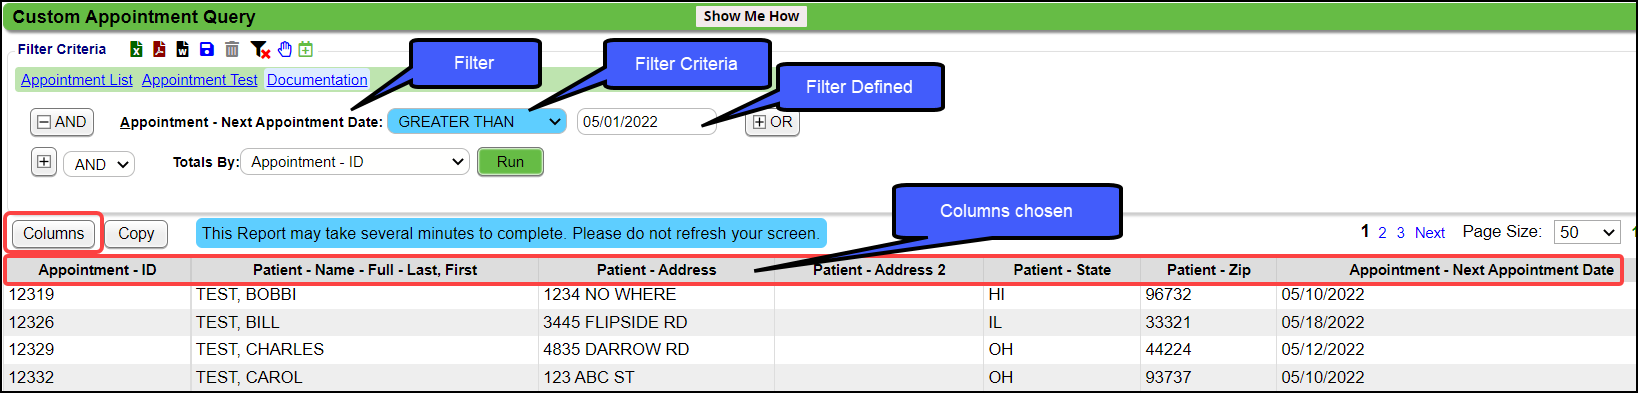
Add the Columns to Display on the CAQ
Use Columns to determine what data is displayed on the Report.
- From Reports on the Left Side Menu, choose Custom Appointment Query.
- One of the other methods listed above can also be used to access the CAQ.
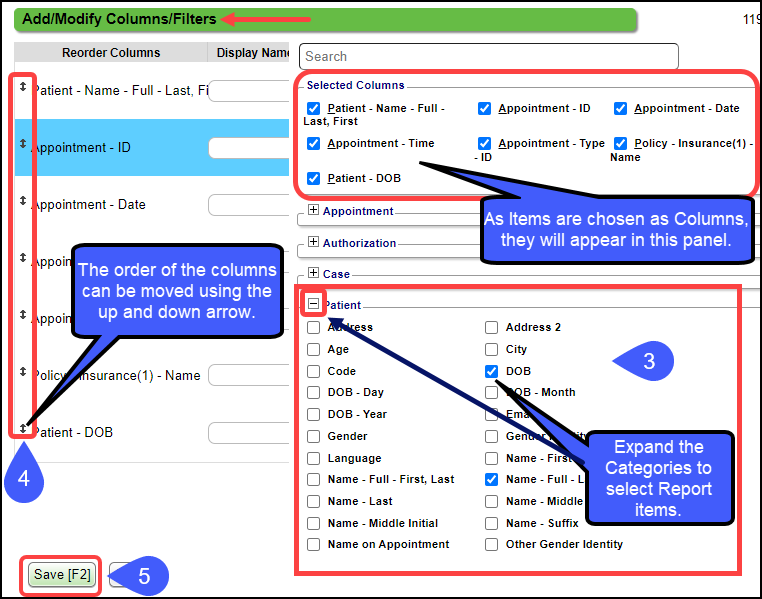
- Select the Columns button to choose the columns to display on the report.
- The items that are selected will appear at the top of the Add/Modify Columns/Filters screen. You can choose to add these as Filters as well.
- Use the up and down arrows to move the Columns to the desired order.
- Select Save [F2].
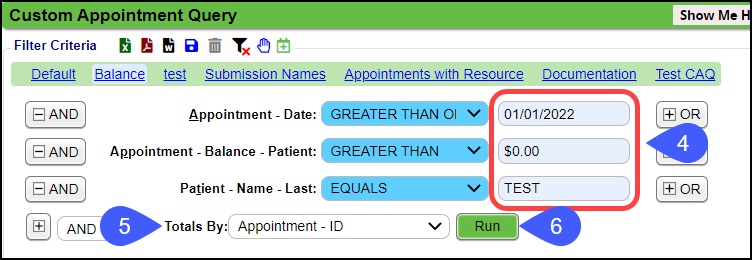
Add the Filter Criteria
Filters narrow the search to populate the report with the exact data and will eliminate unwanted data.
- Add the Filter Criteria by using the Plus icon to the left of the And.
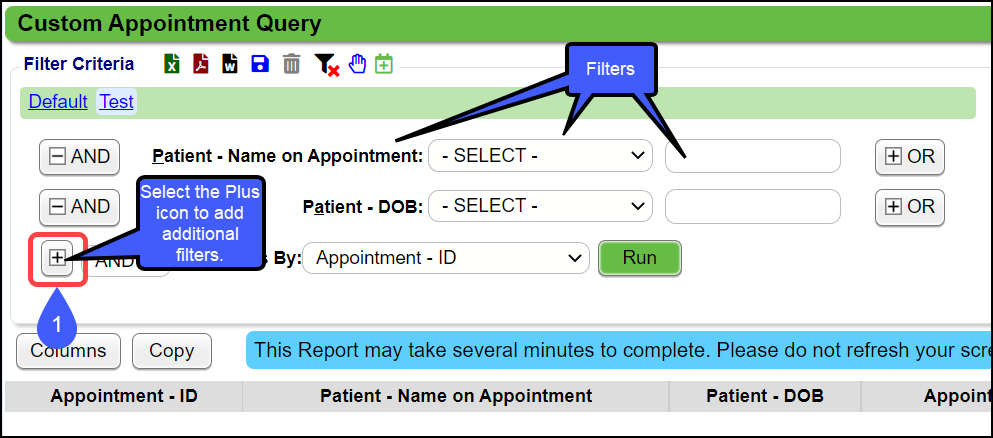
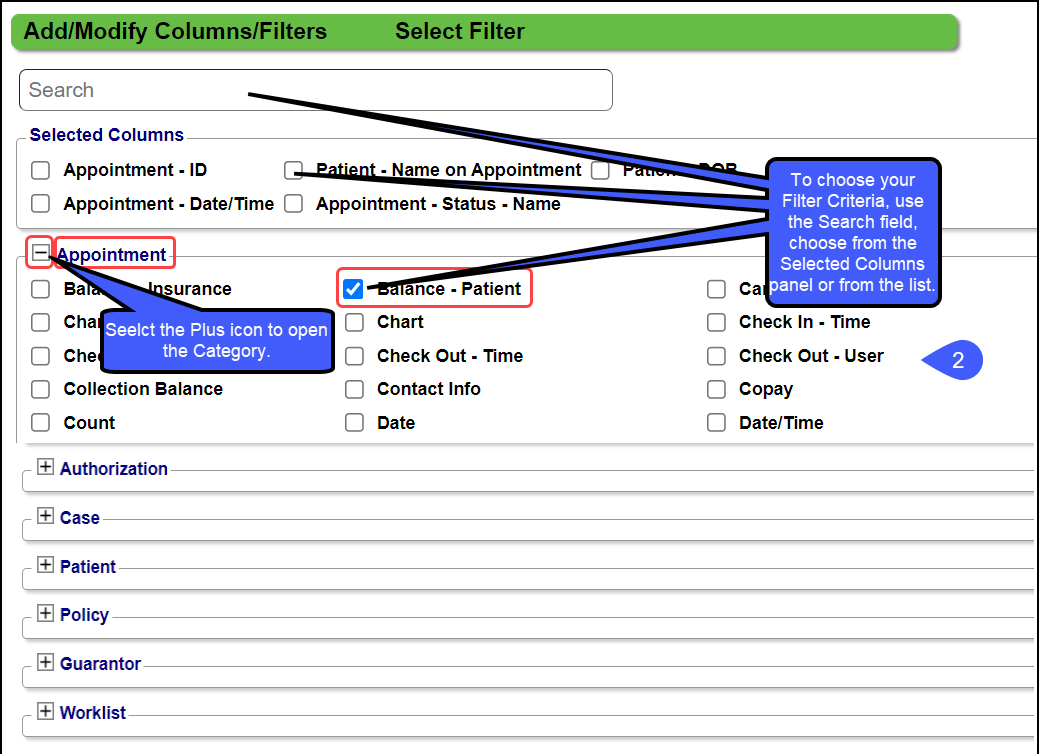
- Choose the Filter Criteria by using the Search field, the selected Columns, or from the list.
- Use the dropdown on each Filter to define the criteria further.
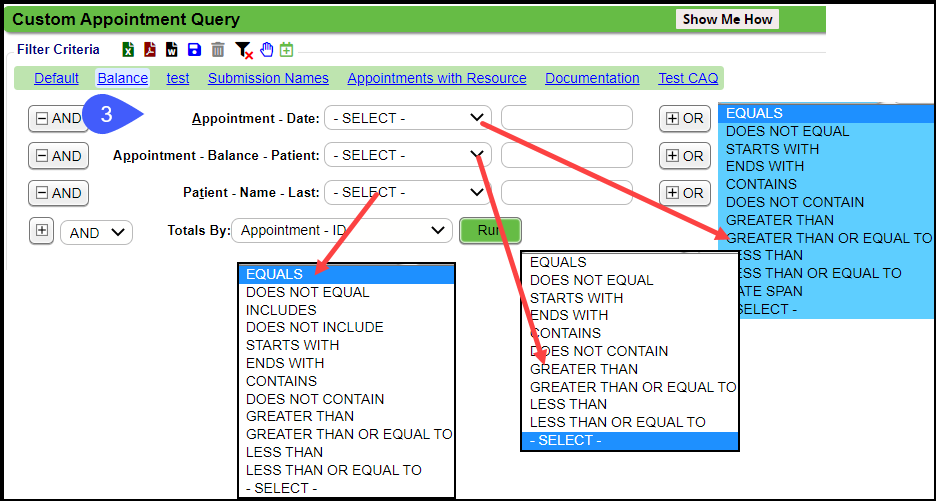
- Choose the criteria for your Filters.
- Totals By: Choose how to total the Report.
- Select Run.
Example:
- Columns:
- Appointment - ID
- Patient - Name - Full - Last, First
- Patient - Address
- Patient - Address 2
- Patient - State
- Patient - Zip code
- Appointment - Next Appointment Date
- Filtered by Next Appointment Date: Greater than or equal to 05/01/22.
Save and Copy the Query
- Save and Copy the report by selecting the Save icon.
- Enter a Name for the Report.
- Check the Default box if you want to make this report your Default.
- If Default is selected, the Filter Criteria will automatically populate when the CAQ is accessed.
- Other Reports can still be saved if a Report is saved as a Default.
- Enter a Description.
- Select Share to copy this report to other users or roles.
- Share to: Select Users or Roles from the dropdown.
- Use the Plus icon to expand the Users or Roles to choose who you want to see this report.
- Choose Save to overwrite the current report; choose Save As New to create a new report.
- Select Save [F2].
Copy the Query Without Saving
- Use the Copy button to copy the report to other users
- Using the dropdown, choose a User.
- Select Save [F2].
Run an Eligibility Report using the Custom Appointment Query
Eligibility Statuses:
- Eligible
- Not Eligible
- N/A
- Self Pay
- Unknown
The output of this report mirrors the values seen on the Calendar.
- Batch Eligibility runs Primary Insurance Eligibility only.
There are two ways to work this Report:
- Use Ctrl + Select to open a new tab for the Patient Dashboard.
- Export the output to a Worklist.
Suggested Eligibility Report Filters
Run a No Show Report
If you want to run a No Show Report for a specific period:
- Add Filters:
- Select Appointment > Date
- Select Appointment > Status - Name or Status - ID
- Select the specific Filter Criteria:
- For Appointment - Date, select Date Span from the dropdown.
- Select the specific Date Span.
- For Appointment - Status - Name or Appointment - Status - ID
- Enter No Show for Name or select N from the dropdown for ID.
- Selections depend on your Status Setup.
No Show Report Example
- It is Monday, and you want to run a No Show Report for the previous Friday. Your office is open Monday through Friday and closed on Saturday and Sunday.
- For the Date Span, select Previous Weekday.
- The System logic will use Friday as the previous weekday.
Use the No Show Report in the Job Scheduler
- Save the Report.
- Select the Calendar icon to add to the Job Scheduler.
Patient has not been seen in X Days/Years
Use the CEQ to pull a list of Patients that do not have a Date of Service for an X number of days.
Best Practice: If you are using the Calendar, it is best to use the Recall Feature and the Recall Report.
Example 1: List of Patients that had an Annual Exam (AE) that do not have an Appointment for another Annual Exam after 365 days.
- Filters
- Appointment - Type - ID: EQUALS AE (Annual Exam)
- Appointment - Most Recent DOS - Days: Greater Than or Equal To 365.00
- Appointment - Most Recent DOS - Days: Less Than or Equal To 420.00
- Use Less Than or Equal to define a smaller subset of Patients.
- Appointment - Next Appointment Date: EQUALS blank (leave the field blank)
- Totals By: Patient ID (Must select Patient ID)
Example 2: List of Patients that do not have a Post Op Appointment for 2 weeks from the Surgery DOS.
- Filters
- Appointment Type - ID: EQUALS SURG (Surgery)
- Appointment - Most Recent DOS - Days: GREATER THAN OR EQUAL TO 14
- Appointment - Most Recent DOS - Days: LESS THAN OR EQUAL TO 20
- Appointment - Next Appointment Date: EQUALS blank (leave the field blank)
- Totals By: Patient ID (Must select Patient ID)
The CEQ (Custom Encounter Query) can also be used to find Patients that have not been seen in X amount of days.
Learn More
Scheduling Reports
Custom Query Reports Overview
Custom Query Report/Table Filters and Criteria
Create a Job to run a Custom Query Report
Reports Dashboard
Use Reporting Groups
My Favorite Reports and My Reports Panels
Related Articles
Custom Query Reports Hub
Custom Query Reports (CQR) Custom Encounter Query = CEQ Custom Receipt Query = CRQ Custom Transaction Query = CTQ Custom Patient Query = CPQ Custom Appointment Query = CAQ Overview Filters and Criteria Create a CQR CEQ CRQ CTQ CPQ CAQ Overview Custom ...Create a Custom Query Report
Select the Custom Query Report There are five Custom Query Reports. Select the one that you want to use. Transactions Panel Custom Encounter Query (CEQ) Custome Receipt Query (CTQ) Custom Transaction Query (CTQ) Patient Panel Custom Patient Query ...Custom Query Reports Overview
Custom Query Reports Overview Custom Query Reports can be custom-built to produce the output and columns you want specifically. A Default Report is System delivered for each Custom Query Report. They all operate in the same way but pull specific ...Custom Queries - Admin
Custom Queries - Admin These are custom SQL queries that are written for clients to extract specific information to meet specific needs. There may be a charge for the creation of the Custom Query and will be presented to the client before starting ...Custom Encounter Query (CEQ)
The CEQ is a Custom Query that queries Encounter Data. Access the CEQ Report by selecting Reports on the left side menu. Select Custom Encounter Query in the Transactions panel. Build a Custom Encounter Query Filter Criteria: Add your filter criteria ...