Add/Register a New Patient
A new Patient can be registered from:
- Patient Lookup
- The Scheduling Dashboard > Patient Registration button
- The Calendar.
- The Navigation Search Box (Go-Box)
You can determine which fields you want to be mandatory when adding a Patient from Patient Lookup and from the Calendar. A Quick Registration can be done when adding a Patient from the Calendar or by entering QR in the Navigation Search Box (Go-Box). Learn More: Mandatory Fields.
Register a New Patient
- Before adding a new patient, verify that the patient is not already in the System by using Patient Lookup.
- If the patient is not found, select Register Patient or enter np in the Navigation field.
- Use the Patient Lookup fields to verify that the patient is not already in the System.
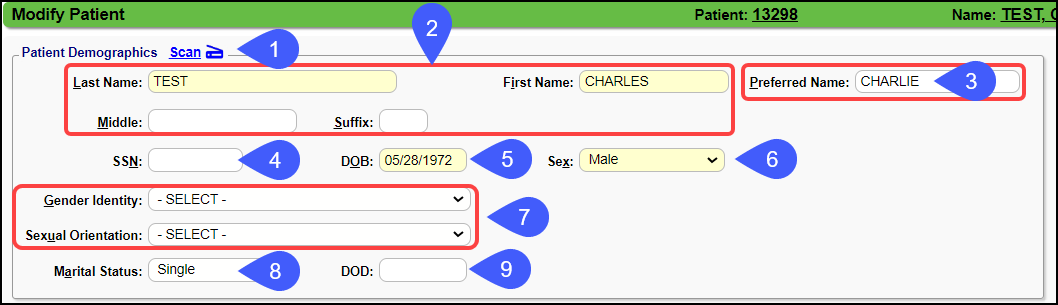
Patient Demographics Panel
- Scan: If you are using Direct Scanning, the scanned driver's license will populate the Demographic Fields and the Address fields. See IDology Direct Scanning.
- Enter the Patient's Last, First, and Middle Name.
- Enter Suffix if applicable.
- Enter the Patient's Preferred Name if applicable.
- In the System, the Preferred Name will be in parentheses beside the First Name. (Example: Test, Charles (Charlie))
- The Preferred Name is searchable in Patient Lookup and is available in the Custom Query Reports.
- On correspondence, such as Statements, the Preferred Name will replace the First Name. (Example: Charles Test will be Charlie Test.)
- SSN: If the Patient's SSN is needed, only the last 4 digits will show in the System.
- DOB: The Patient's DOB is mandatory.
- Sex: This is a mandatory field. (Male, Female, or Unknown).
- Gender Identify and Sexual Orientation: These fields can be activated or hidden using Admin > System Settings > Patient > GENDERIDENTITY and SEXUALORIENTATION
- YES for Gender Identity and Sexual Orientation fields to display on the Patient Demographic screen with multiple options in the dropdown menus.
- If you decide that you don't want to see these after activating, go back to System Settings and select NO to remove them from the Patient Demographic screen.
- Select NO to hide these fields (Default).
- Learn More: Meaningful Use (MU) Information
- Select the Patient's Marital Status. (Optional)
- If the Patient is deceased, the Date of Death (DOD) can be entered here.
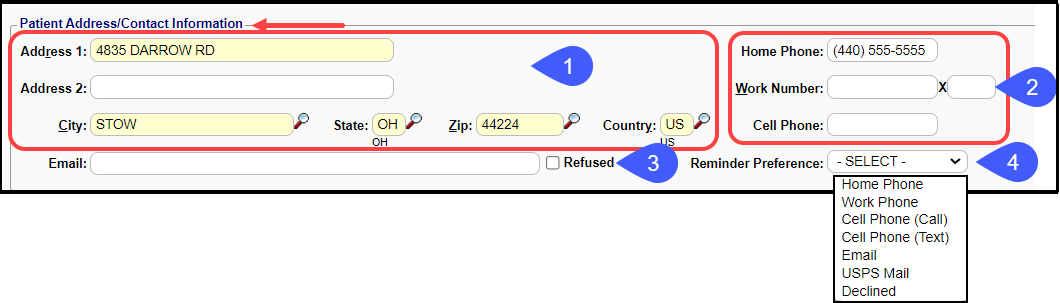
Patient Address/Contact Information
- Enter Patient's Address.
- If the the the County System Setting is set to yes, the County field will display. (Admin > System Settings > Patient > PATIENTCOUNTY > Yes)
- Learn More:
- Enter Patient's Phone Numbers.
- The Patient must have a cell phone number if they want to receive Notifications using Text (SMS) Messages.
- Example: Appointment Notifications, Balance Notifications.
- If the Patient is a child, the Parent's/Guarantor's phone numbers can be entered.
- Enter Patient's Email address or select Refused.
- The Patient must have an Email address if they want to receive Notifications in their Email. Same example as above.
- If the Patient is a child, enter the email address of the Parent/Guarantor.
- Select the Patient's Reminder Preference if they will be receiving Appointment Reminders from a third-party vendor or if the information will be reported to a third-party vendor. This setting does not apply to Appointment Reminders in the System.
- When Appointment Reminders are active in the System, the Reminder Preferences should be selected in the Notifications section when registering a Patient.
- If your office is not using Appointment Reminders, you can still use this field to note how the Patient prefers to be contacted for future communication.
The System validates ALL Email Address fields for format. If the Email Address is not in the correct format, it is removed and your cursor remains in the Email field
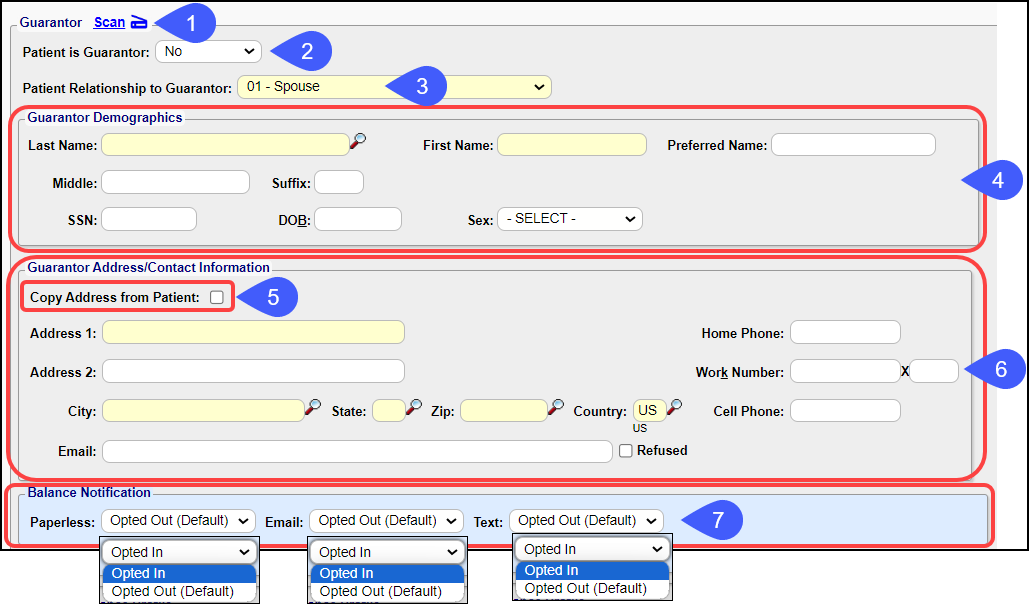
Guarantor Panel
- Guarantor: The Guarantor is the person ultimately responsible for any Patient financial responsibility and is the person who will receive the Statements.
- Yes: If Patient is the Guarantor, skip to Step 7.
- No: If another person other than the Patient is the Guarantor, selecting No opens the fields to enter the Guarantor's information.
- Scan: If Direct Scan is being used (premium add-on), the Guarantor's information can be auto-completed.
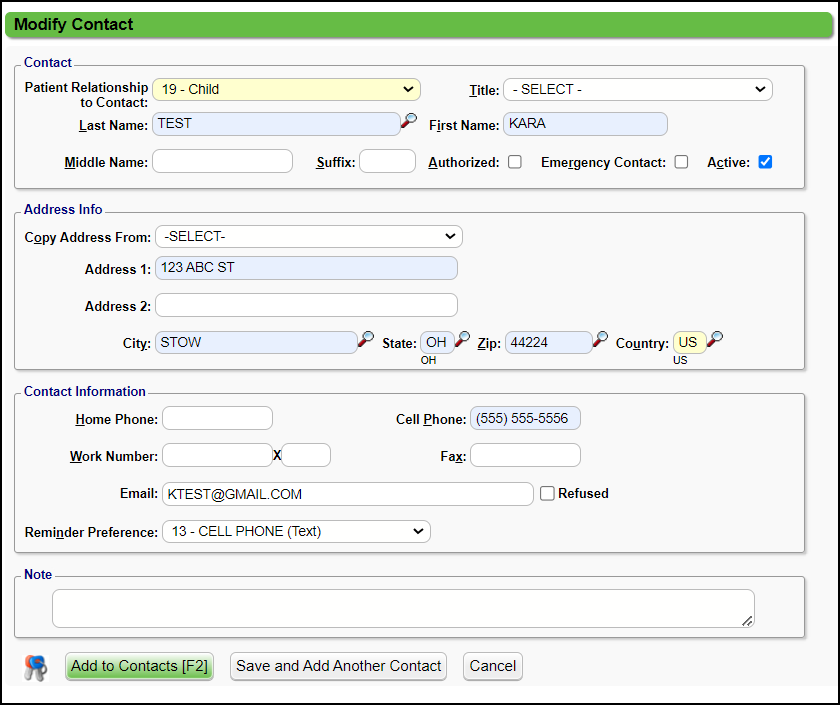
- Select the Patient's Relationship to the Guarantor.
- Example: If the Guarantor is the mother, the Patient's relationship to the Guarantor is 19 - Child.
- Enter the Guarantor's Name, DOB, and other pertinent info in the Guarantor panel.
- Guarantor's Address/Contact Panel: If the address is the same as the Patient's address, select Copy Address from Patient.
- The address, phone numbers, and email address will be copied from the Patient.
- If the address is not the same as the Patient, enter the Guarantor's Address.
- Balance Notification Panel: *This feature is a Premium Add-On Feature.
- Paperless: The Paperless field is populated based on System Default Settings (Notifications).
- The setting can be updated as needed. For example, if your practice defaults the Patients to paperless Statements, but a Patient wants to receive a paper Statement, you can select Opt-Out.
- Email/Text: The Notification Settings in Statement Profiles determine if/when Balance Notifications are sent via text, email, or both.
- The Email and Text Opt-Out option allows you to remove a Patient from one or both of these contact methods.
Default Insurance Profile Panel
There is a User Permission to add Insurance on the Patient Registration screen
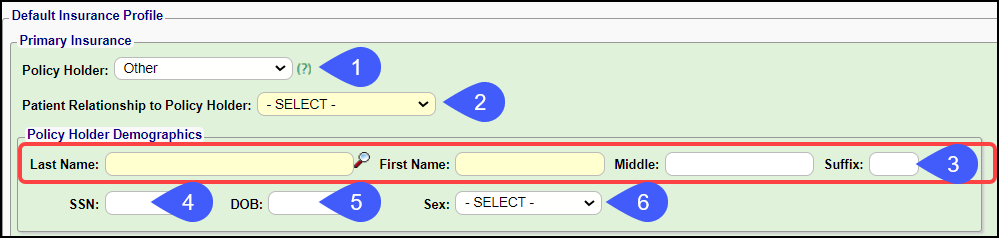
Primary Insurance Panel
- From the dropdown list select the Policy Holder.
- No Insurance/Self Pay: This is the default. If the Patient does not have Insurance, leave as is.
- Patient: Select if the patient is the Policy Holder. Skip to the Insurance Info Panel.
- Guarantor: Only available if you added a Guarantor other than the Patient. Selecting Guarantor will add their information automatically. Skip to the Insurance Info Panel.
- Other: Select if someone other than the Patient or Guarantor is the Policy Holder if other than Patient. Go to the Policy Holder Information Panel.
Policy Holder Information (If Other was chosen above)
- Other was chosen above.
- Learn More: Add an Employer as a Policy Holder
- Patient Relationship to Policy Holder: Example: If the Policy Holder is the mother, you would choose the relationship, Child.
- This is a mandatory field.
- Policy Holder's Name: Last, First, Middle, and Suffix if applicable.
- Policy Holder's SSN: Optional
- Policy Holder's DOB: Necessary for Claims
- Sex: Optional.
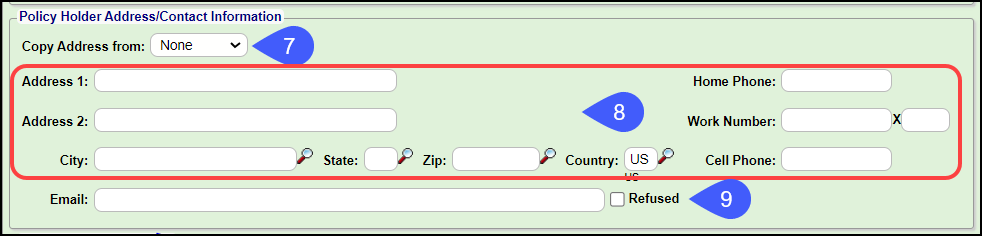
- Policy Holder's Address/Contact Information: You have the option to copy using the Patient or Guarantor's address or None.
- If None is chosen, add the Policy Holder's address and phone numbers manually.
- Add Policy Holder's Email (Optional).
- The Policy Holder's (Subscriber) Date of Birth is required.
Insurance Info Panel
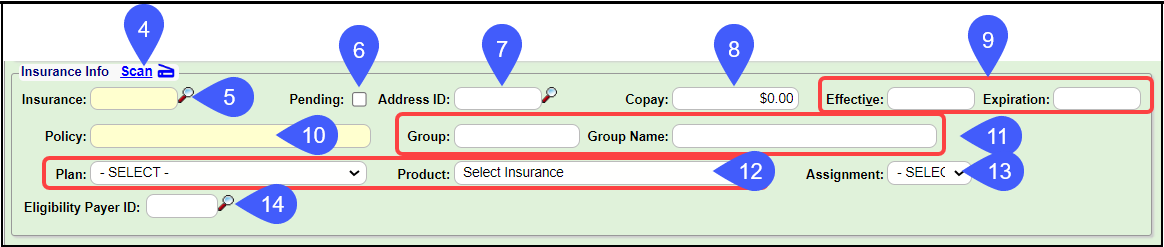
- Scan: If Direct Scanning is being used, the fields will auto-populate. (This is a premium add-on feature.)
- If there are fields that do not populate, enter manually.
- If all fields populate, skip to Secondary Insurance.
- Select the Primary Insurance by using the Lookup icon.
- Select the Pending checkbox to mark the Insurance as Pending if the Insurance information is not available.
- Uncheck the Assign Insurance to Policy checkbox in User Permissions to force all Insurances to be marked as Pending during Patient Registration.
- Address ID: Use only if you are using different addresses for the same Payer.
- Since most Claims are sent electronically with a Payer ID, this information is usually not needed.
- Add the Copay for the Primary Insurance.
- Effective and Expiration Dates: Use if applicable.
- Do not use for Medicaid, which usually expires at the end of each month.
- Add the Policy number.
- Add the Group number and/or Group Name if applicable.
- Plan and Product: Enter if applicable. If Eligibility is being checked, these fields will auto-populate.
- Assignment: Only select if you are non-par with this Payer.
- Eligibility Payer ID: Use only to check for Eligibility for a different Eligibility Payer ID than what is in the Insurance Library.
Secondary/Tertiary Insurance/Patient Responsible Panels
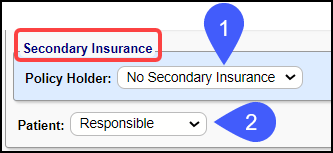
- Secondary Insurance: After the Primary Insurance is selected, the option to add a Secondary Insurance displays. The Tertiary Insurance option appears after a Secondary is added. Once this screen is saved, you will not be able to modify Insurance information on the Patient Demographic screen. See Insurance Management for further details.
- Patient Responsible
- Choose Responsible if the Patient/Guarantor is ultimately responsible for payment on the remaining balance after insurance pays. Statements will be sent for Encounters on this Profile.
- Choose Not Responsible if the patient has no financial obligation for the remaining balance after Insurance pays. Statements will not be sent for Encounters on this Insurance Profile. Example: Medicaid patient may not be responsible after Medicaid pays. This can be set up globally for specific insurances.
Contacts Panel
If you opted to see the Contacts panel on the Patient Registration screen, you can add contacts here. (Admin > System Settings > Patient > PATIENTCONTACTS = Yes)
Contacts will be added automatically if you add a Guarantor and/or Policy Holder on the Registration screen.
- Select the Add link to enter additional Contacts.
- Select the box for Authorized to make this Contact an authorized person to receive Patient information.
- Select the box for Emergency Contact to make this person a contact in the case of an emergency.

After the Patient Registration screen is saved, Contact information modifications are done on the Patient Dashboard.
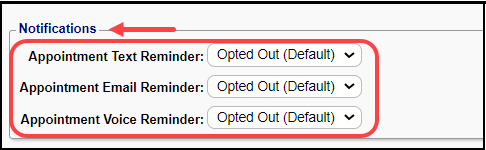
Notifications Panel
*This is a Premium Add-On Feature.
In this Panel you can Opt-In or Opt-Out for Appointment Reminders for this Patient. Select options for the Text, Email, and Voice reminders.
Additional Info Panel
- Statement: Choose the Statement Profile for this patient. Your choices are dictated by the Statement Profile Setup in Admin.
- If you do not want a patient to receive any Statements, choose Hold Statement.
- Signature: Defaults to B.
- Sign Date: If nothing is entered, today's date will be used for the date the signature was obtained.
- Chart Number: The Chart Number from your EHR/Old System can be used here.
- Patient Type: This field can be used to flag specific Patients.
- Example: Flag Patients who have Medicare, Diabetic Patients, etc.
- Patient Code: The field can be used to identify Patients in a specific category and can be used in conjunction with Patient Type.
- Example: Patient Type is Medicare and Patient Code is Diabetic. These fields are reportable fields. You can run a report for Patients who have Medicare and are Diabetic.
- Assigned Provider: Use this field to assign a specific Provider to a Patient.
- If the Charges System Setting COPYPATPROV is set to Yes (default), this Provider will automatically populate the Rendering Provider field on Charges created for the Patient (unless the Provider is retired).
- Additional Providers: Learn More: Patient Access by User/Resource
- Facility: Assign a specific Facility to a patient.
- PCP: Identify a Patient's Primary Care Physician.
- The PCP pulls from the Referring Provider list.
- If not found, the Provider can be added using the Add Button after selecting the Lookup icon.
- Referring Provider: Select the Patient's Referring Provider using the Lookup icon.
- If the Referring Provider is not found, it can be added using the Add button.
- If the Referring Provider is not active: a validation error displays when attempting to save the Modify Patient screen.
- You must change the Referring Provider in order to save.

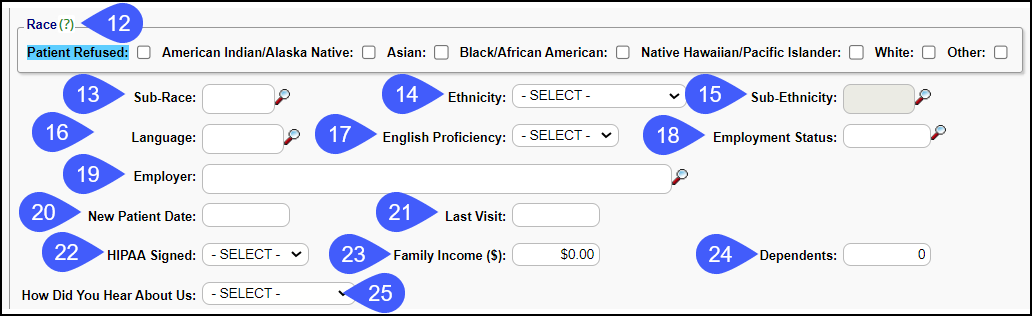
- Race: Options to choose Race, Sub-Race, Ethnicity, Sub-Ethnicity, or Patient Refused.
- Sub-Race: Select from the dropdown. (Optional)
- Race and Sub-Race are multi-select to abide by Medicare standards.
- Ethnicity: Patient Refused, Hispanic or Latino, and Non-Hispanic or Latino (Optional)
- Sub-Ethnicity: This field becomes active when Ethnicity is chosen. (Optional)
- Language: Choose the Patient's preferred Language. (Optional)
- English Proficiency: Select an option from the dropdown. (Optional)
- Employment Status: Select if applicable.
- Employer: Select from the dropdown or add if applicable.
- New Patient Date: Enter the date that the Patient was first seen. (Optional)
- Last Visit: The date the Patient was last seen in your Office. (Optional)
- HIPAA Signed: Select Yes or No.
- Family Income: This is an optional feature that can be activated for a Sliding Fee Schedule for Self-Pay Patients based on Income and Family Size.
- If this feature is not activated, you will not see it on your screen.
- Dependents: Only displays if you are using the Sliding Fee Schedule feature.
- How did you hear about us?: This is a Custom Field that was added to the Patient Registration screen.
- Other Custom Fields can be added to the Additional Information Panel as well.
Next Action: Choose where you want to land after saving this screen.
Select Save [F2].

Quick Registration for New Patients
You can use the Quick Registration option when registering a Patient from the Calendar or using QR in the Navigation Search Box by making specific fields mandatory or non-mandatory. Learn More: Mandatory Fields
Fields Displayed after Save
- Date of Death (DOD) (See Indicate a Patient is Deceased)
- Active (See Make a Patient Inactive)
Print a Patient Registration Form/Demographic Face Sheet
Patient demographic forms are found on the Patient Dashboard and on the Patient's Appointment screen. You can use the Face Sheet as a Patient Registration form. The Default Face Sheet will populate with the Patient's Demographics, Guarantor information, Insurance Information, & Emergency Contact if they have been entered in the System.
Duplicate Patient Warning
The System will produce a Warning if a duplicate patient is possibly detected.
You will have the option to choose one of the Patients listed or to Register a new Patient.
- The System compares Names, DOB, Phone Number, SSN, and Sex by default.
- The System Setting DUPPATVALID (Admin > System Settings > Patient > DUPPATVALID) can change the fields that are used to trigger the duplicate Patient warning,
- If one or more of those fields is the same, the Warning will display with the reason.
- If the Warning displays and the Patient is not a duplicate, close the popup to continue registering the Patient.
Display the County Name
To view the Patient's County on the Patient Demographic screen, a System Setting will need to be added. The System auto-populates the county, and it is a view only field.
- Add the PATIENTCOUNTY System Setting.
Add a City/County
- If the County field is blank:
- Select the Search icon or double select in the City field.
- Select the Modify icon beside the City.
- If the City does not exist in the System City list, select the Add button to enter it and the associated County.
- Enter the County.
- Select Save [F2].
- Use the X to close the City screen.
Learn More
Required Fields for Patient Demographics
Foreign Addresses
USPS Address Standardization
Mandatory Fields
Patient Category in System Settings
Related Articles
Add/Register a New Patient (Table of Contents)
Patients can be added to the System from Patient Lookup, the Scheduling Dashboard > Patient Registration button, and from the Calendar. Contents Add/Register a New Patient Patient Demographics Panel Patient Address/Contact Information Panel USPS ...Demographics Panel
The Demographics panel contains Patient Information. Modify Select the Modify link to make changes to the Patient's Demographics. Forms Select Forms to open Patient Forms that can be printed. Contacts Add or change Patient Contacts information. ...Add a Guarantor
Add a New Guarantor from the Patient Dashboard From the Patient Dashboard, the Guarantors () link. On the Guarantor List, select the Add button. Guarantor Panel Entered: Defaults to the current date. Patient's Relationship to Guarantor: To select ...Find Patient/Guarantor/Policy Holder
To avoid duplicates, you should always search for a patient before Registering a new Patient Patient Search Select Patient on the Left Side Menu. Enter Search Criteria. Select Include Policy Holders/Contacts to search non-patients. ...Encounter Demographics Panel
The Encounter Demographics screen provides basic demographic information, such as name, address, DOB, and phone numbers. From the Encounter Demographic Panel, you have access to: Edit: Patient Demographic Edit screen Forms: Run and Print Forms, such ...