Statement/Invoice Profiles Setup
Statement/Invoice Profiles must be set up before Statements or Invoices can be batched.
- If the Statement Profile is selected as the Default, it will be attached to new Patients automatically.
- Other Statement/Invoice Profiles can be created to be used for attachment in the Patient Demographics and on the Modify Encounter screen.
- If a Statement Profile is selected in the Patient Demographics or on the Modify Encounter screen, the Default Profile is overridden.
- A Statement/Invoice Batch must be sent to the Statement Department.
- Proofs will be sent to you to approve.
Statement/Invoice Setup Workflow
- Set up Statement/Invoice Profiles.
- Assign the Statement/Invoice Profiles to Patients/Encounters.
- Create a Test Batch for Statements and Invoices (separately if using both).
- Upload to Statement Department.
- Proofs will be sent back to you for both (if using both).
- Approve Proof(s).
- Send separate Proofs to the Statement Department for Statements and/or Invoices.
- Approve the Proofs.
Set Up a Statement/Invoice Profile
Access Statement Profiles
- Select Admin on the Left Side Menu.
- Select the Statement Profiles button.
- Select the Add button.
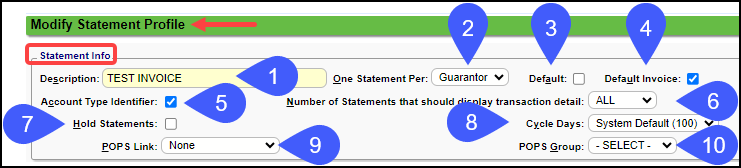
Statement Info Panel
- Description: This field is for internal use (not patient facing).
- One Statement Per: This setting determines Patient billing or Family billing and dictates which Account Number appears on the Statement. (This setting does not apply to locally Printed Statements or to Invoices.)
- Guarantor: One statement per Guarantor (Family Billing).
- Uses the Guarantor ID as the Account Number on the Statement.
- Patient: One statement per Patient (Patient Billing).
- Uses the Patient ID as the Account Number on the Statement.
- Default: Select this option to make this Statement Profile the default selection for all new Patients.
- Default Invoice: Choose this as the Default if this Statement Profile is for billable Employers. When an Employer is setup in the Library, the Statement field will default to this Profile. The System will create automatically an Invoice instead of a Statement.
- Account Type Identifier: When this option is selected, the statement account number is prefixed with the letter "P" or "G". (This setting does not apply to locally printed Statements or to Invoices.)
- P: For Patient Billing Statements - the account number is the Patient account number.
- G: For Family Billing Statements (and all custom statement types) - the account number is the Guarantor account number.
- Number of Statements/Invoices that should display transaction detail:
For Statements
- To limit the number of Statement pages sent, choose a low number, such as 1 or 2.
- The Statements exceeding this setting will display a Balance Forward Line instead of the Transaction Details from previous Statements.
- Use System Setting: EXCLBALFW to exclude Balance Forward in the Statement Total.
- For Transaction details to appear on every Statement for Balances Due, select All.
For Invoices
- Select 1 for Invoice Billing.
- If Number of Invoices to Display Transaction Details is set to 1, and If the Max Dunning Count is set to more than 1, the Balance Forward lines are separated into a line for each previous Invoice with a Balance Due.
- Displays the Invoice ID# with the Charge and Payment Amounts as the Product Description on the Balance Forward line(s).
- If the Max Dunning Count is set to 1, no Balance Forward lines will show on the Invoices.
- Hold Statements: Select this option if this Statement Profile will be used to Hold (Prevent) a balance from billing on a statement.
- A Statement Profile can be assigned at the Patient/Encounter/Provider levels. Balances can be Held at these levels by assigning a Statement Profile with the Hold Statements option selected.
- Cycle Days: This determines the number of days between Statements sent to a Guarantor with this Profile, and allows you to generate Statements daily without the Guarantor receiving two Statements in the same month.
- POPS Link: *This is a Premium Add-On feature. A link or QR Code can be added to the paper Statements that directs the Guarantor to a website to pay on the account.
- None
- Link
- QR Code
- Link and QR Code
If you do not have POPS, but you have a third party Patient/Payment Portal, the URL to that site can be added in the Dunning Messages. This will create a link to your portal for Patient Payments.
- POPS Group: Select the Group to provide a POPS/QuickPay link on the paper Statement with the option chosen on the PatientOps Link field.
Return Info / Billing Office Info Panel
Return Info Panel
- Return Address: This is the return address for your Practice. The Patient Ledger Report also uses this information to print the Practice name and address on the report.
- Remit Address: This is the address where the patient will remit the Payment. If this is the same as the Return Address, select the Copy Return Info checkbox.
- The first line of this Address is pulled to the Make Check Payable To field on the Statement.
Billing Office Info Panel
- Hours Line 1 and 2: The time of day for patients to call regarding billing (not necessarily your office hours).
- Phone: The phone number for calls regarding billing.
- Fax: The fax number for billing.
- Email: The email for billing (if applicable).
Contact Info on Statement Panel
- Contact Info on Statement: Control the billing office contact information that prints in the lower-right corner of the Statement. Note that this information will not appear on locally-printed Statements.
- Select your options from the drop-down: The output that shows on the Statement pulls from the matching field.
- Free Text: Type exactly what you want to print, and choose the alignment and format.
Dunning Count and Notifications Panel

Add/Remove Dunning:
Select the Add Dunning link to create Dunning Messages to show on Statements.
Hover over the help symbol (?) for a sample Dunning Message that you can copy and paste.
You can modify a sample after it is pasted.
If you want 3 Dunning Message, select the Add Dunning link 3 times to add each one.
Force to Paper option
With any Dunning greater than 1, there is an option to Force the Statement to Paper.
Example: If a Patient has received 2 Electronic Statements with no response, the third Statement can be forced to paper with the Force to Paper override.
Remove a Dunning Message by selecting the Remove Dunning link.
Learn More: Dunning Message Examples
- No Dunning Limit: Select this checkbox to continue sending Statements for Patient balances without stopping.
- If you have set up Dunning Messages, the last Dunning Message will display on Statements that exceed the number of Dunning Messages set up.
- Example: You chose the option for No Dunning Limit, and three Dunning Messages have been set up. You have already sent three Statements and are now sending the fourth. The third Dunning Message will be sent on the fourth Statement and all subsequent Statements.
- Clear Pre-Collections: This is selected by default and only works if you have not selected the No Dunning Limit option.
- When the Statements are batched, the previous Pre-Collections list will be cleared. If you do not want it cleared, do not select this checkbox.
Payment Rules Panel
- Amount: This applies to auto-posting patient payments. Enter the minimum acceptable payment amount or percentage of outstanding balance.
- If the patient payment is auto-posted and meets the Payment Rules, the Dunning Message Level will auto-reset to what it was prior to the statement being sent.
- If Amount is selected but is left as 0, the System will ignore the Payment Rule and will not reduce the Dunning Count.
- Dunning Reset: When a payment is posted that satisfies the Payment Rules (but does not settle the entire balance)
- Reset to Zero sets the Dunning Count to Zero (treated as a current balance).
- Minus One sets the Dunning Count to the count it was when the last statement was batched.
- Self-Pay Discount: Percentage to discount if a patient is self-pay.
- Adjustment Code: Transaction Code to use for the discount.
- First Statement Only: Apply the discount to the first Statement only.
Invoice Options Panel
Use this panel to customize your own Invoices. For this panel to be available, System Settings must be activated.
- If you are outsourcing the printing/mailing of your Invoices, this panel will not display. Only use Admin > System Settings > General < Yes
- If you are in-sourcing the printing/mailing of your Invoices, you will need to activate two Invoice settings in System Settings.
- Admin > System Settings > General > Invoice > Yes; The setting activates invoicing features, such as creating Invoice Batches and Posting Invoice Payments.
- Admin > System Settings > Invoice > USENEWINVOICE > Yes. This setting allows you to use the System Invoice and activates the Invoice Options panel on the Statement/Invoice Profile.
Customize the System Invoice
- Current Logo: If a logo already exists, select the View link to see it.
- Upload Logo: Your company's logo can be uploaded to appear on your Invoices.
- Note: The logo should not be uploaded with a border.
- Credit Card Box: Select Yes for the Credit Card section to appear on the Invoices.
- Show Labels: Select Yes to show the Labels on the Invoice for the selected Credit Cards that are accepted.
- Visa, MasterCard, Discover, American Express: Select Yes for the credit cards that are accepted.
- Show Last Payment: Select Yes to display the Last Payment on the Invoice.
- Repeat Patient Name
- Address Font Size: Select the Font size to use for the Address.
- Details Font Size: Select Font size the Invoice Details.
- Highlight Color: Select a Highlight Color to use.
- Remit Payment Label: Enter a Remit message
- Example: Please make checks payable to: The Clinic
Invoice Details: Total by Patient or Procedure
- Total By: Select Patient or Procedure.
- Patient: Organize the Invoice by Patient.
- Example: Total By Patient Layout (PDF)
- Procedure: Organize the Invoice by the summation (aggregate) of the rendered services (Procedures).
- Font Size: Select the desired Font Size.
- Diagnosis Code: Determines if a Diagnosis Code column is printed on the Invoice.
Note Panel
For Internal uses only and does not print on the Statements.
Select Save [F2].
Assign First Statement Profile to Patients and Encounters
When the first Statement Profile is setup and marked as Default it can be assigned to all existing Patients and Encounters.
- After saving, select the Assign this Statement Profile to existing Patients and Encounters checkbox on the Validation Warning.
Statement and Invoice Test Batch and Proof
Before your Statement/Invoice Go-Live, Statement and Invoice Test Batches must be created and uploaded to the Statement Department.
- If you are using both Statements and Invoices, a test batch for each must be sent to the Statement Department.
- Proofs for Statements and Invoices will be sent back to you for your approval.
- If you are using only Statements or only Invoices, you will receive one proof for the one you are using.
- If you are using both, you will receive Proofs for Statements and Invoices.
- Select this link for more information: Statement/Invoice Test Batch and Proof.
Difference between the Statement Count and Dunning Message Count
- Statement Count: The physical number of Statements that have been sent to the Guarantor to collect a balance.
- Dunning Message Count: Represents the current Dunning Level. This determines the dunning message printed on the Statements, and drives the letters and Pre-Collections processes.
Hold Statements until All Line Items are Paid on an Encounter
- System Setting: HASINSBAL
Sample Dunning Messages
Statement Dunning Messages Example 1
Dunning Message 1: According to our records the balance due is your responsibility and your prompt payment is appreciated.
Dunning Message 2: According to our records, your balance is now 30 days past due. Please remit payment as soon as possible or contact our office.
Dunning Message 3: Our records indicate that your account is now seriously past due and you have not responded to our requests for payment. Please remit the balance immediately to avoid referral to a collection agency.
Statement Dunning Messages Example 2
Dunning Message 1: According to our records, the balance due is your responsibility. Monthly payments will keep your account current. *A $40.00 service fee will be charged on all returned checks*.
Dunning Message 2: Your balance is now 30 days past due. Your prompt payment is appreciated. *A $40.00 service fee will be charged on all returned checks*.
Dunning Message 3: Your account is now 60 days past due. Please contact our office to make payment arrangements. *A $40.00 service fee will be charged on all returned checks*.
Statement Dunning Messages Example 3
Dunning Message 1: This bill is due and Payable Now.
Dunning Message 2: This bill is now past due. Please remit payment immediately.
Dunning Message 3: This is your final notice. Please remit payment or your account will be reviewed for collection.
Invoice Dunning Messages Examples
Dunning Message 1: According to our records, the balance due is your responsibility. Monthly payment will keep your account current.
Dunning Message 2: Your balance is now 30 days past due. Your prompt payment is appreciated.
Dunning Message 3: Your account is now 60 days past due. Please contact our office to make payment arrangements.
Statement Letters
Statement Letters can be attached to a Statement for a small additional Fee.
- Final Notice Letter
- Past Due Letter
- Announcement Letter
Learn More
Statement Test Batch and Proof
Statement System Settings
Statement Samples
Embed a POPS Link in a Website
Add POPS QuickPay Link to Email/Text Notification Templates
POPS Groups
POPS: Mirror the Patient Experience
Reset the Dunning Count
Apply a Self-Pay Discount
Add/Modify/Delete Transaction Codes
General System Settings
Related Articles
Invoice Profile Setup
In addition to Statement Profiles, a separate Profile is required for Invoices. Invoice System Settings These are some of the most important System Settings for Invoices. There may be others that you want to include as well. Admin > System Settings ...Archive a Statement Profile
Archive a Statement Profile Access Statement Profiles Select the Statement Profile to be Archived (It will be highlighted). Select the Archive button. Enter a Reason for Archiving. Select the Archive button. View Archived Statement Profiles In the ...Statement/Invoice FAQs
Statement/Invoice FAQs Balance Forward on Statements/Invoices How do I show/exclude Balance Forward on Statements? How do I show/exclude Balance Forward on Invoices? Batch Why did a Statement not Batch? Statements/Invoices Troubleshooting Delete a ...Balance Notifications Setup
All setup for Balance Notifications is done in Statement Profiles using the Notifications panel. When Statement Balance Notifications have been activated (Premium Add-On), the Notifications Panel is added to the Statement Profile screen, and a ...Statements/Invoices Overview
Statements/Invoices Overview Statement and Invoice Profiles must be set up before Statements can be sent. Statements and Invoices must be set up separately. Both require Proofs to be approved. Statement Profiles Setup Statement/Invoice Test Batch and ...