Reset the Dunning Count
Reset the Dunning Count from the Receipt Posting Screen
- On the Receipt, choose Manually Post to manually update the Dunning message count.
- Select Save [F2].
- Reset the Dunning Count for the below Encounters to: Choose the new Dunning Count from the dropdown.
 ***Manual Post: If the Dunning Count is set back for a Guarantor where there is more than one Patient under that Guarantor, the Dunning Count is set back for all the Patients.
- Auto-Post: The dunning count is set back by one or to zero based on the set up in the Statement Profiles.
- After saving, the payment will be posted automatically to Encounters with an outstanding Patient balance.
Reset the Dunning Count from the Patient Dashboard
- From the Select Action dropdown list, select Change Dunning Count.
- Select the checkboxes for the Encounters to change.
- Use the plus icon to see all open Encounters if necessary.
- Select Apply.
- Choose the new dunning count from the dropdown.
- Add a note.
- Select Save [F2].
Reset the Dunning Count from the Guarantor Dashboard
- From the Patient Dashboard, select the Guarantors link.
- From the Guarantor List, click Modify.
- On the Add/Modify Guarantor, choose to reset the Dunning Count to Minus One or Reset to Zero.
- Select Save [F2].
Reset the Dunning Count from the Encounter Dashboard
Resetting the Dunning Count on the Encounter Dashboard only resets it for the Patient not any other Patients that may be under the Guarantor.
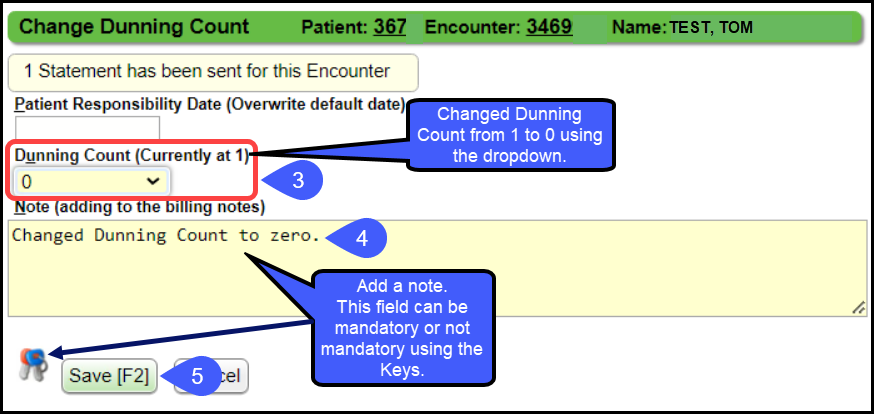
- From the Encounter Dashboard, select Statement History.

- Select the Reset Dunning Count button.

- Select the Dunning Count from the dropdown.
- Add a Note.
- The Note field can be mandatory or not mandatory.
- Select Save [F2].

Reset the Dunning Count from Pre-Collections
Multiple Dunning Counts can be set back in one step from the Pre-Collections screen.
Learn more by selecting this link: Set and Apply and Action.
Dunning Message Count Logic Examples
System Logic: The Dunning Message Count is determined by your Statement Profile setup and whether the Guarantor makes a Payment. The Dunning Count determines the Message that is sent on the Statement. For example:
Dunning Message 1: According to our records, the balance due is your responsibility, and your prompt payment is appreciated.
Dunning Message 2: According to our records, your balance is now 30 days past due. Please remit payment as soon as possible or contact our office.
Dunning Message 3: Our records indicate that your account is now seriously past due and you have not responded to our requests for payment. Please remit the balance immediately to avoid referral to a collection agency.
The Dunning Count starts at zero and increases by 1 on each Statement Run. On the first run, the Guarantor gets Dunning Message 1; on the second run without receiving a payment, the Guarantor gets Dunning Message 2, etc.
Statement 1: A Statement is sent to the Guarantor, which will equal Statement Count 1 with Dunning Message 1.
Scenario 1: The Guarantor makes a Payment that meets the Payment criteria but still has a balance.
The Dunning Message Count will be set back to zero.
The Statement Count remains as 1.
Statement 2: The same Guarantor is sent Statement 2, with Dunning Message 1.
Scenario 2: The Guarantor does not make a Payment within the Cycle Days.
The Dunning Message Count is not set back, staying at 1.
The Statement Count is 2.
Statement 3: Statement 3 is sent to the Guarantor with Dunning Message Count 2 (Increases by 1 because no payment was received in the previous cycle).
Scenario 3: The Guarantor makes a Payment that meets the Payment criteria.
The Dunning Message Count is either set back to 1 or to zero, depending on the Dunning Reset selection on the Statement Profile. In this example, it is being set back by 1 (from 2 to 1).
The Statement Count is 3.
Statement 4: The Guarantor is sent Statement 4 with Dunning Message 2. (If the Dunning Reset was zero after payment was made on Statement 3, the Guarantor would receive Dunning Message 1.)
Scenario 4: The Guarantor makes a Payment which pays off the balance.
The Dunning Message Count becomes irrelevant since the balance is zero after the Payment is posted.
The Statement Count is 4.
Related Articles
Reset the Dunning Count from the Pre-Collections Worklist
From the Pre-Collections Worklist, choose the Encounters. Select Set Action. From the Choose Action dropdown list, select Reset Statement Counter to X. Select Run. Select Apply Action. Select Run. Learn More What is the Dunning Count ...Dunning Count vs Statement Count
Dunning Count vs Statement Count What is the Dunning Message Count? Dunning Message Counts are used as a measure of the delinquency of a Patient balance and to drive collection activities based on the level of delinquency. The Count is based on the ...Statement/Invoice FAQs
Statement/Invoice FAQs Balance Forward on Statements/Invoices How do I show/exclude Balance Forward on Statements? Show or Exclude Balance Forward on Statements How do I show/exclude Balance Forward on Invoices? Show or Exclude Balance Forward on ...Password Reset
The first time a User logs in, they will be required to reset the Password. The Password must be reset at least once a year. However, every three months is recommended. Add the User's email to the User in User Maintenance to allow them to reset their ...Invoice Exception Batches
After the Invoices are batched, review the Invoices and Exceptions for accuracy before uploading them. Reasons to Review: An Encounter should go to Workers' Comp, a different Employer, or the fee is incorrect. An Encounter or the entirety of the ...