Mandatory Fields
The Keys icon shows on data entry screens and are only available to users who have permission to use the Admin Form Keys. The keys are next to the Save at the bottom of the page.
Accessing the Keys for Mandatory Fields
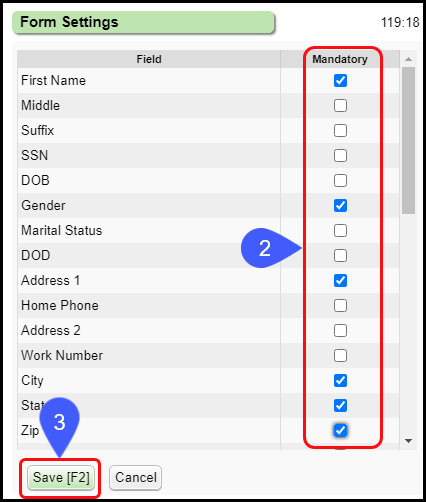
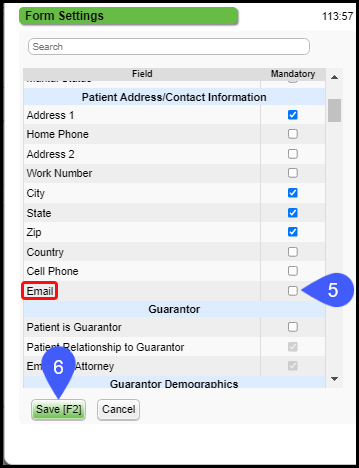
A window opens with a list of available fields.
- Select the Keys icon.
- To make a field mandatory, select the checkbox or deselect to make the field not mandatory.
- Click Save [F2].
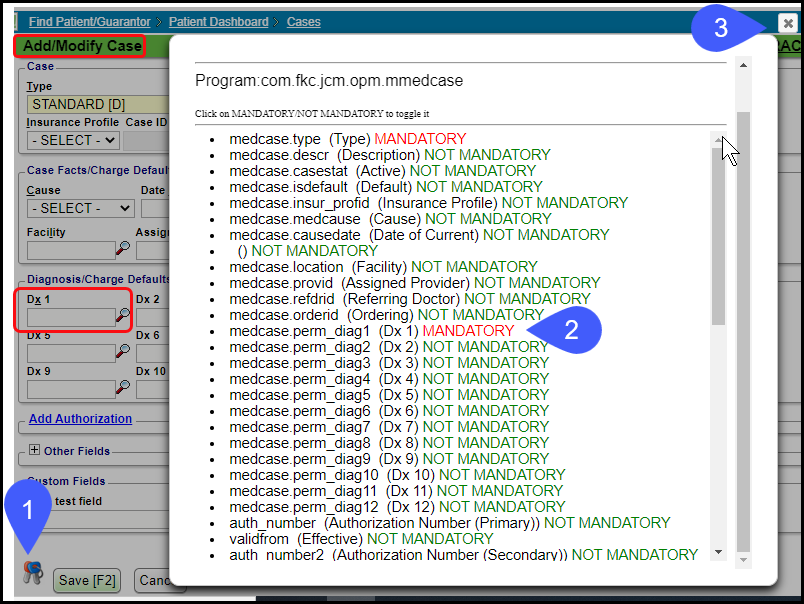
On Some Older Screens
- Click the Keys icon.
- Next to the field name, click on Mandatory or Not Mandatory to toggle between the two.
- Close the pop-up window.
Example: Make Dx 1 mandatory on a Case, select Not Mandatory to toggle to Mandatory.
Required Fields for Patient Demographics
There are three pages where you can edit the required Patient Demographic fields. This allows for a quicker registration from the Calendar and enforces a different workflow for Check-in. For example:
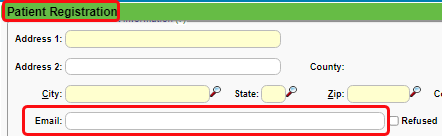
- Email address is not required during Registration when the appointment is made. On the New Patient Registration screen, make it not mandatory.
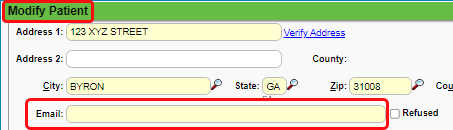
- Email is required during Check-in on the edit Demographic screen.
Make Email Not Mandatory on the Patient Registration screen
- On the Calendar, click an empty appointment slot.
- Click the Patient Lookup icon.
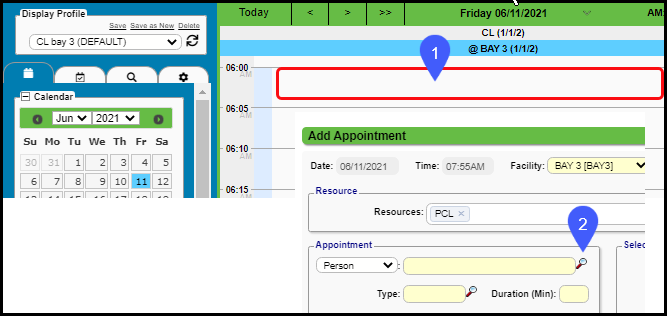
- Select Register Patient.
- Go to the bottom of the Patient Registration screen and select the Keys icon to open Form Settings.
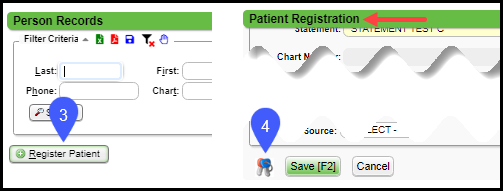
- Deselect Email.
- Select Save [F2].
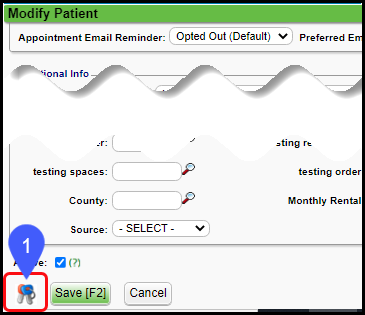
Make Email Mandatory on the Modify Patient screen (Edit Patient on the Patient Appointment screen)
- On any Patient's Dashboard, click Edit in the Patient Demographic Panel.
- Go to the bottom of the Modify Patient screen and click the Keys to open Form Settings.
- Select Email.
- Select Save (F2).
Related Articles
Add/Modify Custom Fields
Add a Custom Field If you set the Data Type on the Custom Field to Text, you will get additional options that are not available for the other Data Types. See Text Data Types for more information. From the Admin Dashboard, select Custom Fields. Select ...Custom Fields Overview
Custom Fields can be added to any data entry screen to track specific data, such as how a patient heard about your practice. These fields provide the flexibility to capture unique or specialized information that is important to your specific workflow ...Encounter Charge Panel
Charge Panel Links HCFA Fields Additional information can be added to the boxes on the HCFA. Manually enter the additional information in the box where you want it to print on the HCFA paper Claim. If additional information is added in the HCFA ...Data Entry Tips
Tips for Entering Data in the System Address Fields: Entering the Zip Code will autofill the City and State fields. The State and Zip code fields will autofill when completing the City field unless there is more than one zip code for the city. You ...Filter for Custom Fields on a Receipt
Filter for Custom Fields on a Receipt The Custom Fields must be completed on the Add Payment Screen when the Receipt is created. On the Receipt History screen, filter for Receipts Custom Field. In the following figure, it is Receipt Type. This can be ...