Make a Patient Inactive
Make a Patient Inactive
When a Patient is marked as Inactive, new Charges and Appointments cannot be added for that Patient. But, from a billing perspective, existing claims can be batched and sent, and statements will continue to be batched and sent if the Patient has a balance.
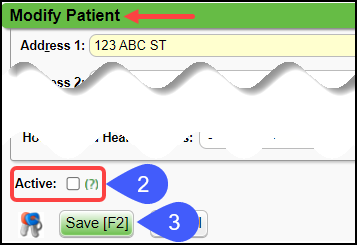
- In the Demographics panel on the Patient Dashboard, select Modify.
- To make the Patient inactive, deselect the Active box at the bottom of the Modify Patient screen.
- Select Save and Continue [F2].
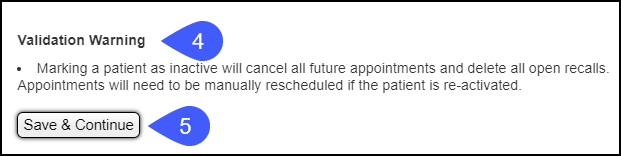
- A Validation Warning will display.
- If Save & Continue is selected:
- All future Appointments will be canceled.
- If the Patient is re-activated, the Appointments will need to be manually rescheduled.
- The Patient will be cleared from the Reschedule Queue.
- All open Recalls will be deleted.
Results of Making a Patient Inactive
- The Patient will no longer display in the Patient look-up results unless the filter is set to Include Inactive Patients or Only Inactive Patients.
- The Patient will be marked as Inactive on the Patient Dashboard and on the Appointment screen.
- Select the Reactivate Patient link to make the Patient Active again.

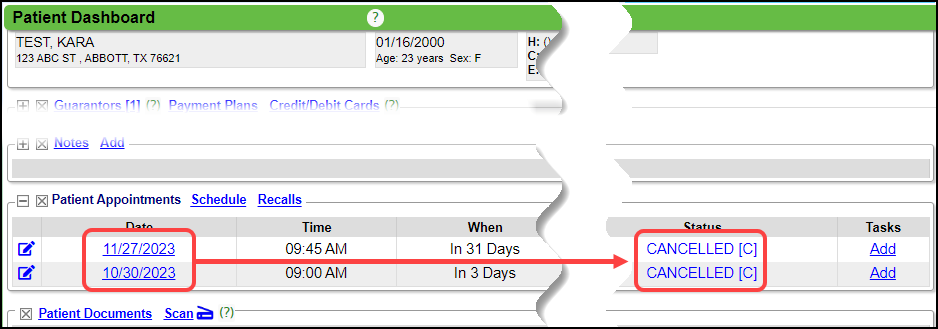
- Future Appointments that were canceled can be seen in the Patient Appointments Panel on the Patient Dashboard.
Learn More
Indicate a Patient is Deceased
Modify a Patient's Information
Related Articles
Indicate a Patient is Deceased
If a Patient is Deceased or Inactive, you can add the Date of Death (DOD) and mark the Patient as Inactive on the Modify Patient screen. From the Patient Demographics panel, select Modify. Add a date to the DOD (Date of Death) field. If you want to ...Patient FAQs
Alert/Header How do I remove an Alert or Header? Remove an Alert or Header Cases How do I add a Case? How do I add a Case? Charges How do I post a new Charge? How do I post a new Charge? Deceased How do I indicate that a Patient is deceased? Mark a ...Keep Active, Deactivate, and Reactivate User IDs
As a security measure, a User who has not logged in for 30 days will be unable to log in until their User ID has been reactivated. Activation, Reactivation, and Deactivation can be done from the alert on the Home Dashboard and from User Maintenance. ...Global Patient Search
Billing services often have multiple Databases where the same Patients are seen, or when Patients call, they do not know the Practice or Provider name. To make the search more efficient, the Global Search checkbox can be used to search for ...Patient Responsibility
Patient Not Responsible A Patient can be marked as not Responsible in Insurance Management, on the Patient or Encounter Dashboard, Patient Demographics, and on the Insurance in the Insurance Library. If the Patient is marked not responsible on the ...