Guarantor Dashboard Overview
The Guarantor Dashboard is accessed by selecting the Guarantor's Name in the Guarantor Panel on the Patient Dashboard or from the Find Patient/Guarantor screen.
The Guarantor is the person or entity who is responsible for Payment, and the person or entity who will receive the Statement.
Guarantor Panel
Links in the Guarantor Panel
- Modify: Select to Edit this Guarantor's Information.
- This is not used for adding a new Guarantor.

- Receipts: Select the Receipt link to display all Payment Receipts that have been entered for this Guarantor.


- Change Log: Use the Change Log link to view changes that have been made to the Guarantor, who made the changes, and when the changes were made.

- Register as a New Patient: Select to register the Guarantor as a New Patient.
- This link is only available if the Guarantor is not already a Patient.

Guarantor Info
The Guarantor fields in the Guarantor panel are read only, but most of the Guarantor Information can be changed by using the Modify link.
- To Add a new Guarantor, select the Guarantor link on the Patient Dashboard.
Read Only View Fields
- Default: The Default Guarantor is designated by a green check mark.
- Dunning Count: Dunning Counts are used to measure the delinquency of a Balance.
- This count is based on the number of Statements sent for the largest unpaid Encounter Balance.
- Effective/Expiration Date: Date the Guarantor became effective or expired.
- Reminder Preference: Home or Work Phone, Cell Phone (Call or Text), Email, USPS Mail, or Declined
- Guarantor's Name
- Guarantor's DOB
- Language: Primary language spoken
- Guarantor's SSN: Not often used
- Guarantor's Home, Cell, and Work Phone
- Guarantor's Balance: This is the Balance for all Patient's that have this person or entity as the Guarantor.
- Date and Amount of the Last Payment made
- Payment Rule: Shows the minimum Payment Amount or Percentage set up in the Payment Rule.
- This setting overrides any minimum payment amount or percentage set in the Statement Profile.
- Example: $25.00 was entered as the minimum Payment that needs to be paid for the Dunning Count to be set back to zero or set back by 1.
- Guarantor's Email Address
- Opt In/Opt Out Preferences: These options can be changed by selecting the Modify link at the top of the screen. A Red X indicates Opted Out, and a Green Check Mark indicates Opted In.
- Paperless: If Opted In, you will not receive Paper Statements.
- Email Notification: If Opted In, the Guarantor will receive Statements via Email.
- Text Notification: If Opted In, the Guarantor will receive Balance Notifications via SMS.
- Voice Notification: If Opted In, The Guarantor will receive Balance Notifications via Phone notification.
- A Guarantor can Opt In to multiple delivery options.
- Example1: If Opted In for Paperless and Opted In for Email, the Guarantor will receive Email Balance Notifications and will not receive paper Statements.
- Example 2: If Opted In for Paperless, Opted In for Email, and Opted In for Voice, the Guarantor will receive an Email and Voice Notification and will not receive paper Statements.
- POPS Payments Enabled and POPS Scheduling Enabled (Premium Add-On Feature)
- By default, all Guarantors can make Payments and Directly Schedule in POPS if enabled on the POPS Group.
- Modify the Guarantor to change their ability to make Payments or Directly Schedule in POPS.
- These fields show if POPS Payments or Direct Scheduling are enabled or disabled for this Guarantor.
- Green Check: This Guarantor can make Payments/Directly Schedule in POPS.
- Red X: This Guarantor has been restricted from making Payments/Directly Scheduling in POPS.
Statement Addresses Panel
This panel can be used to add additional addresses for Patients who have seasonal addresses.
- The Primary Residence is the address added on the Add/Modify Guarantor screen.
- Additional addresses are added here.
Patients Linked to Guarantor Panel
All of the Patients linked to this Guarantor will be listed here.
Example: There are 3 children in the family, and all are linked to their father as the Guarantor. The father will receive one Statement for all 3 children.
Payment Plans Panel
List of Payment Plans for this Guarantor.
- Existing Plans can be modified by selecting the Modify icon.
- New Plans can be added by selecting the Add link.
Statement/Notification History Panel
Statements and Notifications
- Detailed History information is given for each Statement/Notification sent.
- Batch: Number that the System assigned to the Batch
- Statement Profile: The Profile to which the Encounter(s) were assigned
- Batched: The Date the Statement was batched
- Batch Status (Paper Statements only): Status and Date
- Batch Method (Paper Statements only): Cycle or On Demand
- By (Notifications Only): The User who batched the Statements/Invoices
- Uploaded (Notifications Only): Date the Statement was uploaded to the Statement Department
- By (Notifications Only): The User who uploaded the Batch
- Patient: The Patient's Name(s)
- New Encounters: Encounters that have never been sent on the Statement/Invoice
- Amount: Total amount owed on the New Encounters
- Previously Billed: Encounters that have previously been billed Statement(s)
- Amount: Total Amount of the Encounters that have been previously billed
- Total Amount: New Encounters totals plus Previously Billed Encounters totals
- Status: The status of the Statement/Notification, such as Not Batched, Not Yet Mailed, etc.
- View: Select the icon to view the Paper Statement.
- The ability to view a Paper Statement is available for a limited time.
- Manually Removed: Statements/Notifications that were manually removed by a User from a batch
- Not Batched: Encounter Numbers that did not batch
- Exceptions: Reason why the Encounter(s) was not batched.
Send Billing Notification
A quick Billing Notification or other message can be sent using the Send Billing Notification link.
- Learn More: On-Demand Billing Notification
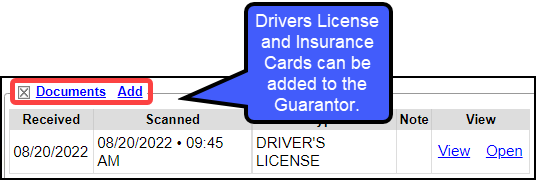
Guarantor Documents
Drivers License and Insurance can be scanned on the Guarantor Dashboard as well as the Patient Dashboard.
Learn More
Add a Guarantor
Modify/Delete a Guarantor
Additional Guarantor Statement Addresses
Guarantor Panel on the Patient Dashboard
Statement History/View Patient Statements & Notifications
Mailed Status of a Statement Batch
Was an Individual Statement Mailed?
Related Articles
Patient Dashboard Overview
Patient Dashboard Select the Patients link on the Left Side Menu to navigate to the Find Patient/Guarantor screen. Use the Patient Lookup Filter Criteria to find a patient. Select the Patient ID to navigate to the Patient Dashboard. Register a new ...Modify/Delete a Guarantor
Update an Existing Guarantor On the Patient Dashboard, select the Guarantor's Name. Select Modify. Make modifications. Select Save [F2]. If the default Guarantor's address was changed, you will be prompted with the option to change the patients' ...Add Employer/Attorney as Guarantor to Patient Dashboard for Invoicing
Add Employer/Attorney as Guarantor to Patient Dashboard for Invoicing The Guarantor must be correctly setup during Registration or on an existing Patient. When the Employer or Attorney is added as a Guarantor, it is also added to the Active Policies ...Patient Dashboard: Balance Panel
Balance Panel Features Filters The Balance Panel can be filtered by Billing Provider, Rendering Provider, or Facility if the panel is expanded. Select the Plus icon to expand the panel. Use the Lookup icon to select a Billing/Rendering Provider ...Find Patient/Guarantor/Policy Holder
To avoid duplicates, you should always search for a patient before Registering a new Patient Patient Search Select Patient on the Left Side Menu. Enter Search Criteria. Select Include Policy Holders/Contacts to search non-patients. ...