Add a Guarantor
Add a New Guarantor from the Patient Dashboard
- From the Patient Dashboard, the Guarantors () link.
- On the Guarantor List, select the Add button.
Guarantor Panel
- Entered: Defaults to the current date.
- Patient's Relationship to Guarantor: To select someone other than Self, choose the relationship of the Patient to the Guarantor from the dropdown.
- Example: 19 - Child
- The Mother is the Guarantor and the Patient's relationship to her is child.
- See instructions for Employer/Attorney (20) (which has a different setup).
- Select the Default checkbox for this Guarantor to be the default responsible party for new Charges.
- This can be overridden during charge entry.
- If there is not a default Guarantor selected, you will be required to choose a Guarantor during Charge entry manually.
- Effective and Expiration Dates: Use when a new Guarantor is added.
Guarantor Demographics Panel
- Use the Lookup icon to search for the Guarantor.
- If the Guarantor is not found, create a new Guarantor by entering the Last and First Name in the Guarantor Demographics Panel.
- The other Demographic fields are optional.
- SSN, DOB, Sex, and Language.
- Select Scan to scan a driver's license using Direct Scanning, if you have subscribed to this feature. *Direct Scanning is a premium add-on feature.*
Address Panel
- If the Guarantor's address is the same as the Patient, select the Copy Address from Patient checkbox.
- When the Relationship to the Guarantor is Child, the phone numbers and email address will be copied from the Patient.
- If the address is different, enter the new information.
Employment Panel
The Employment Information is optional unless Employee/Attorney was selected as the Relationship (20).
Contact Information Panel
If the Copy from Patient was checked above and the Relationship to the Guarantor is Child, the phone numbers and email address will be copied from the Patient.
Home Phone
Work Number
Cell Phone: This field is mandatory if the Text Message Reminder Preference is Opted In (Premium Add-On Feature).
Email: The email address is mandatory if Email Reminder Preference is Opted In. (Premium Add-On Feature)
Reminder Preference: Preferred Reminder option can be selected here. (Premium Add-On Feature)
Payment Rules Panel
Default Payment Rules should be set up on the Statement Profile. If the rules are set here to reset the Dunning Count, the default Payment Rules will be overridden that are set up in Statement Profiles.
Example: The Practice Policy might be set to a minimum Payment of 25% of the Balance, but for this Guarantor, it was decided to allow them to make Payments of 10% of the Balance.
- Amount: Enter the minimum percentage (%) of the outstanding balance or the minimum dollar amount ($) that will be accepted to Reset the Dunning Count when Auto-Post is used.
- If the Patient/Guarantor Payment is auto-posted and meets the Payment Rules, the Dunning Level will auto-reset to the count that it was prior to the Statement being sent or Reset to Zero depending on the Dunning Reset chosen.
- Dunning Reset: Select an option to reset the Dunning Count by Minus One or Reset to Zero.
- Minus One: Sets the Dunning Count to what it was before the last Statement was batched, and the same Dunning Message will be on the next Statement..
- Reset to Zero: This starts the Dunning Count over as it is before any Statements were sent, and the first Dunning Message will be on the next Statement.
- Reset Cycle Days: Select the checkbox to Force this Guarantor's Statement into the next Statement Batch.
- This allows you to send a Statement without waiting for the standard Cycle Days period.
- Example:
- The Cycle Days are set to 30 days, but it has only been 15 days.
- You want the Statement to go out on the next Statement run.
- If this box is checked, when Statements are run, this Guarantor's Statement will be created and sent.
Balance Notification Panel
*Premium add-on feature
- Paperless: The Paperless field is populated based on Patient System Settings.
- The setting can be updated for a single Guarantor.
- Example: if your practice is defaulting Patients to paperless Statements, but the Patient wants to receive a paper Statement, they can be Opted Out of Paperless here.
- Email/Text: The Notification Settings in Statement Profiles in the Admin Dashboard determine if/when balance notifications are sent via text, email, or both.
- The Email and Text Opted Out options allow you to remove a Patient from one or both of these contact methods.
- Note: Internal Note
- Select Save [F2].
POPS Permissions Panel
- Enable Payments: Enable or disable the ability for the Guarantor to make Payments in POPS.
- This is useful if there is suspicious activity in POPS for a Guarantor, such as a hacked account.
Update Guarantor on Existing Encounters
If a new Guarantor was added to an existing Patient, Encounters can be updated with the new Guarantor:
- One at a time on each Encounter; or
- Multiple Encounters can be updated at once on the Patient Dashboard, .
Update Existing Encounters with a New Guarantor from the Encounter
- From the Encounter Dashboard, select Modify.
- From the Guarantor dropdown list, select a new Guarantor.
- Select Save.
Update Existing Encounters with a New Guarantor from the Patient Dashboard
- From the Patient Dashboard, go to Select Action in the Balance panel.
- Select Change Guarantor from the Select Action dropdown.
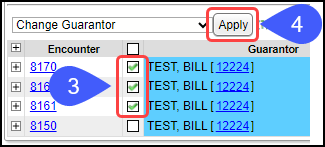
- Select the checkboxes beside the Encounters where you want the Guarantor changed.
- Select Apply.
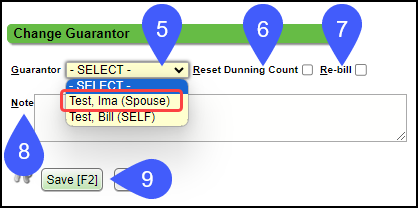
- Select the Guarantor from the dropdown.
- The Guarantor must be added before it will display in the dropdown.
- Reset Dunning Count: Select the checkbox to Reset the Dunning Count Message.
- Re-Bill: Select the checkbox to bill the new Guarantor.
- Note: Internal Note.
- Select Save (F2).
Related Articles
Add the Guarantor to a Receipt
Populate the Guarantor on a Patient Receipt When a Patient ID is entered on the Receipt, the Guarantor for the Patient will populate the Receipt automatically if there is only one Guarantor. If the Guarantor ID pre-pended with a G (G2203) is entered ...Guarantor Dashboard Overview
The Guarantor Dashboard is accessed by selecting the Guarantor's Name in the Guarantor Panel on the Patient Dashboard or from the Find Patient/Guarantor screen. The Guarantor is the person or entity who is responsible for Payment, and the person or ...Modify/Delete a Guarantor
Update an Existing Guarantor On the Patient Dashboard, select the Guarantor's Name. Select Modify. Make modifications. Select Save [F2]. If the default Guarantor's address was changed, you will be prompted with the option to change the patients' ...Add Employer/Attorney as Guarantor to Patient Dashboard for Invoicing
Add Employer/Attorney as Guarantor to Patient Dashboard for Invoicing The Guarantor must be correctly setup during Registration or on an existing Patient. When the Employer or Attorney is added as a Guarantor, it is also added to the Active Policies ...Find Patient/Guarantor/Policy Holder
To avoid duplicates, you should always search for a patient before Registering a new Patient Patient Search Select Patient on the Left Side Menu. Enter Search Criteria. Select Include Policy Holders/Contacts to search non-patients. ...