Add/Modify Insurance Profiles on an Existing Patient
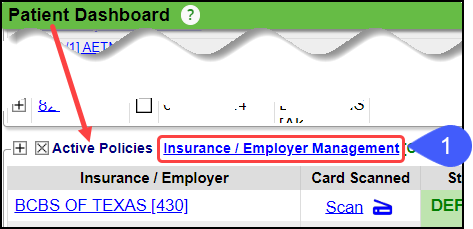
- From the Patient Dashboard, select Insurance Management in the Active Policies panel.
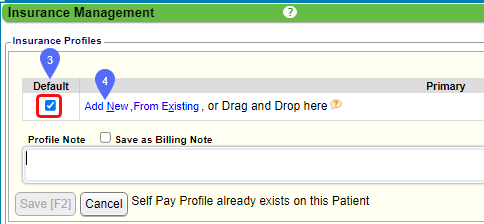
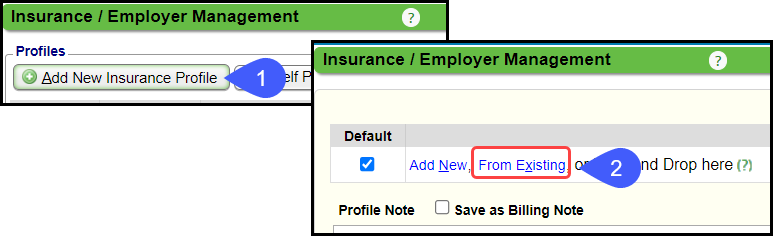
- Select Add New Insurance Profile.

- Default is automatically checked. If this is not a default insurance, see Default and Active Insurances for more information.
- Select Add New to Add the Primary Insurance.
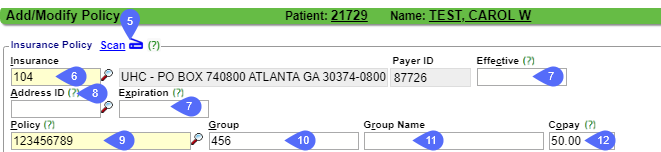
- Scan: If you subscribe to Direct Scanning you can scan the insurance card and the information on this screen will auto-populate.
- Skip to Step 6 if you do not use Direct Scanning. *Direct Scanning is a Premium Add-On Feature.*
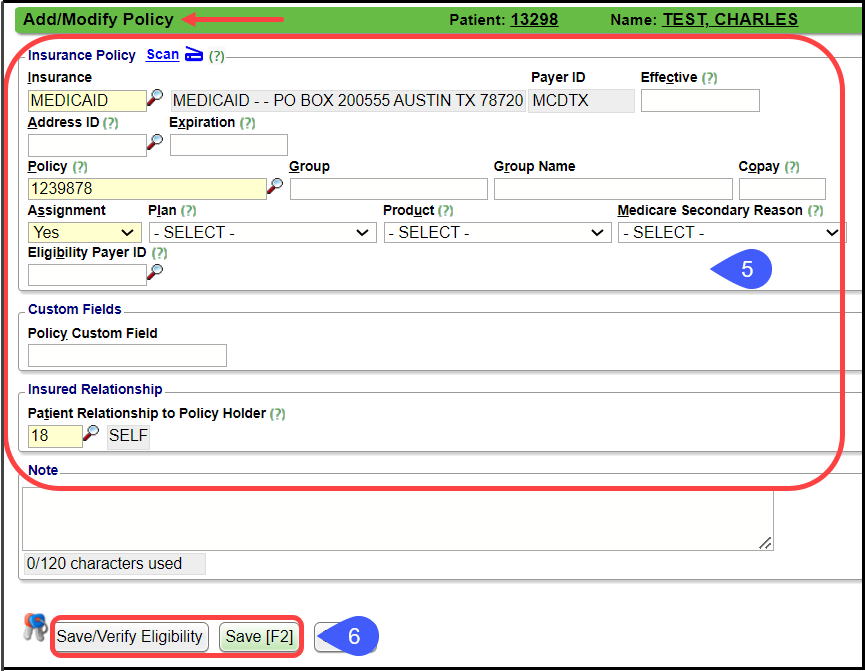
- Insurance: Enter the Insurance ID or use the Lookup Icon
to search for the Insurance.
- Select the Pending checkbox to auto-fill the Insurance field with Pending.
- Effective/Expiration: The date this policy first became effective, and the last date this policy was in effect.
- These can be left blank.
- Address ID: Alternate addresses can be entered, but this is not usually necessary because the claims are sent electronically to the same Claims Payer ID for all addresses for that Payer.
- If you need to add an Alternate Address to send paper claims, see Add Alternate Insurance Addresses.
- Policy: Enter the Policy number.
- The lookup is used only for a shortcut to pull in the Patient's Social Security Number for Policy numbers based on the Social Security Number.
- Group: Enter the Group number.
- If there is no Group number, leave this field blank.
- Group Name: Optional
- Enter the Patient's Copay amount.
- This will populate on the Patient's Appointment screen.
- Assignment: This defaults to the setting configured in the Insurance Library.
- Changing the value on this screen will override the Insurance Library setting.
- Plan: If you are using the System to confirm Eligibility, the Plan information will automatically update from the Eligibility results (if the information is supplied by the Payer).
- Otherwise, select the appropriate Plan for this Patient's policy, if applicable.
- Product: If you are using the System to confirm Eligibility, the Product information will automatically update from the Eligibility results (if the information is supplied by the Payer).
- The appropriate Product for this Patient's Policy can be selected from the dropdown menu or added manually by selecting Manage.
- The Product list can be managed in the Insurance Library.
- Libraries > Insurances > Select the Insurance ID > Products panel
- Select the Add button to add a Product.
- This function is permission based.
- Medicare Secondary Reason (MSP): Leave blank on the Primary Insurance.
- This is only added to Medicare when it is the Secondary Payer.
- Eligibility Payer ID: This field is needed to manage situations where there are multiple Eligibility Payers for one Claims adjudication Payer.
- If applicable, enter the Payer that is the source of Eligibility for this Policy to override the default established in the Insurance Library.
- Multiple numbers can also be added in the Insurance Library.
- Relationship: Enter the relationship of the Patient to the Policy Holder.
- If other than self, enter the additional pertinent information.
- Look up the Insured to see if the person is already in the Database.
- If yes, choose the Insured from the list;
- If the Insured is not found, enter the Name, DOB, & Sex.
- Use Patient Address: Yes or No. If No, enter the address.
- Other fields can be completed as necessary.
- Note: Enter a Note if applicable.
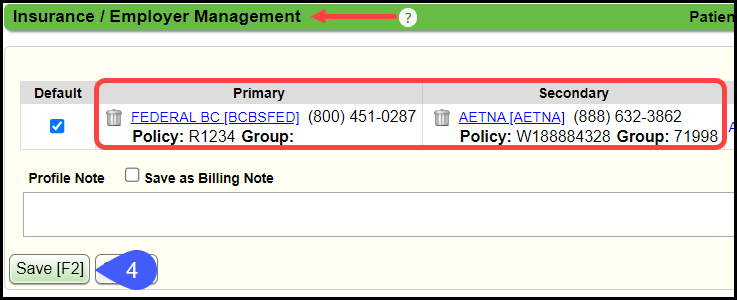
- Select Save/Check Eligibility or Save (F2).
- After Saving the Primary Insurance, the Secondary option is available.
- Select Add New for the Secondary.
- Use the instructions above to add the Secondary and Tertiary Insurances.
- Medicare Secondary Reason (MSP) #16 on the screenshot above: If Medicare is secondary, this is a mandatory field. If using Eligibility, the MSP will auto-populate. Otherwise, choose the Medicare Secondary Payer Reason (MSP) from the dropdown. Leave blank if Medicare is not secondary.
- Select Save/Check Eligibility or Save [F2].
- When all policies are added, select Save [F2]. If you do not Save this screen, the policies will be in the Policies not part of an Insurance Profile panel and will not be available to choose on the encounters. If this happens to you, see Policies Not Part of an Insurance Profile
Modify an Existing Insurance Profile
Before modifying an existing Insurance Profile, consider the following:
- You can modify the existing Insurance Profile if:
- A mistake was made when the Policy number or the Insured Relationship was originally entered.
- A mistake was made or was left blank when the Effective Date, Group, Group Name, or Copay when the Profile was originally created.
- A mistake was made in the order of the Insurances when they were originally entered.
- Insurance was entered as Medicare as the Primary and BCBS as the Secondary, but BCBS should be Primary and Medicare should be Secondary.
- Do not modify the existing Insurance Profile if:
- The Patient has a new Insurance Policy.
- The Patient has the same Insurance as the previous year, but the Policy Number has changed.
Change an Existing Insurance Profile
- Select the Insurance Management link on the Patient or Encounter Dashboard.
- Select the Default or Active link in the Status column to make the changes to a Profile.
Examples of Modifications to the Insurance Profile
Make an Active Insurance the Default Insurance
This will make the Active Insurance the Default and the current Default Insurance will become Active.
- Select the Default checkbox.
- Select Save [F2].
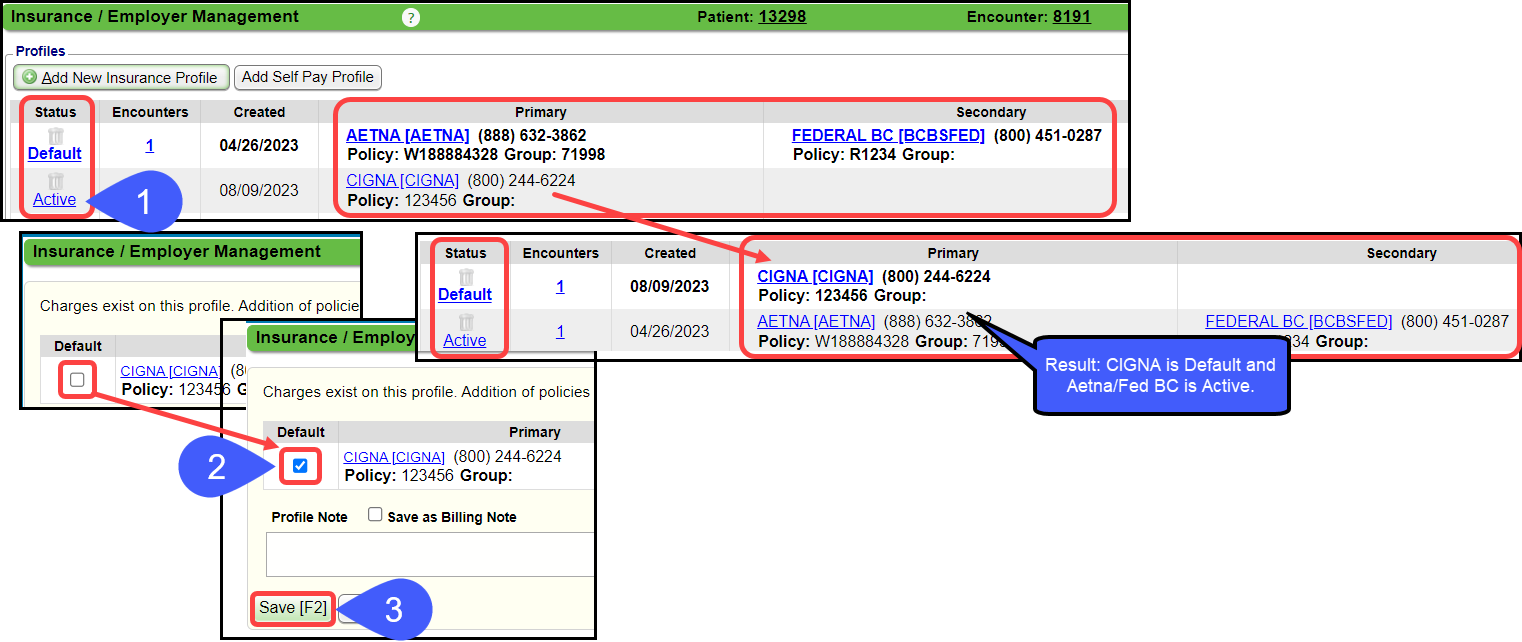
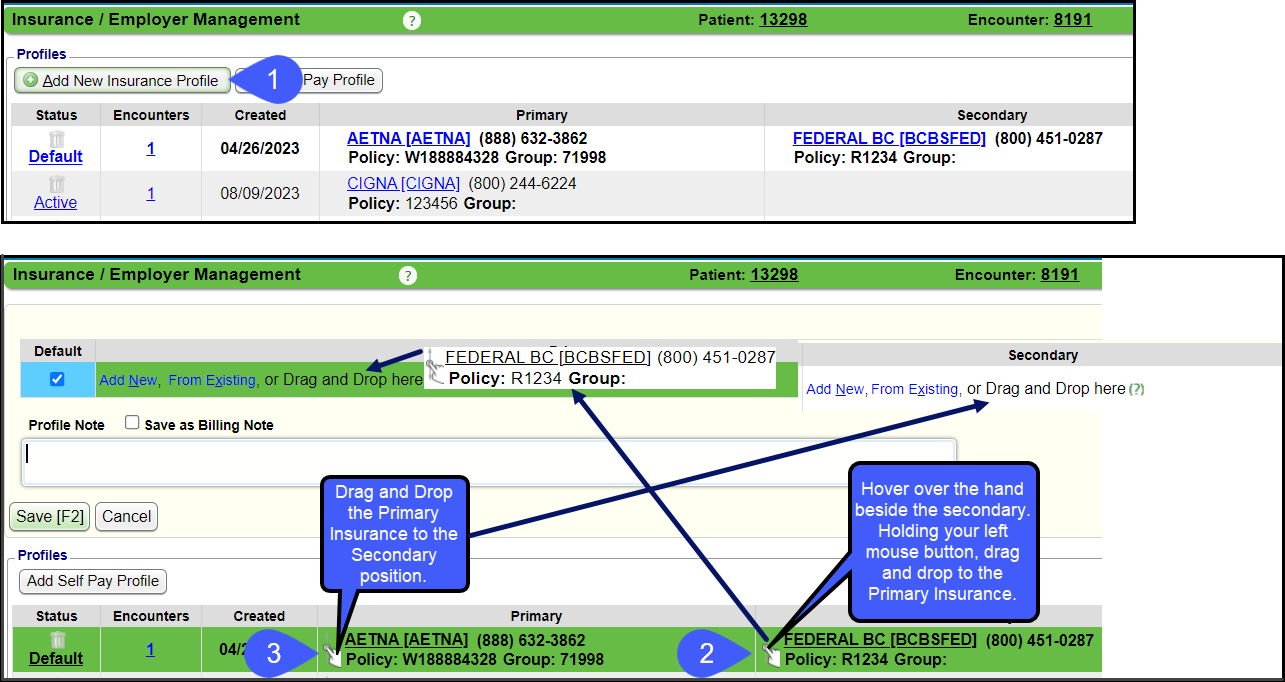
Switch Insurance Positions
Example: Change the Secondary to the Primary.
If the Insurance was entered in the wrong order, another Profile will need to be created.
- The Drag and Drop or From Existing method can be used to prevent entering the information again. The Drag and Drop method is used below.
- Select the Add New Insurance Profile button.
- Drag and Drop the Secondary Insurance to the Primary position.
- Drag and Drop the Primary Insurance to the Secondary position.
- If the Primary is not the Secondary, leave the Secondary position blank.
- If there is another Secondary Insurance, add as New.
Change the Patient Responsibility
If the Patient's Responsibility changes, update the Patient Responsibility dropdown.
One of the Insurances on the Insurance Profile Changes
If one of the Insurances on a Profile changes, a new Profile will need to be created.
The Insurance Information on the one that is correct does not need to be entered again. The Drag and Drop or the From Existing methods can be used.
The Primary Insurance is the same, but the Secondary Insurance has changed
Add a New Profile using the From Existing method below:
- Select the Add New Insurance Profile button.
- Choose From Existing on the Primary position.
- Select the Primary Insurance from the list.

- Choose the Add New link on the Secondary position
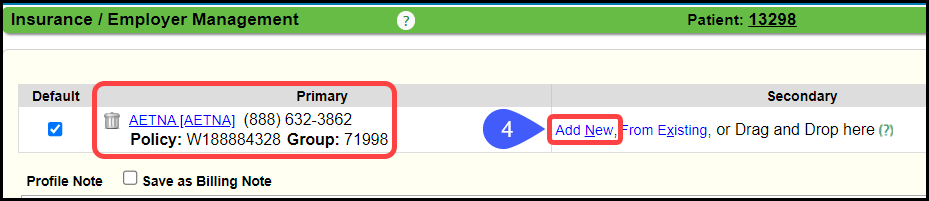
- Complete the Insurance Information.
- Select Save [F2] or Save/Verify Eligibility
- If Save/Verify Eligibility is chosen, go back and Save the Insurance Screen.
- Select Save [F2] again.

Additional Copay/Deductible Amounts for a Policy
There is only one Copay field per Insurance Policy where you can enter a dollar amount. For any additional information.
It is recommended to use the Note field (deductible amount, percentage, or multi-specialty copay amount).
Learn More
Insurance Management
Default and Active Insurance
iDology Direct Scanning
iDology Direct Scanning FAQs
Add/Modify Alternate Insurance Addresses
Insurance Library Overview
Insurance Profiles Overview
Add/Modify Insurance Profiles on an Existing Patient
Policies Not Part of an Insurance Profile
Insurance FAQs
Patient Not Responsible on the Patient/Encounter Level
Related Articles
Move Existing Encounters to a New Insurance/Self-Pay Profile
Move Existing Encounters to a New Insurance/Self-Pay Profile When a new Insurance or Self Pay Profile is added, you may need to move some of the existing Encounters to the new Profile. This most often occurs when a claim is denied for not being ...Insurance Management
Insurance Management is used to manage a Patient's Insurance Profiles. The Primary, Secondary, and Tertiary Insurances are on one Insurance Profile. When the Insurance changes, a new Insurance Profile should be created. Insurance Management is ...Add/Register a New Patient
A new Patient can be registered from: Patient Lookup The Scheduling Dashboard > Patient Registration button The Calendar. The Navigation Search Box (Go-Box) You can determine which fields you want to be mandatory when adding a Patient from Patient ...Attach a Statement Profile to a Patient
When a new Patient is added, the Default Statement Profile will be selected automatically on the Patient Demographics screen. Manually add or modify the Statement Profile on a Patient's Encounter Patient Dashboard Select the Modify link in the ...Add or Modify Insurances in the Insurance Library
When adding Payers to the Insurance Library, the System automatically creates numeric Insurance IDs unless you have elected to create your own. Create Your Own Insurance IDs Go to Admin on the Left Side Menu > System Settings > General > ...