iDology Direct Scanning
*iDology Direct Scanning is a premium Add-On Feature. Contact your Account Manager for more information.

The Direct Scanning integration only functions on a Windows or Mac computer.
With Direct Scanning, you can scan Patient IDs and Insurance Cards directly into the PM System which will auto-populate the Patient Demographics.
- We support and recommend the ScanShell 800DX or 800DXN Scanner for use with this feature.
- Ensure that your scanner drivers are up to date.
- If you are having issues with your scanner, contact your IT Department before contacting Support.
The devices available in the dropdown cannot be managed by Support.
- These are your devices and must be installed and managed in your office.
- The default is set on your side.
This feature allows you to:
- Scan data into the cloud and bypass the local scan and upload process.
- Scan the front and back of documents (duplex scanning).
- Scan a driver's license or passport and automatically pull data into the PM using the barcode or OCR.
- Scan an Insurance Card and automatically pull data into the PM using OCR.
- Capture and store photos from a driver's license or passport.
- Auto-rotate images.
 The User can only Accept Changes if the User Permission Accept Scanning Changes is selected. Otherwise, the User must manually enter the data and save the Scanned Image.
For the following instructions, we recommend using your personal driver's license and Insurance Card to set up your scanner. The setup process should be completed before registering your first patient.
Utilize the Scanning System Settings to control the scanning parameters.
One-Time Setup
- From the Patient Dashboard, select Scan.
- A popup window will prompt you to download and install.
- This message may vary depending on the device.
- Select the Download button.
- Follow the provided steps to install the service.
- Select Reconnect.
Access the Direct Scanning Feature
Use the Scan Icon for Insurance, Driver's License, or other Identification. The Images and data will populate the appropriate places:
- During Patient Registration
- On the Patient Dashboard and the Modify Demographics screen
- On the Insurance Policy on the Patient/Encounter Dashboard
- On the Patient's Appointment screen from the Calendar
- On the Guarantor Dashboard
Registration
The Policyholder does not populate if they are different from the Insured. If different, the User must manually enter the Policyholder.
When Registering a New Patient, the following information can be populated from the scanned images:
- Patient Demographics
- Guarantor Demographics
- Insurance Policy
Patient Dashboard
The scan icon appears in the following Panels:
- Patient Demographics
- Active Policies
- Patient Documents
Direct Scanning: Driver's License
Select the Scan Icon
Source: Select your Scanner in the dropdown.
Type: Select the ID Type.
Add Photo: If checked, the photo will be added from the Driver's License/ID Card being scanned.
The Photo can only be extracted from the Driver's License/ID.
Other document types that contain a photo cannot be used to extract the photo.
Select Save Front.
Select Save Back.
Insert the ID/Card into the scanner per the scanner's instructions.
Select Scan.
Once the scanning is finished, the barcode scanner will complete the Demographic Information. If the barcode scanner fails to read the ID, the OCR feature will complete the information.
- Modify the information as needed.
- If previous information exists, select the Review Changes button to open a new screen.
- Save Card Only: This will not update the Demographic information but will save the card.
- If the front and back of the card scanned incorrectly, use the Swap icon to switch
the order.
- When you are finished, select Accept Changes [F2].
- Accept Changes is based on User Permissions.
Direct Scanning: Insurance Card
If USEADDITIONALADDRESS = Yes, an additional Insurance Address will be captured during Scanning.
Scan using the Active Policies Panel
It may take up to 10-15 seconds to scan an Insurance Card, whereas, a driver's license scans with the barcode.
Insurance must be added to the Insurance Profile before scanning.
- Select the Scan Icon
- Source: Select your scanner from the dropdown.
- Type: Select Insurance Card.
- Insurance: The Insurance must be selected before scanning the document.
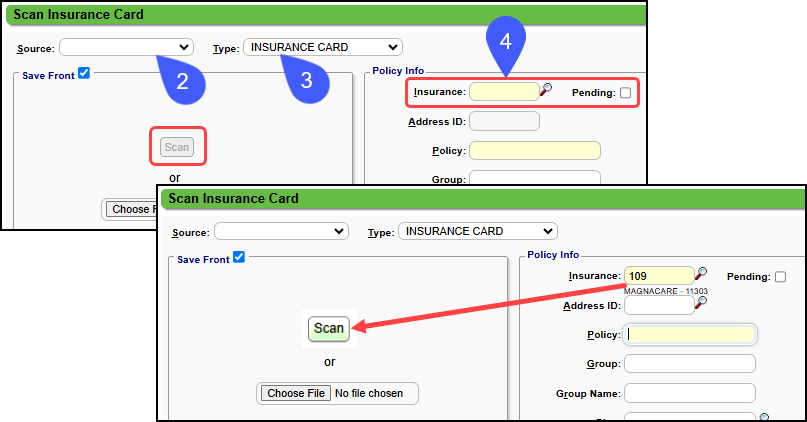
- Select the checkboxes for Save Front and Save Back to scan both sides of the card.
- Insert the Insurance Card into the scanner per the scanner's instructions.
- Select the Scan button.
- Policy Info: If the Insurance Card was not recognized, enter the information into the Policy Info panel.
- If the Insurance Card was recognized, select the Pull Data link to complete the Policy Info panel automatically.
- Enter a Policy Note (optional).
- The Policy Note populates the Note panel on the Add/Modify Policy screen and will display when hovering over the Policy on the Patient Dashboard, Encounter Dashboard, and during Scheduling.
- Select Accept Changes [F2] or Save/Verify Eligibility.
- Complete any additional fields on the Add/Modify Policy screen.
- Ensure that the appropriate Insured Relationship is selected in the dropdown to prevent Claim Denials and Rejections.
- Select Save [F2] or Save/Verify Eligibility.
If you scan an existing policy, you may be prompted to make additional changes to Insurance Management in a popup or make updates to the Policy if the card is not recognized. If at least 90% of the card is not visible, select the Cancel button and re-scan.
Scan Using the Patient Appointment Screen
Insurance Cards can be scanned from the Patient Appointment Screen.
- Select the Scan icon below the Patient's picture.
- Source: Select your Terminal.
- Type: Select Insurance Card.
- Select the checkboxes for Save Front and Save Back.
- Select the Scan button.
- If the Insurance Card was recognized, select the Pull Data link.
- Select the Accept Changes button.
- Eligibility can be checked by selecting the Save/Verify Eligibility button.
- The Modify Insurance Profile screen popup displays.
- If there is no secondary/tertiary, select Save [F2] on the Modify Insurance Profile screen.
- If there is a Secondary Insurance, select the Add New link under the Secondary.
- Select the Scan link.
- Follow the steps above for adding the Primary.
Change Front and Back Positions
In some rare cases, the scan may not recognize the Front and Back positions in the previews. Use the Swap icon .
Hover over the Date the Card was scnaned to see a quick view of the Insurance Card.
Previous Information
If previous information exists, review the data for accuracy.
- Review Changes [F2]: Opens a new screen for review.
- Save Card Only: Saves the card without updating the information.
- Cancel: No changes will be made.
Calendar
The photo displays on the Add Appointment screen and on the Check In/Manage an Appointment screen.
Guarantor
Driver's License/ID only
Learn More
Delete a Scanned Image
Download a Scanned Image
Modify a Scanned Image
Manage Scanned Documents
Patient Documents Panel/Scanning
View a Scanned Document
Mark an Insurance as Pending
Scanning System Settings
Related Articles
Scan Patient Documents Overview
You can scan Patient Documents into your System using two methods: Use your local scanner to scan to a file on your computer and upload to the System. or Use IDology Direct Scanning which is a *Premium add-on feature. The Scanned Documents can be ...iDology Direct Scanning FAQs
Troubleshooting Scanning Problems Questions for Troubleshooting Scanning Problems Answer the following questions for the Troubleshooting Process: What Make and Model is your scanning device? Is the driver on your device up to date? Do you have ...Scanning System Settings
AUTOMATICBORDERDETECTION - AUTOMATICE BORDER DETECTION Use this setting to prevent capturing unwanted space, such as, black/gray space or other "noisy" areas on specific scanner models. The unwanted space affects the use of the barcode scanning, the ...Patient Documents Panel/Scanning
The Patient Documents Panel shows all documents that have been uploaded or scanned (such as Insurance cards and driver's licenses). Patient Documents Link Select the Patient Documents link to open a list of scanned on the Documents/Images screen. ...Upload Scanned Documents
Upload Scanned Documents There is a 2MB file size limit for uploads, and this cannot be increased, and TIF files are not supported. With the Direct Scanning feature (Premium Add-On), you can scan Drivier's Licenses (IDs) and Insurance Cards directly ...