Quick Start Guide
Basic setup of the System
There is initial setup that needs to be done before using your System. There are step-by-step instructions to guide you through the setup of each Library.
- Once you have added the basic Libraries, you will be ready for your first training session.
- Completing this "homework" saves training time and gives you experience using the System.

The first training will not occur until this "homework" has been done.
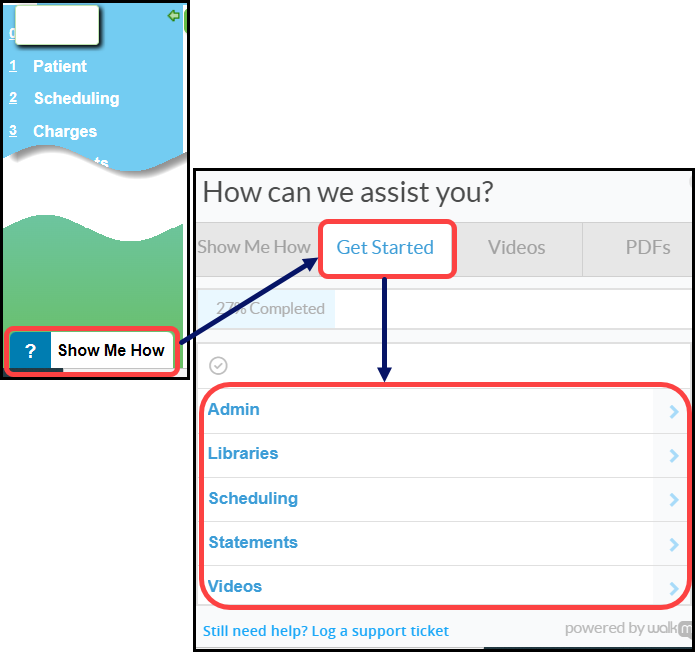
Use Show Me How (?)
- Located at the bottom of the Left Side Menu.
- Select Show Me How.
- Select the Get Started tab.
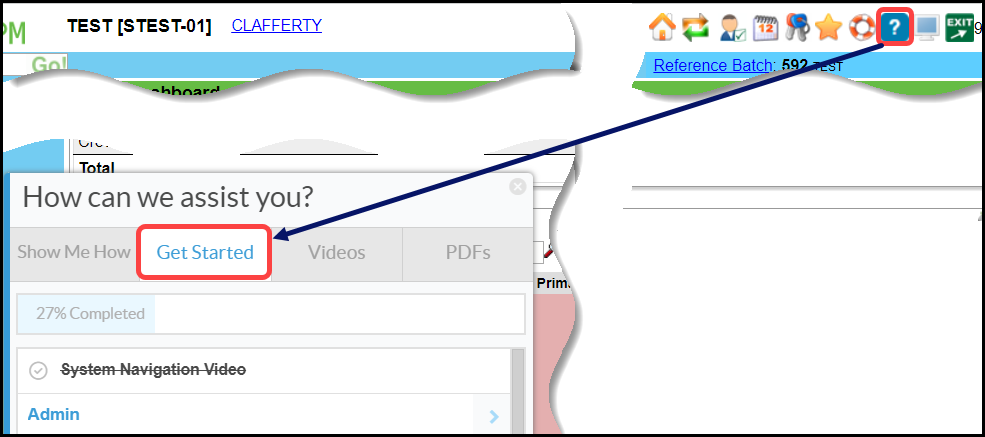
- Question Mark (?) on the Title bar on a screen for step-by-step guidance.
Use the Help Center on the Left Side Menu for a comprehensive guide on the usage of the System.
- General Navigation: Shows how to use the System.
- Getting Started: System and User Setup.

Prepare your Database for Billing
- Library Setup-Prepare to have the following information ready:
- Pay to/Billing Locations: Practice address, EIN, and NPI
- Service Facilities (Places of Service): Facility addresses, NPIs, and CLIA numbers if applicable.
- Billing/Rendering Providers: NPIs and Tax ID number(s)
- Referring Providers: NPIs (We may be able to import this from your current system.)
- Insurances: Payers and addresses (We may be able to import this from your current system.)
- Procedure Codes: NDC information and custom Procedure Codes used in your Practice.
- Statement Profiles Setup: Statement Setup and Dunning Messages. (Reminders and Notifications: premium add-on feature)
Set up the basic Libraries in this order:
Pay To/Billing Locations
- Add your Billing Office and also add a Pay-To Locations if your mail is received in a PO Box.
- If a Pay To/Billing Location was added in error, deactivate it.
From Libraries on the Left Side Menu, select the Pay To/Billing Locations button
Select the Modify icon on the Location that you want to deactivate.
Deselect the Active box.
Click Save [F2].
Service Facilities
- Enter all of your Service Facility locations (enter CLIA and NPI if applicable)
- Telemedicine (Telehealth) Facility setup
- Select Add.
- Add a Facility ID, Name and POS 02.
- Select Save [F2]
It is not necessary to add a separate facility for billing Telemedicine. Change the POS to 02 during Charge entry
Billing/Rendering Providers
- Using the NPPES Import tool, import all of your Billing and Rendering Providers.
- If the Provider cannot be found, the Provider can be added manually.
Insurances
- If your Insurances are not being imported from your old system, you can add multiple insurances in one step by using the Clearinghouse Payer List.
Related Articles
Wind River Lane Terminal Setup
Initial Setup To set up the credit card device successfully, an internet connection is required, either through an Ethernet cable or Wi-Fi, depending on the chosen device. Verify that an Ethernet port or nearby router is accessible from your ...Administrator's Setup Workflow
Welcome to your new Database! Let's get started with your setup! The workflow below will guide you through the setup steps in the most efficient manner. Getting Started Getting Started Overview Standard Operating Procedures and Best Practices Quick ...Balance Notifications Setup
All setup for Balance Notifications is done in Statement Profiles using the Notifications panel. When Statement Balance Notifications have been activated (Premium Add-On), the Notifications Panel is added to the Statement Profile screen, and a ...Schedule Setup and Build Overview
Schedule Setup and Build Scheduling Setup is the backbone of your Calendar. The setup drives the options you have when making an Appointment and the column options that can be displayed. Schedule Build Length If the Expiration Date is left blank on ...Invoice Profile Setup
In addition to Statement Profiles, a separate Profile is required for Invoices. Invoice System Settings These are some of the most important System Settings for Invoices. There may be others that you want to include as well. Admin > System Settings ...