Add/Modify a Procedure Code (CPT)
CPT® Codes (Current Procedural Terminology) is a uniform medical language that defines the Procedures or Services performed by a qualified healthcare professional. They are referred to in the System as CPT or Procedure Codes.
Adding fees directly to the CPT code will update your Default Fee Schedule (Libraries > Charge Fee Schedules > Fee ID 0 (zero)).
- Updating the Fee on the Procedure Code in the Procedure Code Library will update the corresponding Fees on the Default Fee Schedule, 0.
- Updating the Fees on the Default Fee Schedule, 0, will update the corresponding Procedure Code(s) in the Procedure Code Library.
Add Procedure (CPT®) Codes
Procedure Description Panel
- From Libraries on the left Sidebar menu, choose Procedure Codes.
- Select Add.
- CPT®: Use a System-delivered code or create your own quick code. This does not transmit on a claim.
- Submit CPT®: Enter the Procedure Code that will be submitted on a Claim.
- Type: CPT® Code is the default.
- Effective Date: Controls when this Procedure Code can be used. (This can be left blank)
- Expiration Date: The Procedure Code cannot be used after the date entered here. (This can be left blank)
- Description: Enter a Description for the Procedure Code.
- Abbreviation: Enter an Abbreviation for the Procedure Code.
- Patient-Facing Description: Enter the Description that you want the Patient to see, such as on a Statement, on a Patient Ledger, or in POPS. (This can be left blank.)

Procedure Info Panel
- Billable:
- Yes: The CPT will be submitted to any Responsible Party, such as, Insurance or WC.
- No: The CPT will not be submitted to any party. This is for informational purposes only. Payments and Adjustments cannot be posted to this CPT.
- Patient Only: The CPT is Patient Responsibility only and will never be submitted to the Patient's Insurance. This can be used for Medical Records or Products sold in the office.
- Taxable: Select if collecting taxes on the CPT.
- Emergency: If selected, this Procedure will be billed as an emergency service on electronic Claims (ANSI 2400*LX1-09 as Y).
- Outside Lab: If selected, new fields appear for 'Purchased Service Cost' and 'Laboratory'. This data is output as required on both paper and electronic Claims. The Billing Provider NPI will output in the ANSI 2420B loop, if the amount in the 'Purchased Service Cost' field is greater than 0.00.
- Allow Future DOS: As a rule, Service Dates (DOS) cannot be future dates. If this option is selected, the system will allow a future DOS to be saved. This is usually used for DME where supplies have been provided for 30/60/90 days, and the last day is a future date.
- Fee: Enter a fee for the CPT.
- Units/Procedure: Enter the number of Units for this CPT.
- Revenue Code: Enter the Revenue Code used for Institutional Claims. Click this link to learn more about the Revenue Code Library.
- Revenue Only: When selected, only the Revenue Code will be submitted on an institutional claim; NOT the CPT code.
- Report Group: The CPT can be added to a Report Group for reporting purposes.
- TOS: Type of Service (This can be left blank.)
- POS: Place of Service on the Line Item level.
- This field can be left blank, and the POS will default from the Claim Level POS which is set on the Facility Setup or Reference Batch Facility.
- If you enter a POS here, it will override the Facility Setup when the Line Item Charge is entered.
- If all line items have the same POS, the Claim Level POS will change when the Charge screen is saved.
- Hold Claim (Days): Enter the number of days you want this CPT code to be held before submitting. This is left blank most of the time.
- Modifiers: If this CPT is always sent with a modifier, enter it here. In the example, the CPT was entered as 9921425, and 25 was entered in the modifier field. If this CPT is chosen when entering a charge, the 25 modifier will be added automatically to the charge.

Global Period Panel
If there is a Global Period associated with the Procedure, the Global Days can be added here. Multiple Global Periods can be added to account for the different Global Days per Payer. Learn More: Global Days
Modify/Delete Global Periods
Select the Modify icon to modify an existing Global Period.
Select the Delete icon to remove the existing Global Period.
- Learn More: Global Days

NDC/Charge Entry Info Panel
- Use NDC: If this is a J Code or any other code that needs a NDC number, select the Use NDC check box. See Add NDC Numbers (National Drug Code)

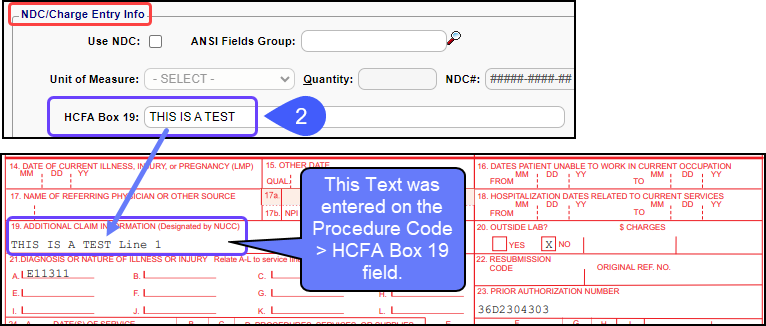
- HCFA Box 19: Entering text here will populate HCFA Box 19 (Paper Claim).
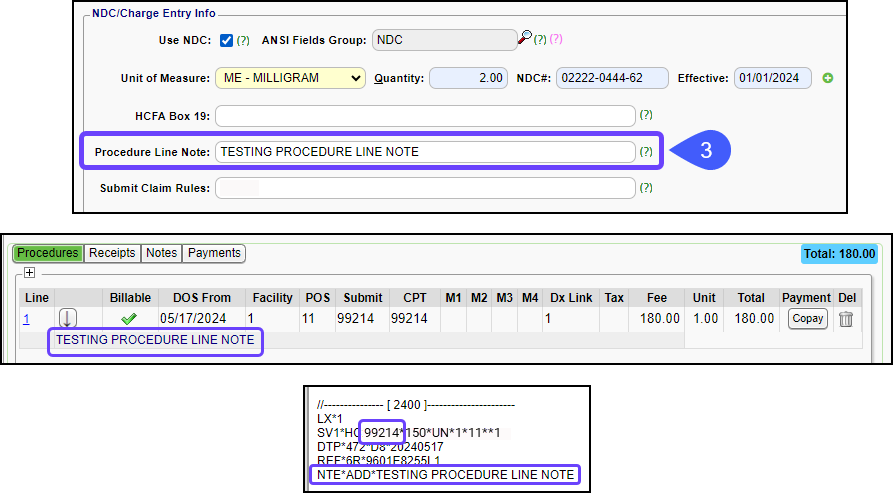
- Procedure Line Note: Entering text here populates the Line Level Note on the Charge Entry screen and submits in ANSI Loop 2400 NTE Segment.
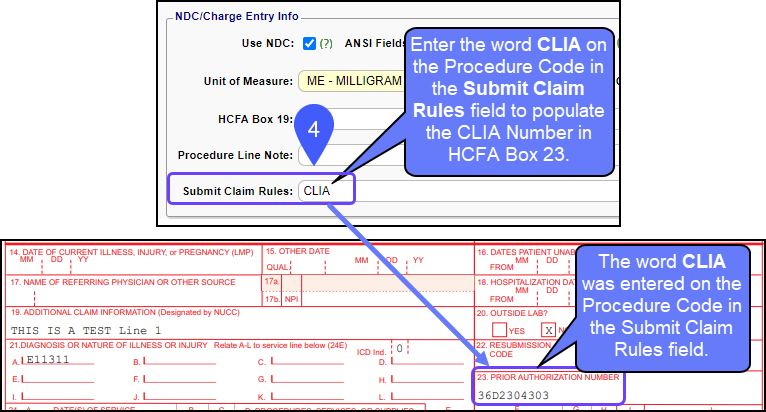
- Submit Claim Rules: Enter the word CLIA here to populate HCFA Box 23 (Paper Claim). Example: CLIA
- Use only if instructed by Support.
Additional Info Panel
Charge and Allowed Fees
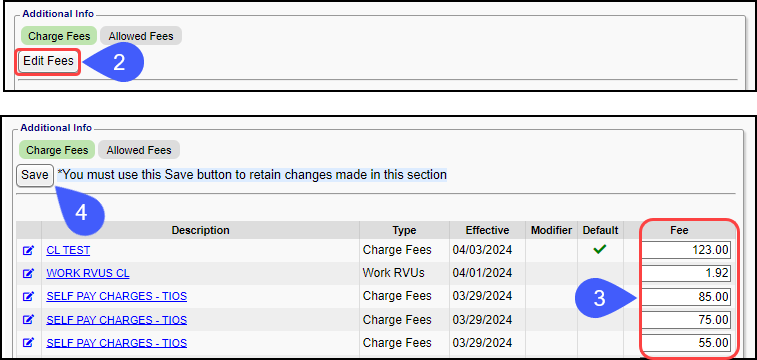
- Select Charge Fees or Allowed Fees to see the existing Fee Schedules where this Procedure Code exists.
- Charge Fees, Allowed Fees,and RVU Schedules can be modified on this screen using the Modify Fees button.
- In the table below, Individual Fees can be modified.
- Updating Fees here also updates them in the Fee/RVU Management associated Fee Schedules.
- Select the Save button above the list after modifying.
- Select the Modify icon to make changes to the criteria of the Fee/RVU Schedule.
- Select the Description link to modify the individual Procedure Codes and Fees in the Fee/RVU Schedule.
Modify a Single Procedure (CPT) Code
- From the Procedure Code Library, select the CPT code.
- Make changes.
- Select Save [F2].
Modify Multiple Procedure Codes
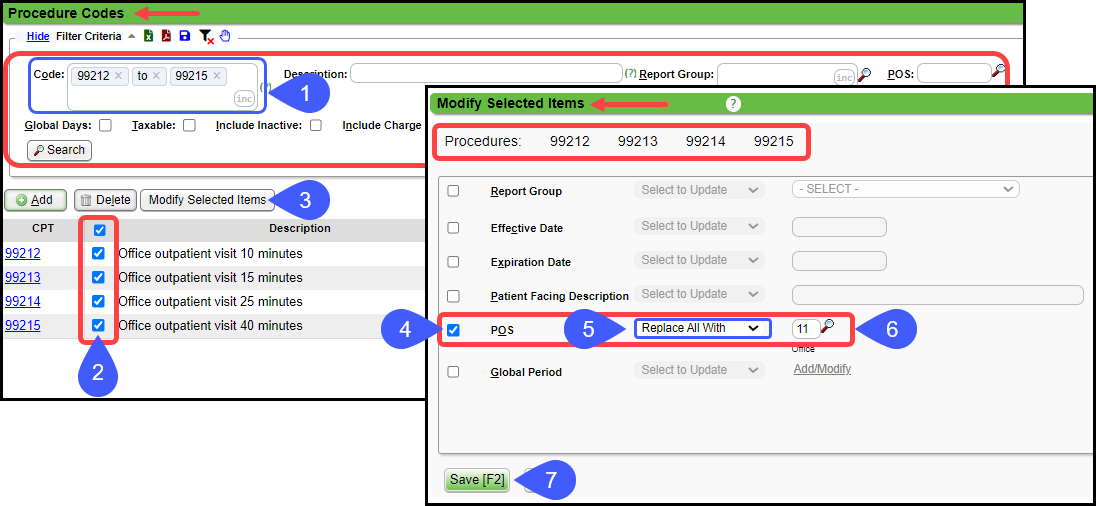
The following items can be modified on multiple CPT codes in one step.
Libraries > Procedure Codes
- Report Group
- Effective Date
- Expiration Date
- Patient Facing Description
- POS
- Global Period
Select the Criteria
- Use the Filter Criteria to search for the CPT codes you want to modify.
- Use the checkboxes to select the CPT Codes to change.
- Select the Modify Selected Items button.
- Select the criteria that you want to change.
- In the Example, Place of Service (POS) is chosen to add 11 as the POS for Procedures 99212-99215®.
- From the dropdown, choose the action to accomplish.
- Replace All With or Clear Fields. Global Period also has Add to Existing.
- Choose the result to be accomplished or select Manage to add a new choice.
- Select Manage from the dropdown to add a new choice.
- Select Save [F2].
Result of Modifying Multiple CPTs

Add a Product Procedure Code
- CPT: This can be a short Abbreviation for the Product or just use PRODUCT
- Submit CPT: leave blank
- Description: Enter a Description for the Product.
- Abbreviation: Enter a short Abbreviation.
- Billable: Choose Patient Only
- Fee: The fee can be left as 0.00 or the actual Fee can be entered. If the Fee is left as 0.00, it will need to be added when entering the Charge.
- Select Save {F2].
Use a Future Service Date
As a rule, Service Dates cannot be future dates. If this option is selected, the System will allow a future DOS to be saved. A good use of this option is for a DME situation where supplies have been provided for 30/60/90 days, where the last day is a future date.
- Libraries > Procedure Codes > Select the Procedure Code for submitting a Future Date
.
- In the Procedure Info panel, select the checkbox for Allow Future DOS.
- Select Save [F2].
® CPT copyright 2019 American Medical Association. All rights reserved.
Related Articles
Charge Templates
Create and Save Charge Templates to use for frequently entered Procedures, for Explosion Codes, and for Self Pay Charges, such as products that are purchased in the office. Add a Charge Template From Libraries on the left Sidebar menu, click Charge ...Charge/Claim FAQs
Charge/Claim FAQs Attachments How do I indicate there is attached paperwork? Attached Paperwork Attending Physician What is an Attending Physician? Attending Physician An Attending Physician is the one who is responsible for the overall care of a ...Add or Modify Insurances in the Insurance Library
Add or Modify Insurances in the Insurance Library When adding Payers to the Insurance Library, the System automatically creates numeric Insurance IDs unless you have elected to create your own. Create Your Own Insurance IDs Go to Admin on the Left ...Enter a New Charge (Encounter) Manually
Before entering Charges, attach to a Reference Batch. Close the Reference Batch when finished reviewing the Charges. If the Reference Batch is left open, the Charges will not batch. Accessing the Post (Add/Modify) Charge Screen Use one of the ways ...Modify a Charge
The Modify Charge screen is used to change or modify an existing Charge or Incomplete Charge. It is accessed from the Encounter Dashboard. Change the Rendering Provider If the Rendering Provider is modified on the Claim level, you have the option to ...
