Add/Modify Service Facilities
Service Facilities
Service Facilities are locations where the physicians and mid-levels provide services to Patients. The Service Facility information is transmitted on the Claim in Loop 2310C on the electronic Claim, and Box 32 on the paper Claim.
- From Libraries, select the Service Facilities button.
- Select Add to enter your Service Facility locations
- Include the Physical Office Location that was added to the Pay To/Billing Location.
- Includes Nursing Homes and Hospitals where the Provider sees patients.
Facility Panel
- Facility ID: Use a simple numeric, alpha, or alphanumeric code (recommended 2-3 digits, up to 6) to identify this Facility.
- This ID cannot be changed once this page is saved.
- Name: Name of the Facility.
- Abbreviation: Abbreviation used for reports and screens where space is limited.
- POS: Place of Service.
- CLIA: If this facility has a CLIA number, enter it here.
- NPI: Enter the Practice or Service Facility NPI number.
- Reporting Groups: can be used to associate Service Facilities for easier reporting on the Group.
- Effective and Expiration Dates: Optional.
- Hold Claim: Optional. If a value is greater than 0, the system will not batch claims with this facility within the specified number of days from the Claim DOS.
- Tax Rate: If you sell products and charge tax, enter the Tax Rate here.
- Time Zone: Select the Time Zone for the Facility.
- Patient Facing Description: (Optional) Facility name that is patient facing.

Address Panel
- Address: Enter the Physical address of the Facility.
- Block Address: Check the box beside Copy.
- This address appears on the paper claims on the HCFA Box 32, UB Box 1, Dental Box 56.
- This field can be used to shorten the address to fit on the paper claim.
- If the Block Address is blank, the System will use the information in the Address panel.

Contact Information Panel (Optional)
Email: Enter Contact's Email
Phone: Enter Contact's Phone Number
FAX: Enter Contact's FAX Number

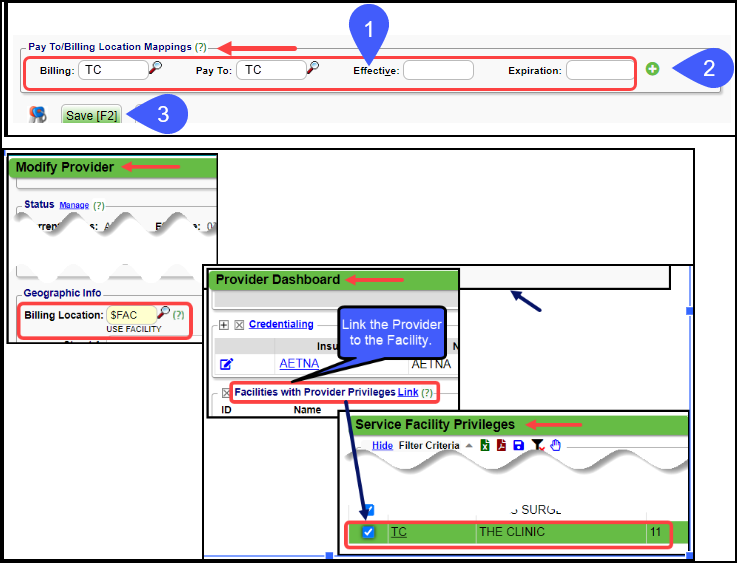
Pay To/Billing Location Mappings Panel
- Pay To/Billing Location Mappings: Link a Service Facility to a Pay To/Billing Location. Use if you have more than one Pay To/Billing location.
- For this panel to be visible, at least one Provider must have $FAC as their Billing Location in the Billing/Rendering Provider Library.
- Only the Service Facilities that are linked to a $FAC provider will have the mappings display.
- Use the Plus icon to add additional Mappings.
- Select Save [F2].
If you have not linked your Provider(s) to this location:
- Select the number in the Linked Providers column on the Service Facilities screen.
- Select the checkboxes beside the Facilities where this provider practices.
- Providers can also be linked to Service Facilities in the Billing/Rendering Library.
Telehealth (Telemedicine) Facility Setup
The Place of Service (POS) for billing Telehealth:
- POS 02: Telehealth provided other than in the Patient’s home. Patient is not located in their home when receiving health services or health related services through telecommunication.
- POS 10: Telehealth provided in the Patient’s Home. The Patient is located in their home (which is a location other than a hospital or other facility where the patient receives care in a private residence) when receiving health services or health related services through telecommunication.
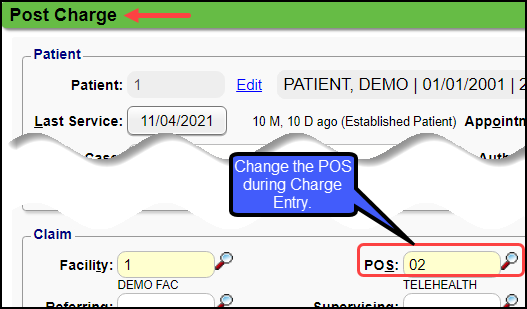
Since the POS can be changed during Charge Entry, a separate Service Facility is not necessary. However, you can add a separate Service Facility that will default to 02 or 10 if you want.
Change POS during Charge Entry
When completing or add a Charge, the POS can be manually changed to 02 or 10.
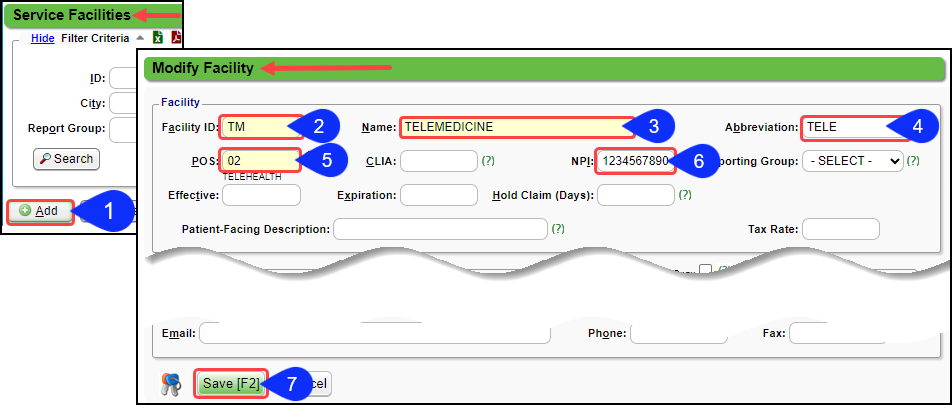
Add Telehealth as a Facility
- Select Add.
- Add a Facility ID, such as TM
- Name: Enter Telemedicine
- Abbreviation: Enter an abbreviation for Telemedicine
- This is the identifier that shows on Reports.
- POS: Enter 02.
- Enter NPI.
- Select Save [F2].
Add Home as a Facility for DME Claims
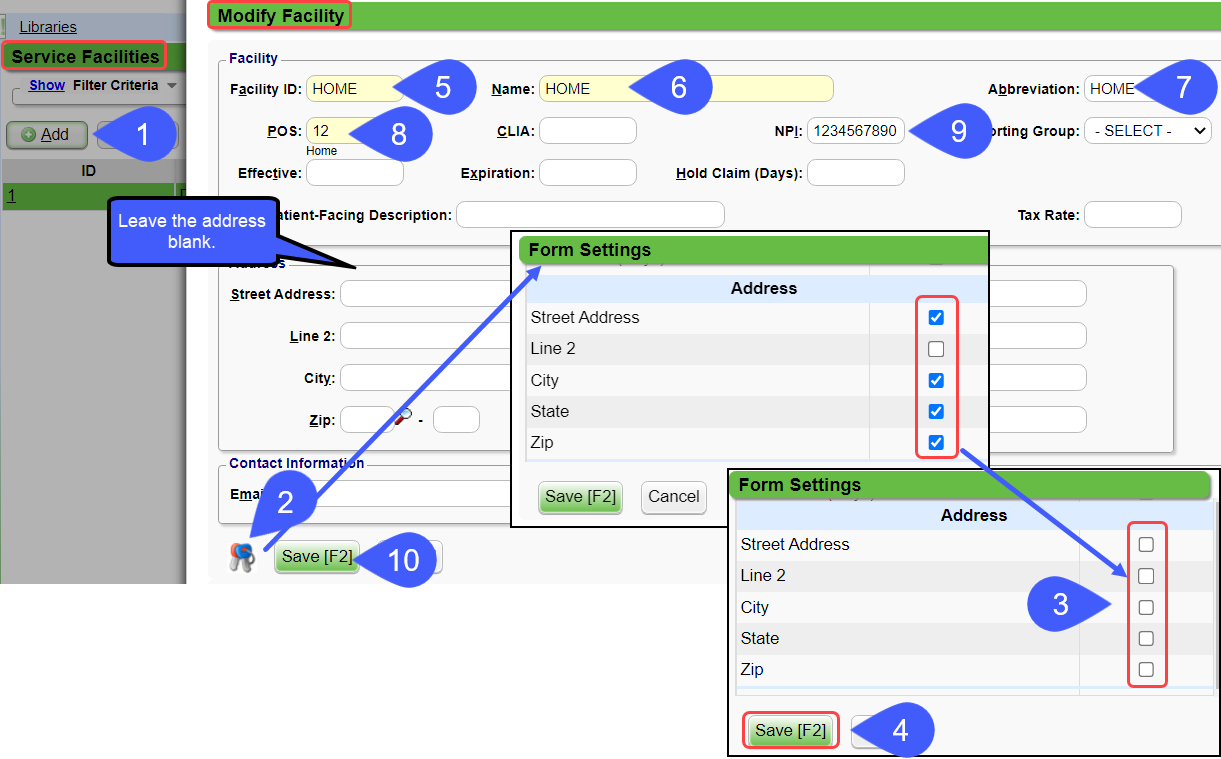
DME Claims use the Patient's address for the Service Facility. You will need to add Home as a Service Facility.
- Select Add on the Service Facilities screen.
- On the Add/Modify Facility screen, use the Keys icon next to the Save Button to open the Form Settings window.
- Deselect the checkboxes for Street Address, City, State, and Zip. The Patient's address is transmitted as the Facility address.
- Populates from the Patient demographics.
- Select Save [F2].
- On the Add Modify Facility screen, enter the Facility ID, Home.
- Name: Home
- Abbreviation: Home
- POS (Place of Service): 12 for home
- Enter NPI.
- Select Save [F2].
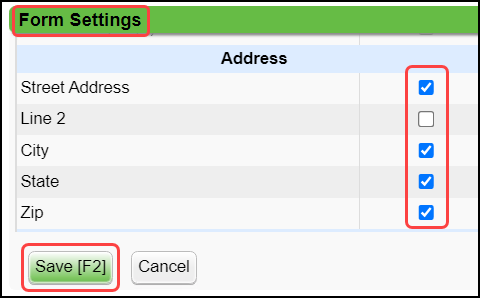
Return to the Keys to select the check boxes next to Street Address, City, State, and Zip and Save to make each one a required field again.
Related Articles
Add or Modify a User
A Site Administrator is the only one authorized to create and modify Users. User Maintenance From Admin on the Left Side Menu, select User Maintenance. Search for existing Users by using the Filter Criteria. You will be prompted to enter your ...Add/Modify a Procedure Code (CPT)
CPT® Codes (Current Procedural Terminology) is a uniform medical language that defines the Procedures or Services performed by a qualified healthcare professional. They are referred to in the System as CPT or Procedure Codes. Adding fees directly to ...Add or Modify Insurances in the Insurance Library
Add or Modify Insurances in the Insurance Library When adding Payers to the Insurance Library, the System automatically creates numeric Insurance IDs unless you have elected to create your own. Create Your Own Insurance IDs Go to Admin on the Left ...Add/Modify/Attach a TPA
Add/Modify/Attach a TPA A Third Party Administrator (TPA) is the entity that is responsible for the processing and payment of Claims. A TPA can be added as an Employer (IS TPA) or can be attached to an Employer (HAS TPA). Set the System Setting ...Preparation for Training
First Training Session Before your first training session, your Implementation Manager will ask you to set up the following Libraries. It is important to get this setup done before your training date. If you have not completed the Libraries before ...
