Add or Modify Referring Providers/PCP
One Library is used for the Referring Provider and PCP.
System Settings for Referring Provider
Access System Settings: Admin > System Settings
Auto-populate the Referring Provider on the Claim
In the System Setting Charges section > REFPROVIDER
- YES: (Default) If the Referring Provider is chosen on the Add/Modify Patient screen from the Patient Dashboard, it will auto-fill on the Encounter Charge.
- NO: The Referring Provider will not auto-populate on the Encounter.
Auto-Assign the Referring ID or Create your Own
- In System Settings in the General section > REFAUTOASSIGN
- YES: The System will Auto-Assign the Referring IDs.
- The System default (---) functions the same as Yes.
- NO: Create your own Referring IDs.
Add a Referring Provider or PCP
A Referring Provider can be added using NPPES Search or Added Manually.
- If you cannot find the Provider using NPPES, you will then have the option to add manually.
- Duplicate Referring Providers can also be added manually.
- Example: A Referring Provider that has two locations, and you want both locations in the Referring Provider Library.
- Hint for how to get the Add Manually link: Enter a "dummy" NPI number in order to get a Validation Message, which will then display the Add Manually link.
NPPES Search
- From the Libraries Dashboard, select Referring Provider.
- Select Add.
- From the NPPES Lookup screen, use the filters to find the provider, such as NPI#, first name, last name, state, etc.
- Select Search.
- Choose from the responses by selecting the NPI link.
- On the NPPES Results screen, select the Import button.
- On the Modify Referring Provider screen, the ID field will be grayed out.
- After saving, you can open the Modify Referring Provider screen to change the ID.
- After the Referring Provider has been used, the ID cannot be changed.
- The Provider's name will Import from NPPES.
- Enter or change the Abbreviation that will be used on Reports.
- Effective/Expiration: Enter an Effective Date if applicable.
- A Referring Provider can be made Inactive by entering an Expiration Date.
- Referring Provider's Credentials: The Credentials will auto-populate from the Import. Make changes if necessary.
- UPIN: Leave this field blank.
- EIN: The Tax ID can be entered but is not required..
- NPI: The NPI auto populates from NPPES.
- Practice: The Referring Provider's Practice name can be added.
- Reporting Group: This field can be left blank. Add to a Reporting Group if applicable
- Medicaid Provider#: The Medicaid number auto completes if on NPPES, but can be added here if not..
- Address Info and Contact Info: Auto populates if it exists on NPPES.
- Select Save [F2].
If you have permission, you can follow the steps above to add Referring Providers from the Patient Demographics or the Modify Encounter screen using the Referring Provider lookup.
Add the Referring Provider's Credentials
If you get an error message for Credentials: There are a limited number of credentials for referring providers. If you get this error message for the credentials, close the popup and either clear the field or add the credentials.
- On the Modify Referring Provider's screen, use the Lookup icon to search for existing credentials.
- If the credentials do not exist, select the Add button.
- Enter the Code (Credentials).
- Enter a Description.
- Select Save [F2].
Modify/Expire a Referring Provider
- Select the Provider from the Referring Providers screen.
- To Expire: Enter a Valid Through.
- To Modify: Make changes.
- Select Save [F2].
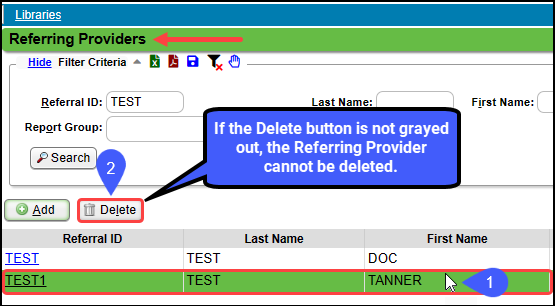
Delete a Referring Provider
Note: A Referring Provide can only be deleted if they have not been previously used on a Patient/Guarantor. If the Delete button is grayed out, the Referring Provider cannot be deleted. Follow the directions above to Expire the Referring Provider.
- Select the Referring Provider line from the Referring Providers screen.
- Select the Delete button.
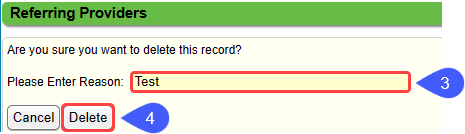
- Enter the Reason for Deletion.
- Select Delete.
Import Updated Information for a Referring Provider
Example of importing an updated Address:
- From the Modify Referring Provider screen, select the NPPES button.
- This button only exists if you have an NPI listed.
- Select the Import button at the bottom of the page.
- Save [F2].
Add a Generic Referring Provider that will not be sent on a Claim
Many groups make the Referring Provider field mandatory on the Patient Registration Screen to ensure the information is captured.
If the patient does not have a Referring Provider, a Generic Referring Provider, such as NONE or DECLINED can be used.
Add manually to the Referring Provider Library
- Enter a "dummy" name, such as Generic Generic.
- Select the Search button.
- When a Provider is not found, selecting Search will make the Add Manually button available.
- Select the Add Manually link.
- The RefID will be grayed out.
- After Saving, open and add an REF ID.
- Last and First Name: Enter a generic name, such as NONE NONE
- Abbreviation: Enter NONE.
- Enter OTH000 in the UPIN field.
- Entering this code in the UPIN field strips it from Loop 2310A on the ANSI (Electronic) claim.
- Enter 9999999999 in the NPI field, since the NPI field is mandatory.
- Select Save [F2].
Learn More
Billing/Rendering Providers Library
Insurance Library
Service Facility Library
Pay To/Billing Location Library
Related Articles
Add/Register a New Patient
A new Patient can be registered from: Patient Lookup The Scheduling Dashboard > Patient Registration button The Calendar. The Navigation Search Box (Go-Box) You can determine which fields you want to be mandatory when adding a Patient from Patient ...Billing/Rendering/Referring Provider FAQs
Add a Provider How do I add a Provider? Providers are added in Libraries: Billing/Rendering Providers Referring Providers/PCP Billing/Rendering and Referring Providers Import Tool Provider Numbers Where do I add the Provider's Medicaid number? ...Cases for PCP Authorization
Create a New Case Type: Choose from the dropdown or choose Manage to create you own. Description: Type the description of the new Case. Example: PCD REFERRAL LSF (Type of Referral plus Assigned Provider ID) Insurance Profile: Choose the applicable ...Billing/Rendering Providers
Add Providers Providers can be added individually using the NPPES Import Tool or en masse using the Import Tool. Using the NPPES Import Tool will complete the Provider screen that will only require editing. Using the Provider Import Tool, all ...Medicaid TPL/Carrier Code
Send TPL/Carrier Code on Medicaid Secondary Claims Overview TPL: Third Party Liability; Some Payers refer to this as a Carrier Code, not to be confused with CFI State Medicaids may require the TPL/Carrier in different places in ANSI Loop 2330B and ...