Create a Worklist
Worklists can be used to work Tasks and specify the Users to work the Tasks.
- Worklists can be created from the Worklist screen.
- Tasks can be added to a Worklist from multiple areas in the System.
- Examples:
- Patient Dashboard
- Encounter Dashboard
- Query Reports
- Interactive Aging
- Encounter by Status List
Home > Worklist button; or
Enter WK in the Navigation Search
- From the Worklist screen, select Add.

- Select the Worklist Type from the dropdown.
- Appointment
- Encounter: Add new panel is displays for Tags
- Patient
- Miscellaneous
- Receipt
- Remit
- Enter a Description. (The field is not auto-capitalized.)
- Add/Change the Abbreviation. (The Field is not auto-capitalized)
- The Abbreviation auto-populates with the first 10 characters of the Description.
- The Abbreviation can be changed to the Abbreviation you want to see on your Reports.
- Active: By default is Active is checked. Uncheck to make a Worklist Inactive.
- Enter the Due Soon Days to define when items display in the Due Soon column. The system will look ahead at the number of days entered here to determine if a work item is Due Soon.
- Example: If a value of 5 is assigned, it will check 5 days ahead to see if any items have a Due Date.
- Default Due Date: The value entered here will generate a Due Date.
- The Current Date plus the Value assigned to the Default Due Date is used to determine the Due Date.
- When the Worklist is created with Default Due Date = Zero, the due date is the day it was added to the Worklist.
- If the Due Date is 1, the due date is the day after it is placed on the Worklist.

- Tags: This panel only displays when Encounter is chosen for the Type.

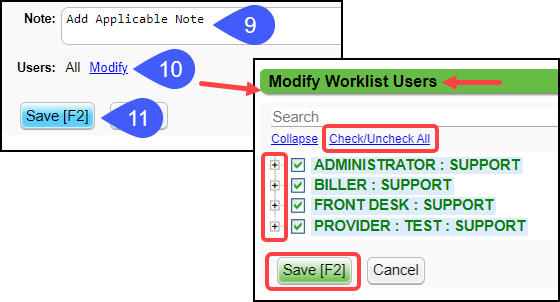
- Use the Note field to enter any applicable documentation.
- Users: Limit and Assign Users with the Modify link.
- To be able to distribute Tasks to specific Users, All can not be selected.
- On the Modify Worklist Users screen, Permissions can be given by the Security Role or by User.
- Select the Modify link.
- Select the Check/Uncheck All link
- Expand the Roles using the plus symbol to select specific Users.
- Access must be given to Users who add, work, and monitor this list.
- Select Save [F2] on the Modify Worklist Users screen.
- Select Save [F2] on the Add/Modify Worklist.
Learn More
Related Articles
Worklist Filters
Filters Options on the Worklist screen Total By & Subtotal By: Use these filters along with the Type filter to create multiple views of the Worklist. (Worklist Total By Option below) Type: Works in conjunction with Total By & Subtotal By. Worklists ...Add a Manually Posted Insurance Denial to a Worklist
This process will post the denial as a Note on the Encounter, and the Encounter will be sent to the Worklist of your choice. Note: To send the Encounter to a Worklist, you must have access to an Encounter Worklist. Create an Insurance Receipt. Post ...Post DW (Denial Worklist) or On Hold (H) Remits
If a line item cannot auto-post when the ERA is Applied, the Encounter Remit will be placed on Hold or placed on the Denial Worklist (DW) for manual review. The Holds and DWs may have Payments or Denials that need to be posted or worked. Payments on ...Create an Invoice Receipt and Post Invoice Payments
If you intend to use Invoices or Post Invoice Payments, you must add the System Setting: Admin > System Settings > General > INVOICE = Yes. Even if you do not send Invoices, the System Setting must be set to Yes to post an Invoice Payment. Create ...Worklist Settings
Worklist Settings Task Statuses, Priorities, and Rules can be added and edited in Worklist Settings. The Worklist Settings button is on the Worklists screen. Home > Worklists button > Settings button OR enter WK in the Navigation Search field > ...