Worklist Settings
Worklist Settings
Task Statuses, Priorities, and Rules can be added and edited in Worklist Settings.
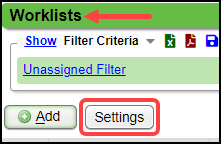
- The Worklist Settings button is on the Worklists screen.
- Home > Worklists button > Settings button OR enter WK in the Navigation Search field > Settings button
Worklist Status Tab
Statuses can be used to create an efficient workflow for your staff and can also be used to close a Task.
- Worklist Statuses can be created, reordered, and edited.
- The default Statuses are Assigned, In Progress, and Complete.
- To create an efficient workflow, Worklist Statuses can be applied to Tasks.
Add a Worklist Status
Home Dashboard > Worklists button
- Select the Settings button on the Worklists Settings screen.
- Select the Statuses tab (Default).
- Select the Add button.
- Enter a Description.
- Select a Background Color.
- Select the Text Color.
- Select the Closed checkbox if the Task should be closed when the Status is used.
- Select Save [F2].
Edit a Worklist Status
Home Dashboard > Worklists button > Settings button > Statuses tab
- Select the Edit icon.
- Make the change.
- Select Save [F2].
Reorder Worklists Statuses
- Hold the left mouse button over the Up/Down arrow.
- Drag the Status to its new position and drop by releasing the left mouse button.
Worklist Priorities Tab
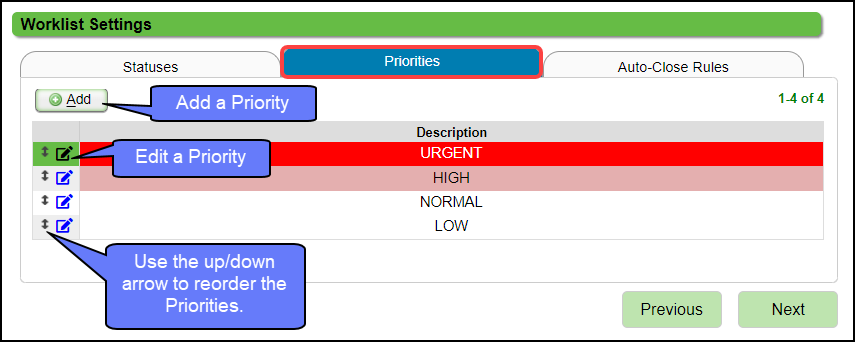
Worklist Tasks can be prioritized according to their importance in your staff's workflow.
Home Dashboard > Worklists button > Settings button > Priorities tab
- Priorities can be added, edited, and reordered on the Priorities tab.
- The default priorities are Urgent, High, Normal, and Low.
Add a Priority
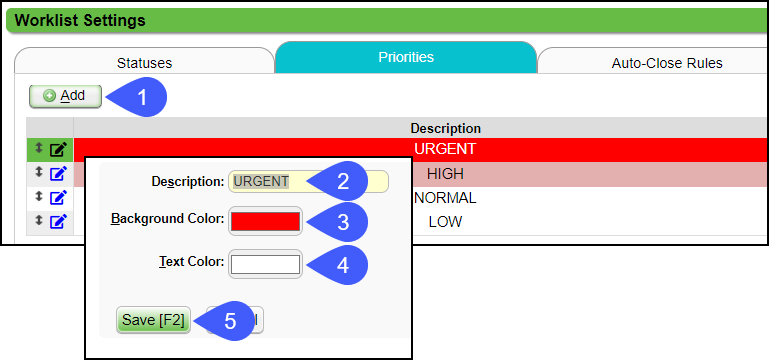
- Select the Add button on the Priorities Tab.
- Add a Description.
- Select a Background Color.
- Select a Text Color.
- If a dark background is selected, choose a light color for the text.
- Select Save [F2].
Auto-Close Worklist Tasks
 Note: Contact support to activate.
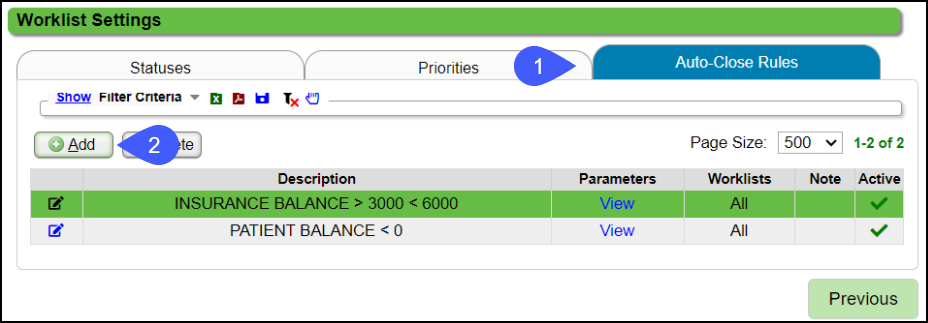
Home > Worklists button > Settings button > Auto-Close Rules tab or WK in the Navigation Box > Settings button > Auto-Close Rules tab
When a Worklist Task is attached to a Tag, and the Tag is resolved, the Task can be auto-resolved using the Auto-Close Rules.
After Activation of this feature:
- A new Tab is added in the Worklist Settings for Auto-Close.
Auto-Close Rules
Create Rules to determine when a Worklist Task should be closed.
- Select the Auto-Close Tab.
- Select the Add button.
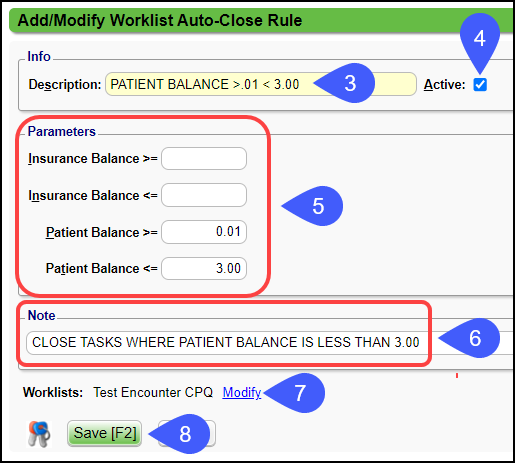
- Enter a Description for the Rule.
- Active: The default is the Active checkbox is checked. Uncheck to make it Inactive.
- Select the Parameters.
- Insurance Balance is >= : Enter the Insurance greater than Balance
- Insurance Balance is <= : Enter the Insurance less than Balance.
or
- Patient Balance >= : Enter the Patient greater than Balance.
- Patient Balance is <= : Enter the Patient less than Balance.
- Enter applicable Notes.
- Select the Modify link to choose the Encounter Worklists that will be affected by this Rule.
- Select Save [F2].
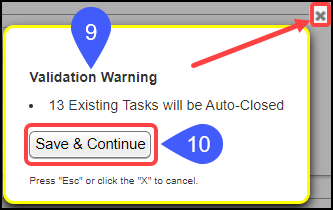
- Validation Warning: A message displays the number of tasks that will be Auto-Closed.
- Select Save and Continue.
- The Rule will be saved and the Existing Tasks shown on the Validation Warning will be Auto-Closed.
- If you do not want to Auto-Close these Existing Tasks, select the X on the popup. The Rule will not be saved and the Tasks will remain as is.
Learn More
Related Articles
Create a Worklist
Worklists can be used to work Tasks and specify the Users to work the Tasks. Worklists can be created from the Worklist screen. Tasks can be added to a Worklist from multiple areas in the System. Examples: Patient Dashboard Encounter Dashboard Query ...Add a Task to an Existing Worklist
There are multiple places to add to a Worklist. The following example shows how to add a Task from the Worklist Tasks screen. Add a Task to a Worklist from the Worklist Tasks Screen On the Worklist screen, select the number link in the Tasks column ...Charge Management Tag and Worklist Assignment
Assign a Tag to a Charge Management Rule Access: Libraries > Charge Management Rules When a Tag is assigned to a Charge Management Rule, and the Charge meets the Rule's criteria, the Tag will be auto-assigned to the Encounter. On the Add/Modify ...Anesthesia System Settings
ANESTHESIA ACTIVATES THE ANESTHESIA FUNCTIONALITY A System Setting must be added to use Anesthesia Billing. This setting will activate the Anesthesia Functionality, add a new System Setting Tab, and allow additional customization. (Admin > System ...Payments System Settings
ADJBALEXCL EXCLUDE CODES FROM ADJUDICATION BALANCED CALCULATION A calculation is performed when manually posting payments to confirm that the payment is balanced. The "does it balance" calculation is: Charge-Allowed-Adjustments=0 If the result is not ...