Add/Modify a Reference Batch
On the Reference Batch List screen, you can add or modify a Reference Batch.
Add a Reference Batch
- From the Reference Batch List page, select Add to create a new Reference Batch.
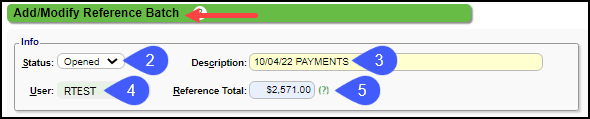
- The Batch Status defaults to Opened.
- Add a Description for the items to be posted. Choose the format that fits your office workflow. Using the same format for the Description each day makes it easier to search by description.
Examples:
- 10/04/22 Copays
- 10/04/22 Charges
- 10/04/22 ERA Payments.
- User ID: If this field is available, choose the User ID from the dropdown. If this field is grayed out, the system has automatically chosen the User.
- Reference Total: Use this field if you know the Total dollar amount of the payments to be entered. The System will highlight in yellow the batches that are not balanced. (Optional)
- Batch Date. This is the Post Date for transactions in the batch. Enter a "T" in the Batch Date field and press the Tab key to auto-populate today's date (T for today).
- The Post Date cannot be a date that is in a Closed Period.
- Example: March 2025 (03/01/25 - 03/31/25) period has been closed. A Reference Batch cannot be created with the Batch Date (Post Date) of 03/01/25 to 03/31/25.
- If you are posting items for only one DOS, Received Date, Facility, Rendering, Billing, Referring, or Supervising, enter the value or select the lookup icon to search.
- If any of these values are entered, the fields will be grayed out on the charge entry screen and cannot be changed on that screen.
- Note: This will only populate the values for New Charges, not Incomplete Charges.
- If the Facility is chosen on the Reference Batch, it will override the address in the Pay To/Billing Location Library.
- The Facility chosen here will be the address that prints on the Receipt.

- Allowable Batch Functions: Use if you want to restrict the functions allowed in the Reference Batch. Defaults to all the boxes being checked.
- Example: If you only want Payments in this batch, uncheck Charges and Demographics.

- Note: Use the Note field to enter Internal Notes regarding this Reference Batch.
- Select Save [F2].

Modify a Reference Batch
- Any field can be modified on a Reference if it is not grayed out.
- A Reference Batch does not have to be Open to modify the fields.
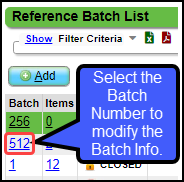
- Select the Batch Number to make changes.
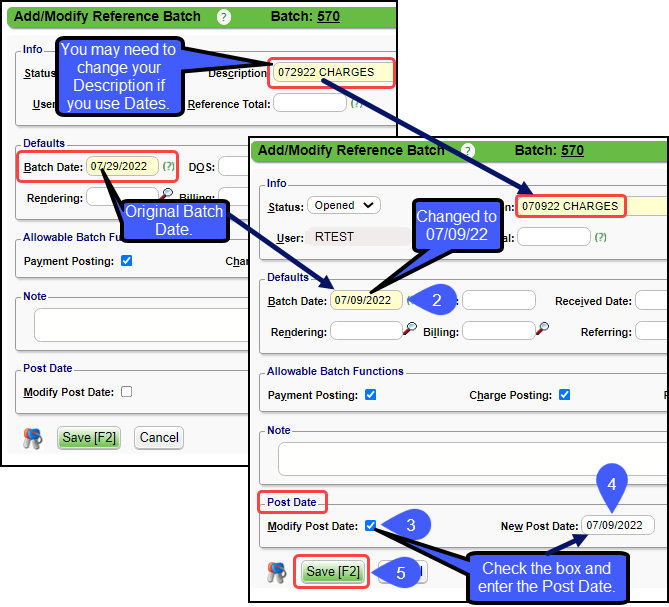
Modify the Batch/Post Date
If a Reference Batch is not locked (not in a Closed Period), the Batch Date can be modified.
- Select the Batch number on the Reference Batch List.
- Batch Date: Enter the new Batch Date for the Reference Batch.
- Modify Post Date: Check the box.
- New Post Date: Enter the same date as the new Batch Date. The date must be entered here to change the Batch Date for the entire Reference Batch.
- Select Save [F2].
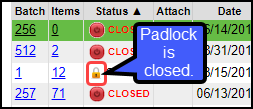
If there is a locked padlock in the Status field, no changes can be made to the Batch Date or Payment amounts.
POPS Reference Batches
POPS Payments have their own Reference Batch that is created automatically by the PM System.
- When the first POPS Payment of the day is made, a new Reference Batch is automatically opened by the PM System with the following criteria:
- Description: API Payments
- User: POPS
- All subsequent POPS Payments with that date are filtered into the Reference Batch.
- The Reference Batch will be closed automatically and should not be closed manually by a User.
- Learn More: POPS Overview
Custom Fields on a Reference Batch
Custom Fields can be added to the Reference Batch screen.
Learn More: Add/Modify Custom Fields
Learn More
Reference Batch Overview
Move an Encounter (Charge) or Receipt to another Reference Batch
Open, Close, Attach, Detach, and Archive a Reference Batch
Reconcile Reference Batch Receipts
Reference Batch List and Details
Reference Batch Report
Reference Batch System Settings
Custom Fields
Related Articles
Post/Apply an ERA
Reference Batch Received Date By default, the Received Date is populated by the Paid Date on the ERA File. If you want the Received Date to be a different Date, there is a System Setting to allow the entry of a Received Date on the Reference Batch ...Create a Patient Receipt/Post Payment Manually
Patient Receipt Creation If the Copay was not entered during the Check-in/Check-out workflow or if your Practice does not use the Calendar: Enter NR in the Navigation box (Go-Cuts) shortcut; Use the Post Payment link on the Patient Dashboard; Use the ...Reference Batch System Settings
ALLOWBATCHFUNC ALLOW ALL BATCH POSTING FUNCTIONS BY DEFAULT Controls whether Reference Batches are created with all allowable functions selected automatically, or if the User needs to select the functions they want to be allowed within the Batch. YES ...Reference Batch FAQs
Access to Reference Batches by User and Role Why am I getting this Validation Error: You must be attached to a Reference Batch? User Access to Add, Modify, Close, or Change a Reference Batch In User Maintenance, you can set who has specific ...Reference Batch Overview
Basic Use of a Reference Batch Using Reference Batches provides a way to balance daily transactions and improve the auditing process. When you enter financial transactions, such as Charges, Payments, and Adjustments), you must be attached to a ...