POPS Groups
A Group is used to define branding and options that determine the Patient experience when using POPS.
- Once a database has been prepared to use POPS, you can create POPS Groups.
- When a Group has been established, the Client and Support Users can begin signing into that Group as a Patient.
- Groups can also be modified after they are created by selecting the Modify icon.
- If the POPS Management button is not visible, you either do not have permission to access it or the Hidden Setting is missing.
Complete the POPS Group Screen
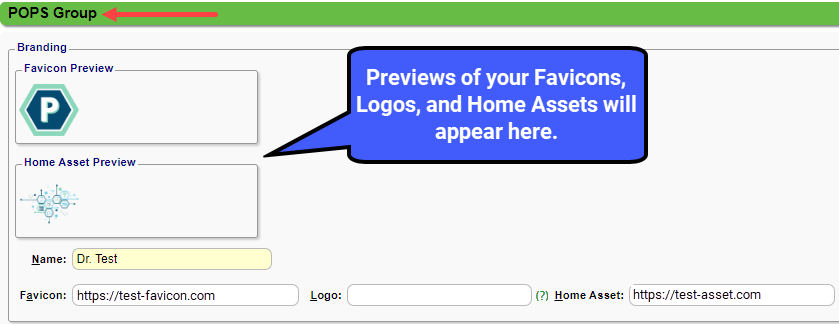
Branding Panel
- From Admin on the Left Side Menu, select the POPS Management button.
- In the POPS Groups panel, select the Add link.
- Enter a Name for the Group, such as your Practice Name.
- Provide a valid URL that hosts your Favicon, logo, and/or Home Asset.
- The logo must be 250 pixels wide and 64 pixels high to display accurately.
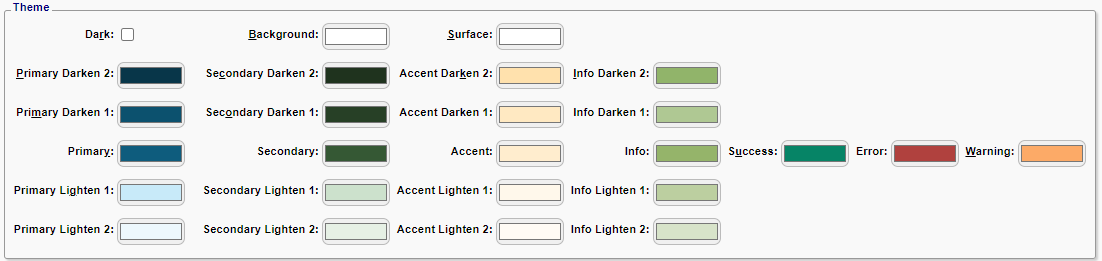
Theme Panel
Choose your color scheme.
- Background Color
- Surface Color
- Primary Colors
- Secondary Colors
- Accent Colors
- Info Colors
- Success Color Indicator
- Error Color Indicator
- Warning Color Indicator
If your selected colors are dark, select the Dark Checkbox to ensure that the text can be read.
Options Panel
Payments Panel
- Enable Apple Pay: Portal Users can pay with Apple Pay when:
- Apple Pay has been activated through the Wind River or CMS portal.
- Browsers/Devices: The Portal User can use a Mac OS, IOS, or a Safari browser.
- Enable Credit Card Transactions: Allows Portal Users to make Payments using a credit card.
- Enable Google Pay: Portal Users can make Payments with Google Pay.
- Google Pay must be activated through the Wind River or CMS Portal.
- Google Pay does not have browser or device restrictions.
- Enable Payment Method Storage: Adds a checkbox for Portal Users to store their Payment information for future use.
- Auto-Post Payments: When a Portal User makes a Payment, the funds will automatically apply to oldest balances first.
- Email Receipt: If this box is checked and an email address is entered, a Receipt will be sent to the User"s email.
- Note: The email field will still be available when making a Payment even if the box is not checked, but the User will not receive a Receipt.
- Require CVV: Portal Users must enter a CVV when attempting to pay.
Look and Feel Panel
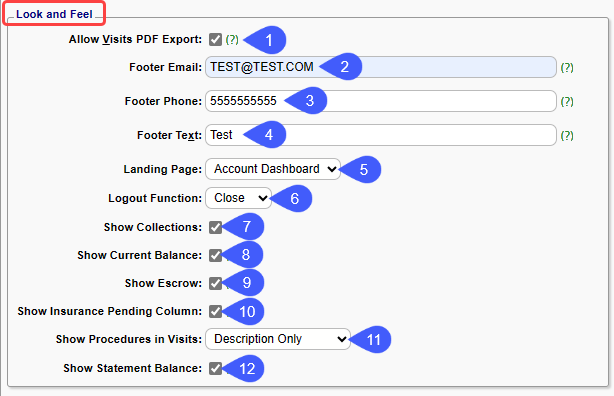
- Allow Visits PDF Export: Portal Users can export their Visit information as a PDF.
- Footer Email: Enter the email to display in the Footer for portal users to direct questions.
- Footer Phone: Enter the Phone number to display in the Footer for portal users to direct questions.
- Footer Text: The information entered here will display in the footer.
- Example: Contact our office with any questions.
- Note: The email and phone number entered above will display after this text.
- Landing Page: This determines the page that will display after the User logs in to POPS.
- Logout Function: This controls what will happen if a logout function is selected.
- Close: Closes the tab/window.
- Logout: Terminates the session and displays the login screen.
- None: No logout/close option will be displayed.
- The session will terminate when the session time has expired.
- Returns to the login screen when the session has ended.
- Show Collections: Adds the Collections Balance panel to the Account Page.
- Show Current Balance: Allows users to view the current total balance of their selected accounts.
- Show Escrow: If checked, Users will be able to see Unapplied funds that are in Escrow.
- Leave unchecked if you do not want the Patient to see Unapplied Funds (Escrow).
- If the Patient has funds in Escrow, a Receipt will be created but not Posted.
- Show Insurance Pending Column: Adds the Insurance Pending column everywhere there is a Patient Balance.
- Insurance Pending: Collections and Insurance Payments that have not been fully adjudicated.
- Show Procedures in Visits options: (The Description is Patient Facing and is setup in Procedure Code Library.)
- None
- Description Only
- Code and Description
- Show Statement Balance: Allow users to view the original balance of their current statement.
- If not selected, Users will only see the Amount Due (and Current Balance is selected above.
- Note: The is relevant when a partial payment has been made which makes the balance due different than the original Statement.
Authentication Panel
- Allow Session Extension: Allows Users to extend the session limit and prompts the User when they have less than 10 minutes remaining.
- If not checked the User will be logged out after 10 minutes.
- MFA Email Body: The content for MFA (Multi-Factor Authentication) emails.
- Note: Must contain ${mfa.code}, which will be replaced when the email is sent.
- MFA Email Subject: The subject line for MFA emails.
- Enable MFA: Allow Patients to fully authenticate themselves using the MFA system.
- MFA Require Opposing Contact Methods: Require users to email MFA if arriving to PatientOPS via SMS or vice versa.
- Require MFA: Patients initially entering the system in quick pay mode are immediately required to complete an MFA challenge.
- MFA SMS Message: Patients initially entering the system in quick pay mode are immediately required to complete an MFA challenge.
- MFA Success Role: Role assigned to users who successfully complete an MFA challenge.
- QuickPay Max Access Attempts: Number of times quick pay links can be used before being invalidated.
- Note: This value must be a number between 1 and 100.
Notifications Panel
- Email From: The email from which notifications like receipt emails are sent.
Patient Permissions Panel
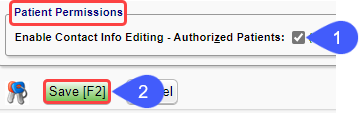
- Enable Contact Info Editing - Authorized Patients: Allow your Patients to manipulate their own contact information when fully authenticated.
- Select Save [F2].
Learn More
POPS Overview
POPS: Full Patient Portal
POPS Pay
Apple Pay
Google Pay
Credit Card Payment
POPS Reports
POPS Setup
Related Articles
Patient Dashboard: Balance Panel
Balance Panel Features Navigation Links Post Charge Opens the Post Charge screen to add a new Charge for the Patient. ERAs Shows the number of ERAs, and the link opens the existing ERA List that is associated with the Patient. Cases Shows the number ...POPS Session Usage Report
The Session Usage Report can be accessed from 2 places within the System: POPS Management Admin > POPS Management > Session Usage Reports Dashboard Reports > Session Usage Use Session Usage to Report on Patient activity within a POPS session. ...Use Reporting Groups
Add Reporting Groups allows the grouping of codes or entities that will commonly be reported together and can be used in multiple Reports. Reporting Groups can be created for the individual Library records, such as, Procedure Codes, Service ...POPS QuickPay
Use QuickPay to make a Patient Payment without the detail of the Full POPS Portal. To mirror the POPS Patient Experience, access QuickPay by using the POPS link in the Balance panel on the Patient Dashboard. QuickPay can be accessed by the Patient ...POPS Overview
Patient Online Payments and Scheduling (POPS) and QuickPay This is a Premium Add-on Feature. Contact Sales for more information. POPS is a Payment Portal providing full integration into the System for real-time balance viewing and effortless posting ...