Patient Copay/Account Payment from Appointment
The payment could be a Copay only or a combination of a Copay and Payment on Account.
Patient Copay entered on the Appointment Screen
- Select the Appointment from the Calendar.
- On the Appointment screen, select the Copay link.
- If a Copay amount is saved in Insurance Management, Enter Copay will be highlighted in yellow with the amount expected for Copay.
- The Post Date auto-populates from the Date entered in the Reference Batch.
- The Received Date auto-populates to today's date.
- If the Post Date is blank, you are not connected to a Reference Batch. Connect to a Reference Batch before continuing.
- If the Post Date is different than the Received date, a warning will display that may indicate that you are not attached to the correct Reference Batch.
- Warning: Your Reference batch date is different than today's date.
- Enter the total Received amount in the Check, Cash, or Card field.
- For Credit Card Payments see: Process Credit Card Payments)
- The Copay amount auto-populates from the amount entered as the Received Amount.
- If the Received amount is the Copay and Payment on Account, change the Copay field only to reflect the Copay amount.
- The Reference/Check Number can be used to enter the check number and any other pertinent information.
- POS defaults to Yes when the Payment is added from the Appointment screen.
- Point of Service: Payment was made in the office.
- Note: Pre-populates with the Appointment Type.
- Additional Notes can be entered.
- Receipts with Escrow: All Receipts that have an amount in Escrow will be displayed.
- Select Save [F2] to save the Post Visit Copay screen, or select Save/Print to save the screen and print a Receipt.
Patient Copay and Payment on Account (POA) entered on the Appointment Screen
- Select the Appointment from the Calendar.
- On the Appointment screen, select the Copay link.
- If a Copay amount is saved in Insurance Management, Enter Copay will be highlighted in yellow with the amount expected for Copay.
- The Post Date auto-populates from the Date entered in the Reference Batch
- The Received Date auto-populates to today's date and is mandatory.
- If the Post Date is blank, you are not connected to a Reference Batch. Connect to a Reference Batch before continuing.
- If the Post Date is different than the Received date, a warning will display that may indicate that you are not attached to the correct Reference Batch.
- Warning: Your Reference batch date is different than today's date.
- Enter the total Received amount in the Check, Cash, or Card field.
- For Credit Card Payments see: Process Credit Card Payments
- The Copay amount auto-populates from the amount entered as the Received Amount.
- Since only part of the Payment is the Copay, change the Copay to the Copay amount of the Received Amount.
- The rest is money to be posted on the Account balance.
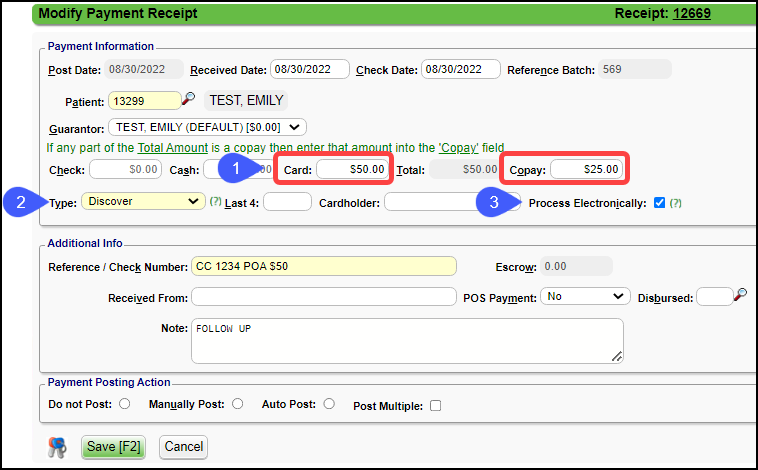
- Example:
- The Patient pays $50 by check.
- $25.00 is for the Copay and $25.00 is for payment on the Patient's account (POA) balance.
- $50.00 is entered in the Check field;
- $25.00 is entered in the Copay field.
- Use the Reference/Check Number field to notate the Check # and POA amount (Total paid minus copay=POA).
- In the example above the POA = $25.00
- POS defaults to Yes when the Payment is added from the Appointment screen.
- Point of Service: Payment was made in the office.
- Note: Pre-populates with the Appointment Type.
- Additional Notes can be entered.
- Receipts with Escrow: All Receipts with Escrow for this Patient can be viewed, opened, and/or posted.
- Receipts can be opened by selecting the Receipt Number.
- The Front Desk User may not have permission to open or post the Receipt since the Biller usually does the posting of the Receipts to Encounters.
- Select Save [F2] to save the Post Visit Copay screen, or select Save/Print to save the screen and print a Receipt.
- Print the Patient Receipt by selecting the Print Receipt [F2] button.
Process a Credit Card Payment from the Calendar
Create the Payment Receipt
Follow the Steps above with the exception of:
- Enter the Payment Amount in the Card field.
- Only the Copay amount should be in the Copay field.
- Choose the Type from the dropdown, such as Visa, MC, Discover, etc.
- Process Electronically: Defaults to checked.
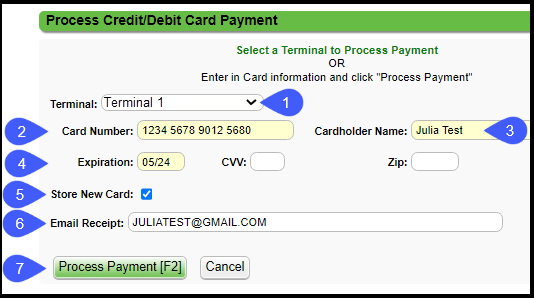
Process the Credit Card Payment
- On the Popup screen, choose the Terminal.
If this is a new Card
- Enter the card number
- Enter the Cardholder's name as it appears on the Card.
- Enter the Expiration Date. The other fields are optional.
- To store the New Card, select the Store New Card checkbox.
- If applicable, enter the Patient's email to send a Receipt via email.
- Select the Process Payment [F2] button.
*******Wait until the Card is processed before closing the screen.*******
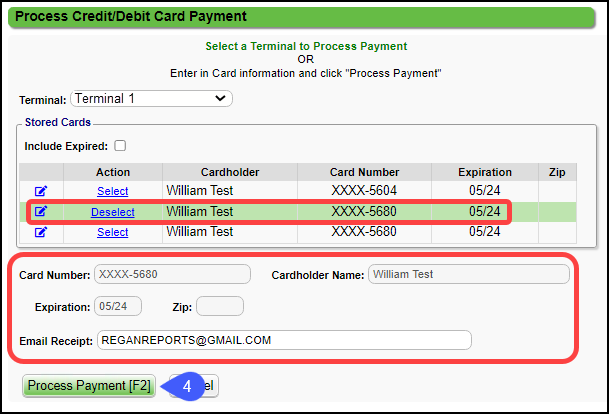
If this is a Stored Card
- Select the Terminal.
- Choose the Select link on the credit card line to populate the Credit Card fields.
- If the Stored Card needs to be updated, select the Modify icon to make the changes.
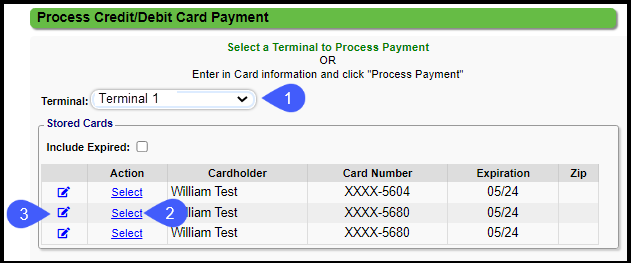
- Select Process Payment [F2].
Patient EFT Payments (Venmo, PayPal, CareCredit)
If a Patient pays using services like Venmo, PayPal, or CareCredit:
- Follow the directions above with the exceptions below:
- On the Patient Receipt, enter the Payment amount in the Card field.
- Choose the vendor, such as PayPal, from the Type dropdown.
- If the option is not in the dropdown, select Manage to add it.
- Deselect Process Electronically.
Learn More
Add Credit Card Copays/Patient Payments on the Patient Dashboard
Print a Patient Receipt
Post a Patient Copay in the Procedure panel when posting Charges
Related Articles
Add/Process a Credit Card Payment
Add/Process a Credit Card Payment A Receipt can be created for a Patient or an Insurance Credit Card Payment. You must have merchant (credit card) service integration in place for this feature to be available. If you are not using one of the System ...Copay and Payment on Account Balance
Enter Copay from the Appointment Dashboard On the Patient's Appointment, select Enter Payment. In the Check, Cash, or Card fields enter the full amount received. In the Copay field, enter only the Copay amount. If this contains a Payment on Account, ...Patient Appointment Screen
When you select a Patient's Appointment on the Calendar, it opens the Patient's Appointment screen which displays: Banner Patient's name DOB/Age Appointment Type Additional Patient Information Phone Numbers Address Patient's Insurance Appointment ...Create a Patient Receipt/Post Payment Manually
Patient Receipt Creation If the Copay was not entered during the Check-in/Check-out workflow or if your Practice does not use the Calendar: Enter NR in the Navigation box (Go-Cuts) shortcut; Use the Post Payment link on the Patient Dashboard; Use the ...Pair your Device and Process a Credit Card Test Payment (Nexio)
Pair your Device and Process a Credit Card Test Payment (Nexio) This workflow only applies if you are using Nexio as your Merchant Services provider. Virtual Credit Card Device If you do not have a physical card reader, the Credit Card Processing ...