Manage ERAs from the ERA List Screen Using Filters
To access the ERA List screen, from Payments on the Left Side Menu, select the All ERAs link on the Payments Dashboard.
- All ERA categories can be managed from this screen.
Filter Criteria
Use the Filter Criteria to qualify which ERAs to view.
Examples:
- Display the ERAs from oldest ERAs to newest: Use the Loaded From and Loaded To Dates or the Paid From and Paid To Dates to display a specific time period.
- The list will be in newest to oldest order.
- To reorder from oldest to newest, click the column title twice: Loaded or Paid
- Display a specific Payer's ERAs, such as Medicare: Enter or use the Lookup icon on the Insurance filter.
- Display a specific Tax ID: Enter a Tax ID to display only ERAs with that Tax ID.
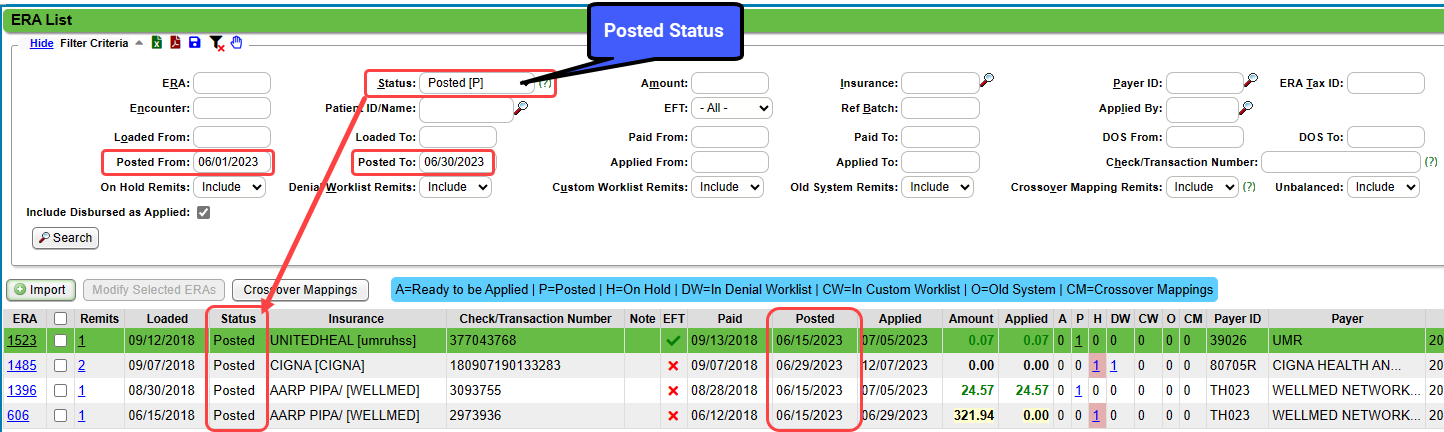
Status
- Choose the Status from the Status dropdown menu.
- Create your own Statuses
- All: Does not include Archived or Duplicates.
- Loaded (Default): Displays only ERAs that have not been Applied.
- Applying: Displays for ERAs that are in the process of being applied..
- This status prevents Users from Applying an ERA that is in the process of being applied and will display the error message "ERA is already being applied."
- This Status will update to Posted when complete.
- Posted: Shows only the Status of Posted.
- It does not include Archived, Duplicate, Posted Manually, or custom Statuses even if the ERAs have been Posted.
- These Statuses must be chosen Individually.
- Duplicate: Choose Duplicate from the dropdown.
- Posted Manually: Choose Posted Manually or All from the dropdown.
- Archived: Choose Archived from the dropdown.
- Use of the following filters will enhance your search capabilities for Posted ERAs.
- Change the Status filter to All, Posted, or Archived to utilize these fields.
- DOS From and DOS To
- On Hold Remits (Include/Exclude/Only): Includes or Excludes Remits that have a number greater than zero in the H (Hold) column.
- Denial Worklist Remits (Include/Exclude/Only): Includes or Excludes Remits that have a number greater than zero in the DW column.
- Custom Worklist Remits (Include/Exclude/Only): Includes or Excludes Remits that have been assigned to a Custom Worklist with a number greater than zero in the CW column.
- Old System Remits (Include/Exclude/Only): Includes or Excludes Old System Remits with a number greater than zero in the O column.
- Unbalanced (Include/Exclude/Only): Include or Exclude Remits where the Amount column is not equal to the Applied column.
- Crossover Mapping Remits (Include/Exclude/Only): Mappings for claims that have been crossed to Secondary Payer where the Secondary Insurance is in the Library but not on the Encounter’s Insurance Profile.
- Applied By: User Lookup for person that Applied the Remit. On the ERA List report, hover over the person’s ID in the Applied By column to see the date and time the Remit was Applied.
- Check/Transaction Number: Spaces at the beginning or the end of the Check Number will be removed automatically.
- ERA Tax ID: Pulls the Tax ID list from the Pay To/Billing Location Library
- Selecting the All Status does not pull Archived or Duplicates.
- To see the Archived, Posted Manually, and Custom Statuses, choose these Statuses in the dropdown.
- Review all Applied ERAs for DW (Denial Worklist), and H (Holds)
- These may have money in Escrow that needs to be posted.
- All Holds (H) will be highlighted in red in the H column.
- All DWs will be in the DW column.
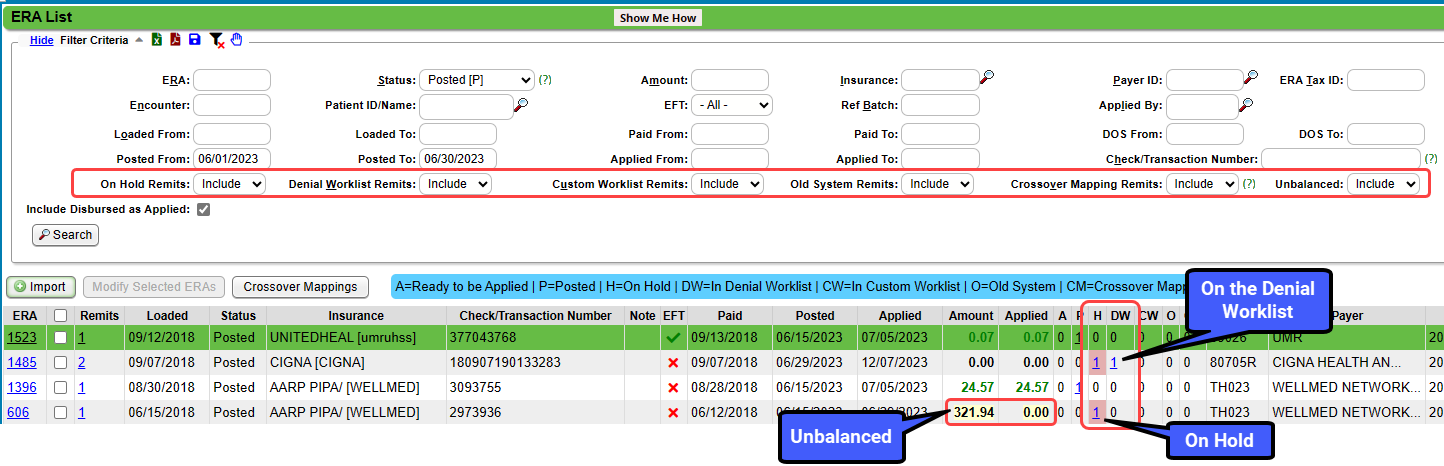
- Use the yellow highlighted items in the Amount and Applied columns to verify that the ERA is balanced and to help identify issues, such as, Provider Level Adjustments.
Create an ERA File Status
- Select an ERA number on the ERA List screen.
- On the ERA File Dashboard, select the Modify link.
- Choose Manage on the File Status dropdown.
- Select the Add button.
- Enter a Code.
- Enter a Description.
- Select Save [F2].
- Close the Lookup Items screen using the X in the upper right corner.
Update an ERA's File Status
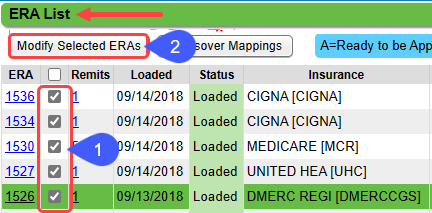
- On the ERA List, select one or multiple ERAs.
- Select Modify Selected ERAs.
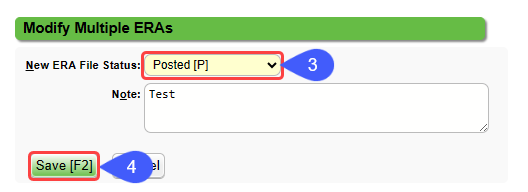
- Select a Status in the New ERA File Status dropdown.
- Select Manage to add a new ERA Status.
- Select Save [F2].
Learn More
Payments System Setting: ERAVIEW
Related Articles
Post/Apply an ERA
Reference Batch Received Date By default, the Received Date is populated by the Paid Date on the ERA File. If you want the Received Date to be a different Date, there is a System Setting to allow the entry of a Received Date on the Reference Batch ...ERA FAQs
ERA FAQs Archived ERAs How do I Archive ERAs? Update an ERA's File Status Where do I find Archived ERAs? Status Claim Type Why does the ERA Claim Type say it is Processed as Tertiary when the Patient only has a Primary Insurance? The Claim Type comes ...Add/Map an Insurance or Payer ID to an ERA
If you see this message when applying ERAs, you will need to add the ERA Payer ID to the Insurance Library and then to the ERA. SORRY CANNOT POST ERA. Insurance ID Payer ID number is missing from Remit File OR When a Remit goes on hold for a similar ...Apply ERAs Using the Job Scheduler
Using the Job Scheduler provides the option to auto-apply ERAs using a set of Criteria. Multiple Jobs can be created to meet your needs. The Job Criteria determines how the ERA is posted, such as: Apply by Paid Date By ERA ID Specified order to post ...ERA Management Profiles, Rules, and CARC Crosswalk
Use caution when changing ERA Rules. Test updates with relevant ERAs when possible, and closely monitor ERA application after adding, modifying, or removing any ERA Management Rules. ERA Management Profiles, Rules, and CARC Crosswalk Overview ERA ...