Workers Comp and Jopari Electronic Attachments
Attach Documents using the Claim Attachments Link

This is a Premium Add-On feature.
Create a Manage Services Ticket for Jopari setup and activation of this feature.
The Electronic Document attachment works independent of a connection to an EHR/EMR, but does require the use of Jopari.
After activation, you can manually upload an attachment to the Encounter.
- The PWK segment is added automatically to the ANSI 837 (Electronic Claim).
- The filename links the attachment to the Claim.
- The Claims File Indicator (CFI) on the Insurance must be WC.
- The Electronic Attachment is sent to the Clearinghouse when the Claim batch is uploaded.
Attach the Document
- To add documentation on the Encounter Dashboard, select the Add link in the Claim Attachments panel.
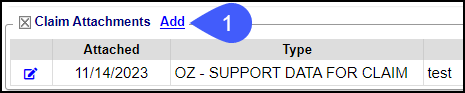
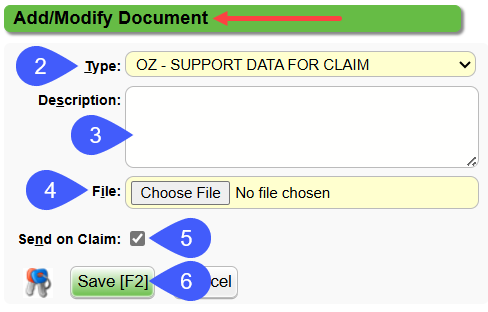
- Choose Type from the dropdown.
- Description: Optional field used to identify specific documents.
- Select the File to attach.
- Send on Claim: Selected by default.
- Select Save [F2].
Claim Attachments Panel

In the Claim Attachments panel, details of the attachment can be viewed and changes can be made.
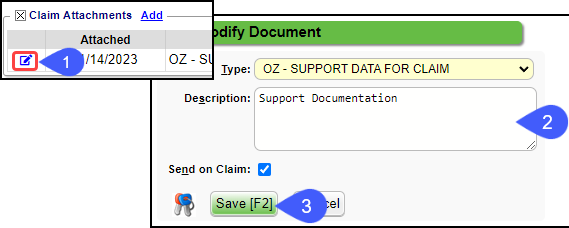
- Modify icon: Select to make modifications to the Type and Description.
- Attached: Date the Document was attached
- Type of Document attachment.
- Description of the Document.
- Claim File Name
- The File Name is the Tax ID_Patient Encounter_DOS_Document number. The Document number is in the order the Document was attached.
- File Name example:
- 230000000_10111E78945_20220125_1
- 230000000_10111E78945_20220125_2
- File Extension
- Upload Status
- The Attachment will be sent to the Clearinghouse when the Claim is Uploaded.
- Uploaded is indicated by an upload date.
- Not uploaded is indicated by a red X.
- The PWK Segment is added automatically to the electronic 837 claim file.
- Send on Claim: Determined by the Send on Claim checkbox.
- View column
- Select the Open link to view the Document.
- Select the Delete link to remove the Document.
- A Document can only be Deleted if it has not been uploaded.
- Select the Print icon to print the attachment.
- The Print icon only appears when the attachment is a PDF or an image.

Modify the Attachment Type and Description
- In the Claim Attachment panel, select the Modify icon
.
- Make your changes.
- Select Save [F2].
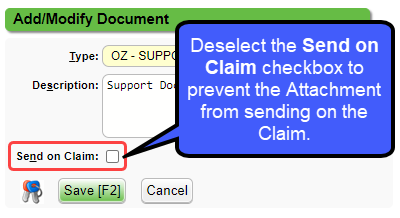
Prevent an Uploaded Attachment from Sending on the Claim
If an Attachment should not be sent on the Claim, deselect the Send on Claim checkbox.
Print or Save Attachments
- In the Action column, choose the Open link.
- Select the Print or Save icon on the opened Attachment to print it for a paper claim or to save locally.
Policy Requirements
- Insured Relationship MUST be 20.
- The Employer must be added to the Employer/Attorney Library as Type: Policy Holder Only.
- The 2010CA will only show on the electronic claim if the Insured Relationship is 20.
Insurance Library Requirements
The Jopari Payer IDs are preceded by JOP.
- Using the Clearinghouse Payer List, select Jopari ONLY.
- Add the Payer to the Insurance Library by selecting the checkbox and then select Add to Insurance Library or add it manually.
If you cannot find a Payer ID
- If you want the Clearinghouse to print and send them.
- Select JPRINT as the Claims Payer ID
- Select Electronic for Primary Form Type and select HCFA for Secondary and Tertiary Form Types.
- The Clearinghouse will print and send the Claims for you.
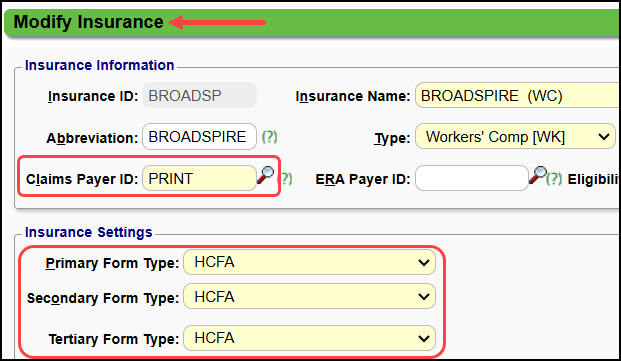
- If you want to print the HCFA in-house:
- Select PRINT as the Claims Payer ID
- Select HCFA for all Form Types.
- These will be printed locally with manual Attachments.
Tags
If you have a claim that needs an attachment that is not yet available, you can use a TAG to hold the claim.
Example: Create a Tag, Waiting on documentation, and attach it to the Encounter..
This holds the claim until the documentation is available and the claim is Ready for Submission.
Local Edit, Clearinghouse, and Payer Rejections
Clearinghouse Rejected [CE]
Reason: Jopari requires the patient (dependent) loop on all claims.
Fix: Update the Relationship to 20 and resend the claim.
Reason: Jopari Workers Comp Claims require a Related Cause Indicator on the claim.
Fix: Add the Accident Date/Related Cause to the claim and resubmit. In the example, it is added on the CASE.
Payer Rejected
- Requests for additional Information/Documentation or Requests for additional supporting documentation.
- Examples: Usually this pertains to a second attachment request for certification, x-ray, or notes.; Supporting documentation. Usage- At least one other status code is required to identify the supporting documentation.;-OZ Support Data for Claim-;
- Process: Resend the claim with the corrected attachment.
Claim Investigation Recommendations
Client Investigation: Clients should investigate delayed claims directly with the Insurance Payer.
Questions to ask the Insurance Company
Receipt Date: When did the Insurance Company receive the claim?
Claim Status: What is the current status of the claim?
Has it been received, processed, or is it pending review?
Reason for Delay: If the claim is delayed, what is the specific reason for the delay?
Is there missing information, documentation, or a need for further investigation?
Reason for No Payment: Why is this Claim not being paid?
Contact Information: Who is the specific claims adjuster or representative handling the Claim?
What is their direct contact information (phone and email) for follow-up?
If after speaking with the Insurance Company, there is a concern that there was an issue with the Claims submission:
Open a ticket with our Support team.
Provide the following information, as applicable:
Receipt Date
Claim Status
Reason for delay
Reason for no payment
Support will conduct a review of the information provided.
After confirmation of a submission problem, Support will escalate the issue with the Clearinghouse.
Related Articles
Add a Case for Workers Comp
Workers Compensation Case Cases allow specific information for repeated Charges and Appointments per patient. Workers Compensation Policy The Insurance Profile for Workers Comp should be added first. See Workers Compensation Policy Profile. Add a ...Workers Comp FAQs
Workers Comp FAQs Accident Date Where do I enter the Accident Date? Enter the Accident Date on Workers Comp ClaimJopari Rejections
Jopari, a third-party clearinghouse that handles Workers Compensation Claims, provides Payer Rejections that may not align with typical Payer Rejections. The following should be included on Claims that are sent to Jopari: SSN WC Address Authorization ...Worker's Compensation Policy Profile
The System has the flexibility to meet your State's unique requirements for Workers Comp Claims. The Policy Profile and the Case must be set up on the Patient. If there is another Policy Profile on the Patient, the Workers Comp Policy Profile must be ...Payer Rejections
Acknowledgement/Receipt PE: A6 -A1-;Acknowledgement/Receipt-The claim/encounter has been received; Payer-A7-;Rejected for Invalid Information;HCPCS;S9999 This does not mean that the claim has been accepted for adjudication.;Entity acknowledges ...