Tags Library
Before using Tags, set up a Tag Library. Pre-planning will be helpful before the library is created. These are some things to consider..
- How can Tags improve your workflow?
- Plan how you want your Tags to be handled in the workflow of your billing.
- If you use Custom Claim Statuses, which ones can be replaced with Tags?
- Determine what names you will give the Tags.
- Decide the color you want for each Tag.
- Which specific Tags do you want to be on a Worklist?
- Who will work each specific Tag?
For more ideas, see TAGS Show & Tell.
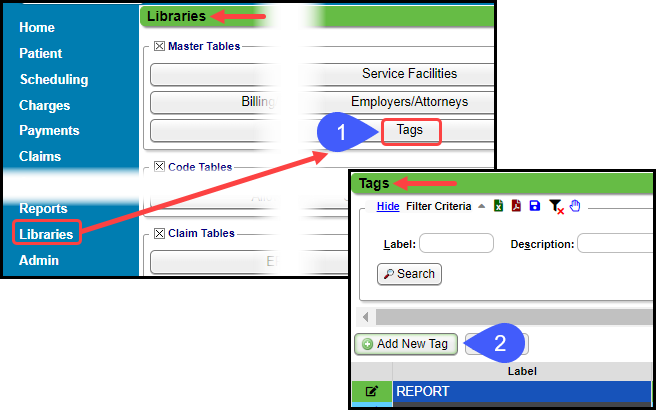
Create a Tag Library
- From Libraries on the left Sidebar menu, choose Tags.
- Select Add New Tag.
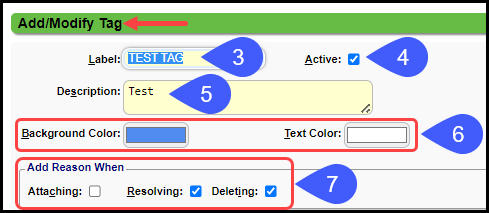
- Label: Enter a short name for this Tag.
- Active: When checked, the Tag will be available
- Enter a Description for the Tag. This will display when a user hovers over a tag in the system.
- Background Color and Text Color: Choose a color for the background and a color for the text. If the background is dark, choose white for the text.
- Add Reason When: Select which instances a reason will need to be entered on the Tag. The selected fields will be mandatory when performing that action.
- Attaching
- Resolving
- Deleting
Attach a Worklist to the Tag
If a Worklist is attached to a Tag, a Worklist Task will be created when the Tag is assigned to an Encounter. When the Tag is resolved on the Encounter, the Task will be completed in the Worklist.
- Select an existing Worklist or add a Worklist.
- A Worklist can be added by using the Loopup icon on the Worklist field and by selecting the Add button.
- Priority: Select from the Priority dropdown menu (Optional).
- Status: Select a Task Status from the Status dropdown menu (Optional).
- Assignee: Assign the Tasks to a User, if applicable.
- Closed Status: Select the Closed Status you want to use when the Task is completed.
- Limit the number of Tasks that will be created.
- Any number of Tasks over the set number will be moved to a Task queue.
- Tasks in the Queue will be removed from the Queue when the Task list number drops below the selected number.
- Task Priority: Select the order that you want the Tasks displayed.
- Oldest DOS: Oldest DOS to Newest DOS
- Largest Balance: Largest Balance to Smallest Balance
- Oldest DOS, Largest Balance: Ordered by Oldest DOS first and then by the largest balance.

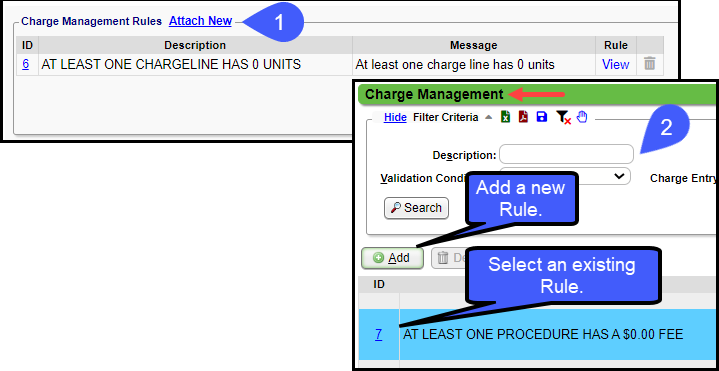
Attach a Charge Management Rule
- Select the Attach New link.
- Choose an existing Charge Management Rule or create a new Rule.
Other Options in the Charge Management Rule Panel
- Open the Charge Management Rule by selecting the ID link.
- Changes can be made to the Rule.
- Hover over the View link to display limited criteria of the Charge Management Rule.
- Use the Trash Icon to delete the Charge Management Rule from this Tag.

Select the Tag Attribute
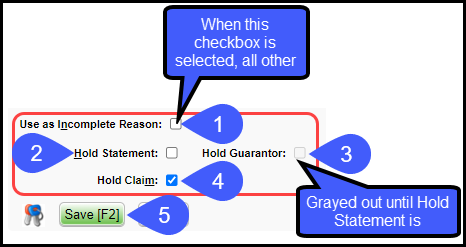
- Use as Incomplete Reason: If chosen, the Tag will be available during the Incomplete Charge validation on the Post/Modify Charge screen.
- The options below will not be available if this is checked.
- Hold Statement: Holds Statement for the Encounter if selected.
- Hold Guarantor: This checkbox becomes available when Hold Statement is selected and will hold all Encounters for a Guarantor.
- Hold Claim: Holds the Claim for an Encounter.
- The Claim will not be transmitted until the Tag is resolved.
- Select Save [F2].
Tag Attribute Visibility
In the Tag Library, the attributes of the Tag are visible without opening each Tag.
Learn More
Related Articles
Tag FAQs
Guarantor Does the Hold Guarantor Tag Attribute affect all Patients connected to the Guarantor? Hold Guarantor Tag If Hold Guarantor is selected on a Tag, all Encounters attached to the Guarantor will be held. If there are several Patients that are ...Tags Overview
The goal of Tags is to replace the need for Encounter Custom Claim Statuses which will give better access and functionality when working Charges. One of the key advantages of using Tags is that multiple tags can be attached to an Encounter. Access to ...Tag Workflows: Attach, Resolve, Delete
Tags can be worked from several areas in the System. Tagged Encounters Dashboard Encounter Dashboard Patient Dashboard (Balance Panel) Note: Tags that appear on the Patient Dashboard in the Balance Panel are Encounter Tags. Encounters by Status List ...Charge Management Tag and Worklist Assignment
Assign a Tag to a Charge Management Rule Access: Libraries > Charge Management Rules When a Tag is assigned to a Charge Management Rule, and the Charge meets the Rule's criteria, the Tag will be auto-assigned to the Encounter. On the Add/Modify ...Claim FAQs
Claims Stuck Why are Claims stuck in the status of Ready for Submission? Claims are stuck in Ready for Submission Examples: The most common reason is that the Reference Batch is not closed. It will be listed in the Claims Submission Queue as Open ...