Customize the Encounter by Status Panel (Claim Status)
Change the Order of the Claim Statuses
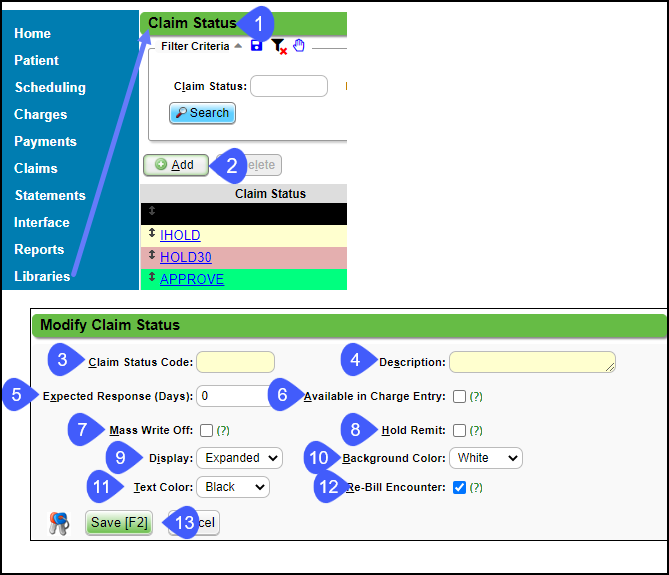
On the Libraries screen, select the Claim Status button.
Change the order the Statuses appear in the Encounters by Status list by using the up/down arrows to drag and drop.

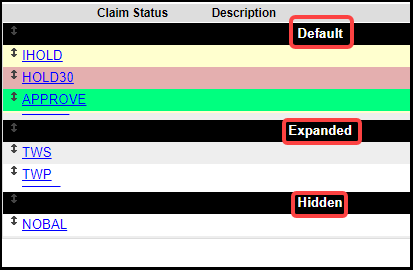
Claim Status Sections
Default: Shows by Default
Expanded: This shows when the Plus icon is selected.
Hidden: This shows when the
Plus icon is selected and the checkbox to
Include Hidden Statuses is selected.
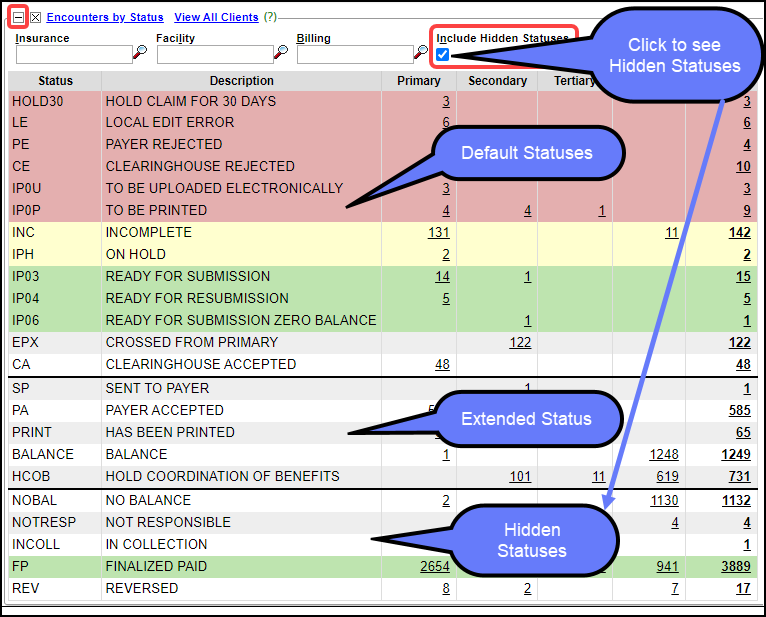
Section Views on the Encounter by Status Panel
Default View

Default, Extended, and Hidden Status View
Add a Custom Claim Status
On the Libraries screen, select the Claim Status button.
Select the Add button to create a new Status.
Enter a Claim Status Code: Abbreviated version of the Description.
Enter a Description.
Expected Response (Days): Do not show Encounters on the
Encounters by Status panel until the specified amount of days has passed.Available in Charge Entry: Select the checkbox to make available during Charge Entry.
Mass Write Off: Select to make this code available on the Mass Write Off function.
Hold Remit: Select to place an ERA Remit on Hold.
Display: Choose where you want this Claim Status Displayed.
-
Default
-
Extended
-
Hidden
Background Color: Choose the background color for this Claim Status.
Text Color: Choose the text color for this Claim Status.
Rebill Encounter: Select if you want the System to Rebill the claim automatically and Change the Claim Status to Ready for Submission/Resubmission when modifying an Encounter with this Claim Status.
Save [F2].
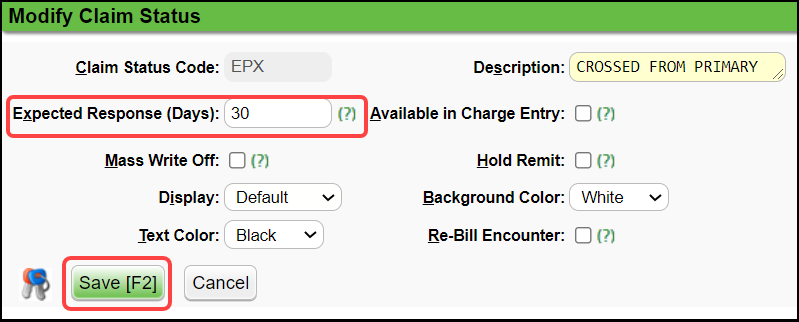
Customize the Crossed from Primary (EPX) Status

Expected Response Days
-
Select
EPX.

-
In the
Expected Response (Days)
field, enter the approximate number of days that it will take the Secondary to pay after the Primary pays.
-
Select Save [F2].
Place a Claim on Hold
Related Articles
Custom Encounter Query (CEQ)
The CEQ is a Custom Query that queries Encounter Data. Access the CEQ Report by selecting Reports on the left side menu. Select Custom Encounter Query in the Transactions panel. Build a Custom Encounter Query Filter Criteria: Add your filter criteria ...Real-Time Claim Status
*This is a Premium Add-on feature. Common Problems with manually checking Claim Status Challenge of timely follow-up on Insurance Claims that are delayed or have no response from the Payer. A Claim can appear to be Payer Accepted, but the Claim has ...Charge/Claim FAQs
Charge/Claim FAQs Attachments How do I indicate there is attached paperwork? Attached Paperwork Attending Physician What is an Attending Physician? Attending Physician An Attending Physician is the one who is responsible for the overall care of a ...Map a Crossover Insurance To an Existing Insurance
Insurance Mappings for Crossover Remits This applies to any Insurance where the Claim is a crossover to a secondary or tertiary Payer. Examples: Medicare and HSA plans. Insurance Plans that electronically send the claim to the Secondary or Tertiary ...Custom Query Reports Hub
Custom Query Reports (CQR) Custom Encounter Query = CEQ Custom Receipt Query = CRQ Custom Transaction Query = CTQ Custom Patient Query = CPQ Custom Appointment Query = CAQ Overview Filters and Criteria Create a CQR CEQ CRQ CTQ CPQ CAQ Overview Custom ...