Statements/Invoices Management Dashboard
The Statement Management Dashboard provides breakdowns of the batch counts, dollar values associated with the batches, and the status of the batches.
Before Statements/Invoices can be sent, Profiles must be set up.
Learn More: Statements/Invoice Profile Setup
Navigation of the Statement Management Dashboard
(Select Statements on the Left Side Menu)
History Panel
- Learn more: Encounter Statement History can be viewed using the Statement History button in the Actions panel on the Encounter Dashboard.
Create Cycle Batch: Manually create a Statement Cycle Batch.
Cycle batches can be created by the Job Scheduler, which eliminates the necessity of manual creation.
However, it is recommended that you start with creating batches manually before using the Job Scheduler.
Create On-Demand Batch: Select this button to run Individual Statements on-the-fly.
Print one Statement by Patient ID or Guarantor ID with the option to Add all Patients for the same Guarantor.
Invoices have additional options.
Print a previous Batch with the option to include all Errors or just the status of Error.
Print specific DOS, Post Dates, or Responsibility Dates.
Statement Profiles: Select to navigate to Statement Profiles screen where Profiles can be Added, Edited, Archived, and Message Templates can be created.
Statements/Invoices within Cycle Days Panel
This panel categorizes Statements/Invoices by their Status across all Batches within the Cycle Days determined by the setup in Admin > Statement Profiles > Add or Modify > Cycle Days.
- Example: If the Cycle Days = 28, Statements/Invoices batched in the last 28 days will display.
- The Statuses shown reflect the Statuses given to the Statement Batch Items.
- Error: These are Statement Batch Items that were not Mailed due to an Error.
- Select the Items number link to troubleshoot the Errored Batch items.
- Not Yet Mailed: Number of Items that were Batched but not Mailed.
- This Status does not show Errored Statements.
- The batch may simply be a Statement/Invoice batch that just needs to be uploaded.
- Mailed: Number of Items that were Batched and Mailed successfully.
- Will Not Send - Payment Made: Electronic notifications that won't be sent due to a payment made that satisfies the minimum required Payment Rule. Learn More
- Total Unique Statements: Total number of Statements that have Batched in the set Cycle Days.
- The number of Items in the Error, Not Yet Mailed, and Mailed Statuses does not need to equal the number of Items in the Total Unique Statements row.
- An item can display in multiple categories, so the Total Unique items may be less than the sum of the various categories.
- Last Batch displays the last Batch number that was created.
- Select the Batch number to navigate to the Statements Batch Dashboard.
- Date Created: The date the last Batch was created.
- Number of Statements Batched in last 24 hours.
- Number of Statements Batched in last 7 days.
Batches to be Sent/Processed Panel
- Statement/Invoice Batches are split into batches that are clean and ready to upload and those that have Exceptions (Errors).
- Exceptions Batches need to be reviewed before sending. There are various reasons for Exceptions.
- Missing Addresses
- The Patient has Escrow (Payments that have not been applied) and/or the Patient has a credit balance.
- The Patient or Guarantor is deceased.
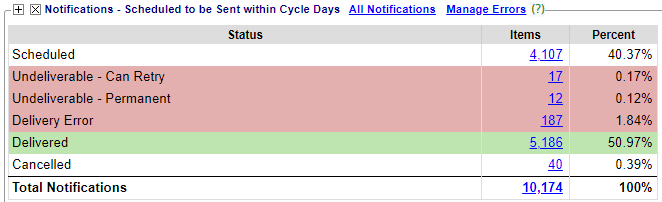
Notifications Panel (**Premium Add-On**)
- Shows all Notifications Scheduled to be Sent within the Cycle Days.
- Number of Notifications with Percentages for each status.
Address Corrections Panel
- Address Changes to Review

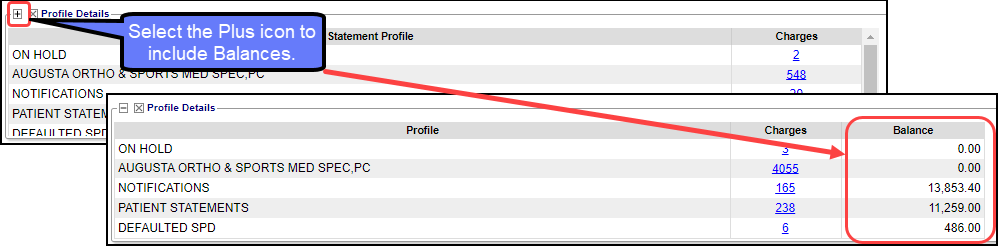
Profile Detail Panel
- Number of Encounters for each Statement/Invoice Profile.
- Select the Plus icon to include Balances.
- Only Encounters with a positive Patient Balance that qualify for a Statement are shown.
Archived: When a Statement/Invoice Profile is made inactive, it will show in the Profile Detail panel.
None: The number on the right represents the number of Encounters that are missing an assigned Statement/Invoice Profile.
It is recommended that a Profile be assigned.
Pre-Collections/Collections Panel
Collections Management Panel (Release 4.10 coming soon)
Learn More: Collections Management
Related Articles
Access Statement/Invoice Batches
Access Statement/Invoice Batches Use the Navigation Search field Enter stb in the Navigation Search field and enter The Statement Batch History screen displays If you know the Statement Batch number, enter stb space and the statement batch number ...Statements/Invoices Overview
Statements/Invoices Overview Statement and Invoice Profiles must be set up before Statements can be sent. Statements and Invoices must be set up separately. Both require Proofs to be approved. Statement Profiles Setup Statement/Invoice Test Batch and ...Statements/Invoices Troubleshooting
Troubleshoot Statements/Invoices Check the Statement Batch Status Created: The Batch has been created, but not uploaded. Uploading: The Batch is in the process of Uploading to the Statement Department. Accepted: The Statement was received by the ...Address Corrections on the Statement/Invoices Management Dashboard
Address Corrections on the Statement/Invoices Management Dashboard Address Corrections - Needs Changed/Do Not Mail Panel Addresses in the Address Corrections panel of the Statement Management screen need to be reviewed. Either the System could not ...Statement/Invoice Profiles Setup
Statement/Invoice Profiles must be set up before Statements or Invoices can be batched. If the Statement Profile is selected as the Default, it will be attached to new Patients automatically. Other Statement/Invoice Profiles can be created to be used ...