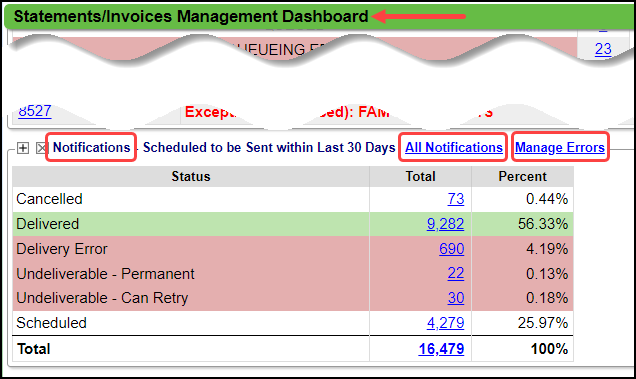
Statement Notifications Panel
The Notification panel is found on the Statements Management Dashboard.
- All Notifications: Redirects to the Balance Notification History page (unfiltered).
- Manage Errors: Redirects to the Balance Notification History page (filtered for Errors).
- Breakdown of Statuses with Total for each Status to open and the percentage.
- Select the Total number link to view the Statements in that Status
Manage Errors
Usually, errors need an address updated or a new email address requested.
- Once the errors are corrected and Statements are batched again (either by the Job Scheduler or On-Demand), and the Notification is successfully sent, the Guarantors error notification will be removed from the error table automatically.
Working the Errors
- On the Statements Management Dashboard, select the Manage Errors link to open the Notifications screen where All Errors can be managed.
- Use the Filters to limit the errors to view.
- Notification Type: View a specific Type
- Example: SMS or Voice
- Status: View specific errors only.
- Statement Type: Select a Statement Profile to view.
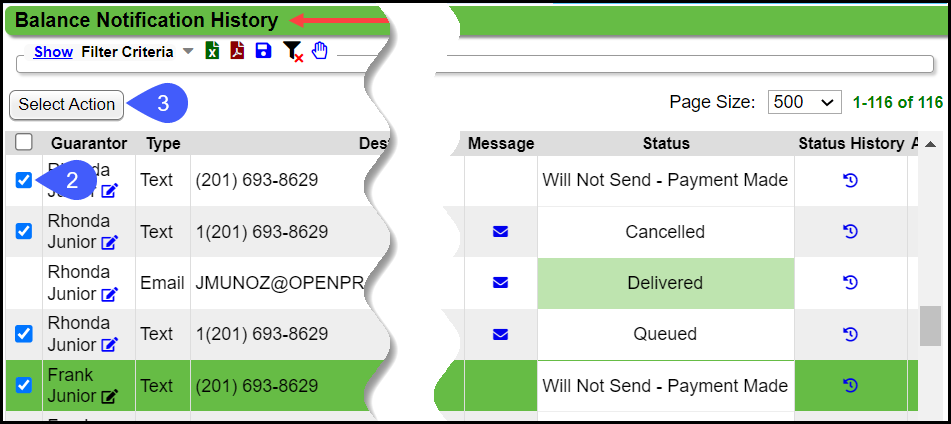
- Notification Actions Checkbox: For Undeliverable-Permanent you can Cancel, Archive, or Cancel and Opt Guarantor Out.
- Select one or more checkbox(es).
- Choose the Select Action button.
- Select the Action.
- Guarantor Modify icon: Opens the Add/Modify Guarantor screen where information can be modified and Notifications can be Opted In or Out.
- If information is updated, when Statements are batched again, the Guarantor Notification will be removed once the Notification is successful.
- No other action is needed.
- The Type column displays the mode of Notification.
- Phone number or email address
- Select the Batch Number to view the Statements Batch Dashboard.
- Select the Message icon to view the message that is being sent to the Patient.
- Status: Status of a Message
- Examples of Errors/Reasons not sent:
- Undeliverable - Can Retry
- Undeliverable - Permanent
- Delivery Error
- Queueing Error
- Will Not Send - Payment Made
- Status History: Select the icon to see the Notification Status History for this Guarantor.
- Archived:
- A red X means it has not been Archived
- A green check mark ✔ indicates that it has been Archived.
- Tasks: Add the Notification Error to a Worklist.
All Notifications
- Select the All Notifications link in the Notifications panel to view All Notifications including the ones that were Delivered.
- Use the Status dropdown in the Filter Criteria panel to change to a specific Status.
- The Notifications screen defaults to the Status of All.
Error/Undeliverable Status Descriptions
For Error Message Explanations, select this link: Error/Undeliverable Notification Status Descriptions
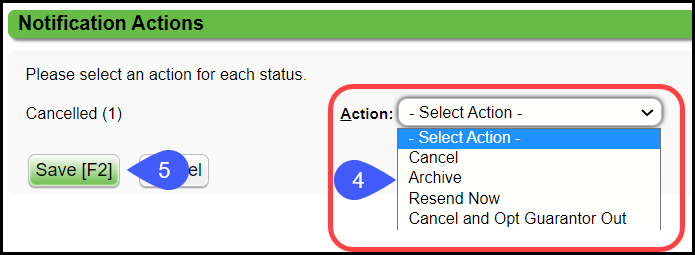
Select Action Button
Use the Select Action button to re-status one or more Notifications.
- On the Statement Management Dashboard, select All Notifications or Manage Notifications.
- Select the checkbox(es) that you want to re-status.
- Select the Select Action button.
- Select the Action from the dropdown.
- Select Save [F2].
- Cancel: Cancels the Notification completely.
- A Notification can only be cancelled if it is scheduled to be delivered in the future.
- Archive: Takes it off your active Notification screen but can be seen by selecting Include Archived in the Filters. (Include or Only)
- This will also cancel the notification if it meets the criteria to be cancelled.
- Resend Now: Resends the Notification immediately.
- The notification must be in one of the following statuses: Queuing Error, Canceled, Un-queued, Delivery Error, or Delivery Error Soft Bounce.
- If the Guarantor information has been updated, the Notification will be sent with the updated contact information even though the change is not reflected on the Balance Notification History screen.
- Cancel and Opt Guarantor Out: Cancels the Notification and Opts Out on the Guarantor screen.
- The Guarantor will no longer receive Notifications.
Learn More
Notification FAQs and Troubleshooting
Related Articles
Balance Notification Testing
Test Notifications Before Go-Live It is important to test the email and notification process before going live. Create a New Test Statement Profile The Time Cadence on the Statement Profile must be set to On Statement Date for test Notifications to ...Balance Notifications Queue
Notification Queue Upload Notifications When Statements/Balance Notifications are uploaded, the Notifications are loaded into the Notification Queue. At this point, they are scheduled to run. Notifications that will be sent can be found in several ...Balance Notifications Setup
All setup for Balance Notifications is done in Statement Profiles using the Notifications panel. When Statement Balance Notifications have been activated (Premium Add-On), the Notifications Panel is added to the Statement Profile screen, and a ...On-Demand Balance Notifications
On-Demand Balance Notifications are a Premium Add-On Feature. Contact Support or your Account Manager for more information. On-Demand Balance Notifications can be sent to a Patient or Guarantor. Use Case: A Patient calls the office and wants to pay ...Patient Dashboard: Balance Panel
Balance Panel Features Filters The Balance Panel can be filtered by Billing Provider, Rendering Provider, or Facility if the panel is expanded. Select the Plus icon to expand the panel. Use the Lookup icon to select a Billing/Rendering Provider ...