Post an Insurance Payment Manually
Before posting, add an Insurance Receipt for the full amount of the check.
Manually Post a Primary Insurance Payment
Using the Receipt that was created for this payment, select the Post button.
Enter the Encounter number preceded by an e (e1234) and tab or lookup the Patient using the Lookup icon on the Patient field and select the Encounter.
The Post as Insurance field will default to the insurance chosen on the receipt.
If a Secondary claim paid as a Primary, use the Post As Responsibility field to choose Primary. All fields for a Primary payment will display.
Check the Crossed to Secondary checkbox on the Primary Payment screen when they are automatically crossed to the Secondary Payer. (This is usually Medicare or RR Medicare.)
The system automatically defaults to the Payment button. If this is a Takeback, choose the Takeback button.
The Post Claim Level button is used for auto accidents and other claim level adjudications. Most clients will not use this button.
Enter the Allowed amount. (The CO45 is auto calculated when the allowed amount is entered.
Enter the Paid amount.
The CO45 field auto-populates when the Allowed Amount is entered. If the CO45 field did not populate, enter the adjustment amount.
Copay (PR3): Enter the Copay amount on the EOB
Deductible (PR1): Enter the amount that is being applied to the patient's deductible.
Coinsurance (PR2): Enter the coinsurance amount from the EOB
Other Codes: Enter other adjustment codes in the Other Code field, such as sequestration, CO253.
Other Amount: Enter the dollar amount for the Other Code that you entered above
To add additional adjustments, select the plus symbol (+) beside Other Code.
Note: For interoffice communication. There is an option on the Patient Ledger to display this note.
All Distributed displays in this field if the lines are posted correctly.
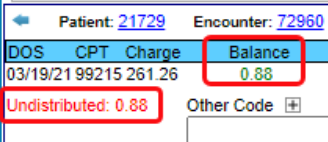
Undistributed and the amount displays if the lines are incomplete or incorrect. All money must be distributed before this page can be Saved.
Balance To: If the claim was paid, it automatically defaults to the next responsible party. Using the dropdown, it can be changed to leave the balance with the current payer or move to another payer or to the patient.
To Worklist: Send the encounter to a custom worklist for review. (The Custom Worklist must be set up first.)
Save [F2].
Example of Undistributed
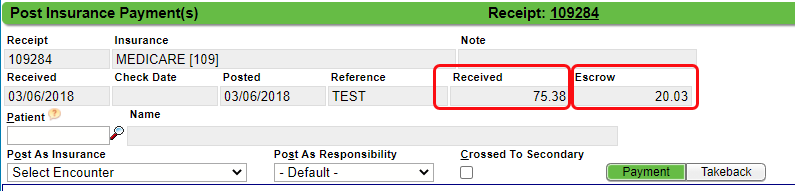
The Post Insurance Payment(s) screen will display to post the next payment on the EOB.
As you post the Encounter Payments on the EOB against this receipt, the Escrow on this Receipt will decrease. When the Escrow amount reaches 0.00, all payments have been posted. If there is any money left in Escrow, the Receipt has not been completely posted.
After completely posting the Receipt, you can start a new Receipt using the Navigation Search box shortcut "nr" or select Payments on the Left Side Menu and then select the Post Payment button.
Post as Note for Denials
- This keeps the Claim balance with the same Payer.
- Changes can be made and the Claim resubmitted without affecting the balance.
- This feature is also available when posting ERAs.
A PR Transaction Code was Posted in Error
For example, a PR45 was posted in error instead of a CO45.
Find the original Receipt.
Select the Receipt number.
![]()
Select the Post (Expert Mode) button.
![]()
If you were on the Patient Dashboard, the Patient ID will auto-populate. If it did not, use the Lookup icon to search for the Patient.
Select the Encounter where the change is to be made.
Transaction Code and Amount
In the Transaction Code field, enter PR45.
Amount: Enter the negative of the original amount and Tab.
In the Transaction Code field, enter CO45.
Amount: Enter the positive of the original amount and Tab.
Select Save [F2].
![]()
 The PR45 can also be mapped to CO45 using the CARC Crosswalk in ERA Management.
Post a Secondary Payment Manually
- Enter the Paid Amount. (The Allowed Amount on most Secondary Payments is the Amount that the Primary Paid, therefore, is not entered on the Secondary.)
- Enter Deductible, Coinsurance, and/or Copay.
- Other Code: Enter any other Adjustment Codes that need to be posted, such as CO253 sequestration adjustment.
- Enter Other Amount if applicable.
- Save [F2].
Posting a CO45 on a Secondary Payment
- When the Secondary pays as the Primary
- To post a Secondary Payment as a Primary Payment using the Secondary, choose Primary for Post as Responsibility. This will open the Primary payment fields to post the Secondary Payment and Adjustment.
- The Secondary pays $0.00, and you want to write off the balance.
- Use the Other Code and Amount fields to enter the Transaction Code, CO45, and the Amount; or
- Use the Post as Responsibility field and choose Primary to open all the fields.
Crossover Claims on Manually Entered Payments
Learn More
Insurance Receipts
Delete or Modify a Receipt
Crossed to Secondary
Insurance Crossover Mapping
Post as a Note Manually
Post as a Note on an ERA
Secondary Pays as Primary
Worklist Suggestions and Examples
Related Articles
Post as Note on Manually Posted Payment (Denials)
Post as Note on Manually Posted Payment (Denials) When a zero payment is received for one or more line items, the zero payment can be posted for information only without writing it off. Use the Post as Note checkbox or enter NOTE in the Other Code ...Create a Patient Receipt/Post Payment Manually
Patient Receipt Creation If the Copay was not entered during the Check-in/Check-out workflow or if your Practice does not use the Calendar: Enter NR in the Navigation box (Go-Cuts) shortcut; Use the Post Payment link on the Patient Dashboard; Use the ...Create an Insurance Receipt
Payment Posting can be accessed from several places using one receipt to post an entire check amount to multiple Encounters. Create an Insurance Receipt Create the Receipt using one of the following methods: Type 'nr' in the Navigation Box or Select ...Payment/Receipt FAQs
Adjustments/CARC Codes How can I post additional Adjustments? Post an Adjustment from: Payment Dashboard Patient Dashboard Encounter Dashboard Learn More Multiple Adjustment Lines Rebill the Claim from the Adjustment screen Adjustment Transaction ...Create an Invoice Receipt and Post Invoice Payments
If you intend to use Invoices or Post Invoice Payments, you must add the System Setting: Admin > System Settings > General > INVOICE = Yes. Even if you do not send Invoices, the System Setting must be set to Yes to post an Invoice Payment. Create ...