Post as Note on Manually Posted Payment (Denials)
Post as Note on Manually Posted Payment (Denials)
When a zero payment is received for one or more line items, the zero payment can be posted for information only without writing it off.
- Use the Post as Note checkbox or enter NOTE in the Other Code field on the Post Insurance Payments screen to display on the Line Items on the Encounter Dashboard.
- Transactions Posted as a Note DO NOT get sent to Secondary/Tertiary insurance and may cause adjudication warnings.
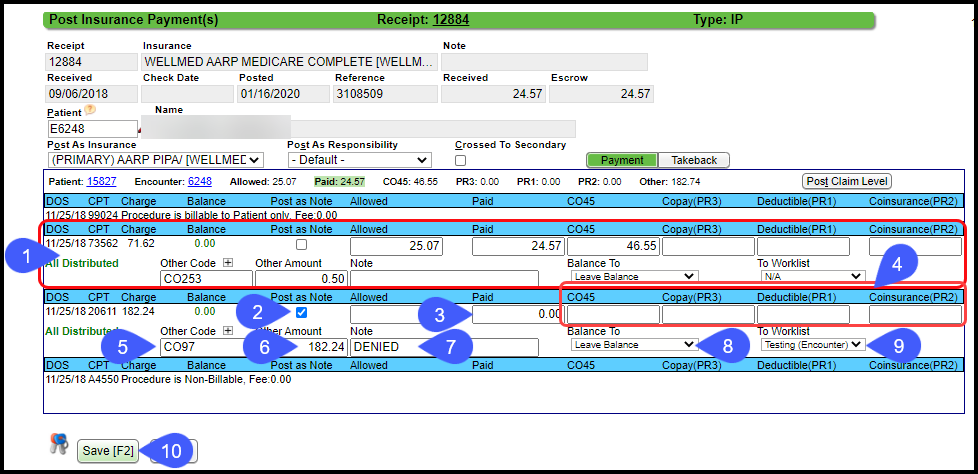
Use the Post as Note Checkbox
- Post any paid line items as usual.
- On the line item(s) that denied, select the Post as Note checkbox.
- Enter 0.00 for Paid amount.
- Remove amounts in CO45, PR3, PR1, and PR2 fields.
- Enter the denial code in the Other Code field.
- Enter the Balance amount in the Other Amount field.
- In the Note field, enter a Note that you want to display on the Encounter Dashboard.
- Balance To: Automatically defaults to Leave Balance.
- To Worklist: Select the Custom Worklist (CW) where you want to send this to be worked.
- Select Save [F2].
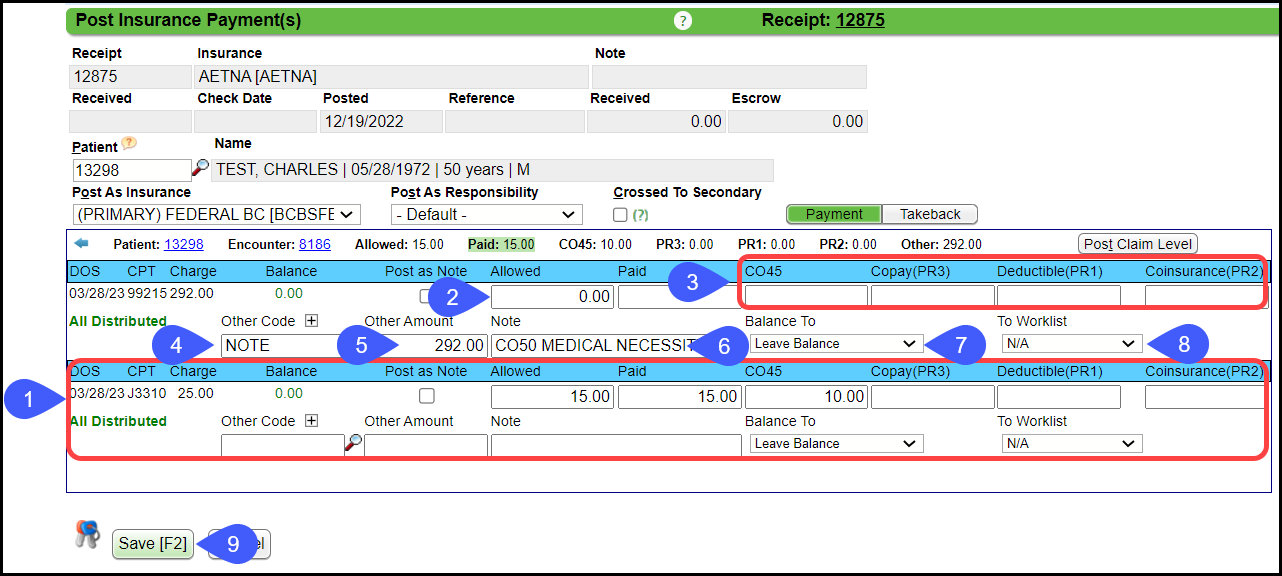
Use the "Other Code" Field
- Post any paid line items as usual.
- Enter 0.00 for Paid amount.
- Remove amounts in CO45, PR3, PR1, and PR2 fields.
- On the line item(s) that denied, enter the word NOTE in the Other Code Field.
- Enter the Balance amount in the Other Amount field.
- In the Note field, enter the CARC code used on the Remit plus a Note that you want to display on the Encounter Dashboard. Example:
- Other Code: NOTE
- Other Amount: $253.00 (amount that the Insurance did not pay)
- Note: CO50 Denied for Medical Necessity (CARC code plus any additional information to display on the Encounter Dashboard).
- Balance To: Automatically defaults to Leave Balance.
- To Worklist: Select the Custom Worklist (CW) where you want to send this to be worked.
- Select Save [F2].
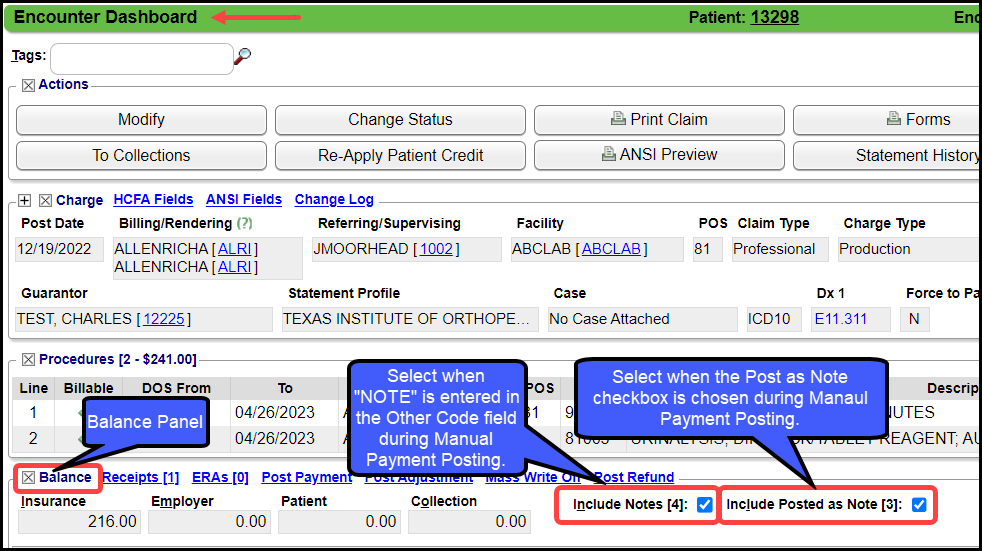
Post as Note and Post Note on the Encounter Dashboard
To display the Payment Posting Notes on the line items on the Encounter Dashboard, the checkboxes must be selected. If there are no notes the option to display the Notes will not be an option.
- Include Posted as Note (3)
- This is the option that displays when the Post As Note checkbox is selected during Manual Payment Posting.
- In the Balance panel, select the Include Posted as Note checkbox.
- Include Notes (4):
- This option displays when entering NOTE the Other Code Field is selected during Manual Payment Posting.
- In the Balance panel, select the Include Notes checkbox.
View the Notes on the Line Item on the Encounter Dashboard
- Expand the Transactions using the plus symbol.

Post as Note on Manually Posted Payment (Denials)
Learn More
Related Articles
Post DW (Denial Worklist) or On Hold (H) Remits
If a line item cannot auto-post when the ERA is Applied, the Encounter Remit will be placed on Hold or placed on the Denial Worklist (DW) for manual review. The Holds and DWs may have Payments or Denials that need to be posted or worked. Payments on ...Post an Insurance Payment Manually
Before posting, add an Insurance Receipt for the full amount of the check. Manually Post a Primary Insurance Payment Using the Receipt that was created for this payment, select the Post button. Enter the Encounter number preceded by an e (e1234) and ...Post Payment as a Note on ERA
Post as Note is used when you want to capture the Remittance denial adjudication information without financially impacting the Encounter. This keeps the line item from being written off in order to resubmit the Claim after it has been worked. Do not ...Post a Zero ERA Payment with a Takeback
If the Remit has a Zero Dollar Payment, but it has Payments in the body of the Remit, there are probably Takebacks at the bottom of the Remit, which results in a Provider Level Adjustment. If the Payments in the body of the Remit equal the Takebacks ...Manually Post Interest or Penalty
Post Interest to an Interest Account Create an Interest Account: Setup for Manually Posting Interest and Penalty. Set up an Interest Payment and an Interest Adjustment Transaction Code if it has not already been done. If you do not have an Interest ...