Appointment/Recall Reminder Sets
 This is a Premium Add-On feature. Contact your Account Manager for more information.
Before creating the Appointment Reminder Set or a Recall Set, create the basic Reminder Texts, Emails, and/or Voice Message Templates.
Automate Appointment and Recall Reminders
The Reminder Sets tell the System When, How, and Where to deliver the Appointment and/or Recall Reminders.
Appointment and Recall Reminders can be sent to your Patients by Text, Email, or Voice.
- If you want the Patients to reply, text message reminders can be set up to support two-way communication for Appointment Reminders.
- The response feature is not available for Recall Reminders.
- Patients can be Opted-In/Out during:
- Use the Appointment Reminder System Settings to Opt New Patients In or Out automatically.
- Existing patients will maintain their current Opted-In or Opted-Out status unless their demographic information is manually modified.
Appointment/Recall Reminder Sets
- From Scheduling on the Left Side Menu, select the Patient Outreach button.
Reminder Sets can also be created in Schedule Setup.
- Select the Appointment Reminders or Recalls Tab.
- To Add a new Reminder Set, select the Add button.
- For an existing Appointment Reminder, select the Modify icon.
Reminder Info Panel
- Copy Reminder: If you want to Copy an existing Reminder for a similar setup, select it from the dropdown.
- Leave as blank if creating a new Message.
- Description: Enter a Description for the Reminder.
- Active: The checkbox is selected by default.
- Sender Email: Select the Sender Email from the dropdown.
Reminder Criteria Panel
- Use the Filters to set the Reminder Criteria.
Note: The Appointment Type, Facility, and Resource will determine which Patient Recall Reminders are automatically sent.
If the field is left blank, it will include all in that category.
Multiple selections can be made for each field.
If you have different Reminder Messages for individual Providers (Resources) Appointment Types, etc., set up a separate Reminder Set for each one.
Example: Provider Dr. Test is using Reminder Message A and Dr. Heal is using Reminder Message B, you will need to set up a separate Reminder Set for each one.
If all Providers are using the same Reminder Messages, only one Reminder Set is needed.
Grouping Type: Select a Grouping Type to determine how many Reminders a Patient will receive for multiple Appointments on the same day.
Appointments can be grouped by:
None (Default)
Facility
Resource
Facility and Resource
Patient
Reminders Panel
- Select the Add link to access the Appointment Reminder Delivery screen.
Delivery Panel
- On the Add/Modify Reminder or Recall Delivery screen, select the Delivery Timing from the dropdown.
- Period of Time: Specify a period of time to send the Reminders Before or After an Appointment.
Example: Send a Reminder 24 hours before the Appointment.
- Specific Day: Specify a specific day of the week and time to send the Reminder before the Recall or Appointment Date.
- Recommended for practices that do not want to send Reminders over the weekend, or want to control which day to send them on
- When Scheduled: Send the Reminder immediately after the Appointment has been added to the System.
- This setting should be used as a Booking Confirmation.
- #: Enter the number of minutes/hours/days/weeks that correspond to the subsequent delivery selections.
- Minutes, Hours, Days, or Weeks Dropdown:
- When Minutes or Hours are selected, reminders will be delivered relative to the actual appointment time.
- Example: 2 Hours before the Appointment.
- When Days or Weeks are selected, the Reminders will be sent the specified number of Days or Weeks before the Appointment.
- Before Appointment/After Appointment Dropdown:
- The Reminder will be delivered by the specified date and time before or after the Appointment.
- At Time:
- The Reminder will be delivered at the At Time specified.
- If At Time is left blank, the Reminders will be delivered at the scheduled Appointment time on the day specified.
- Example:
- Appointment Date: 09/26 at 2:00 PM
- The Reminder is set to be sent 2 days before the Appointment Date.
- The At Time is blank.
- The Reminder will be sent on 09/24 at 2:00 PM.
Delivery Preference Panel
When a Delivery Preference is chosen, a new panel will display to select a Message Template. More than one Delivery Preference can be chosen.
- Delivery Preference: Select one or more checkboxes for how you want to deliver the Reminder.
- Text
- Voice
- Text Message Panel
- Add a new message by selecting Manage or select an existing message
- Learn More: Text Message Templates
- Text Responses Panel: If there is a Text Response that is attached to an existing message selected, the Text Responses panel will open. Modify as needed.
- Learn More: Text Responses
- Email Message Panel
- Email: Select an existing Email Message or create a new Email Message by selecting Manage from the dropdown.
- Learn More: Email Message Templates
- Voice Message Panel
- Select an existing template or select Manage to create a new Voice Message.
- Voice reminders are generated using Text-to-Voice technology.
- Learn More: Voice Message Templates
- Select Save [F2].
Appointment Reminder Grouping (Coming Soon in Release 4.10)
Grouping Type: Select a Grouping Type to determine how many Reminders a Patient will receive for multiple Appointments on the same day.
Appointments Reminders can be Grouped By:
None: Do not use the grouping types functionality on this reminder set.
Reminders will go out for all Appointments scheduled on the same day.
Facility: Groups Appointment Reminders by Facility
Only one Reminder will be sent for the Appointments at the same Facility using the earliest start time.
Only the earliest scheduled Appointment will trigger a Reminder.
If there are two Appointments at different Facilities, an Appointment Reminder will be sent for each Facility.
Resource: Groups Appointment reminders by Resources.
Only one Reminder will be sent for the Appointments with the same Resource using the earliest start time.
Only the earliest scheduled Appointment will trigger a Reminder.
If there are three Appointments with three different Resources, an Appointment Reminder will be sent for each Resource.
Facility and Resource: Groups Appointment Reminders by Facility and Resource.
Only one reminder will be sent per Resource and Facility using the earliest start time.
Example
A Patient is scheduled for 3 Appointments with Dr Smith.
The first Appointment is at Facility A, the second at Facility B, and the third is scheduled back at Facility A.
Two Reminders will be sent:
One for the earliest Appointment at Facility A.
One for the earliest Appointment at Facility B.
An Appointment Reminder will not be sent for the third Appointment, which is at Facility A.
Patient: Group Appointments by Patient.
Only one Reminder will be sent to the Patient for multiple Appointments on the same day using the earliest start time, regardless of who the Resource is.
Only the earliest scheduled Appointment will trigger a Reminder.
Appointments with the Grouping Type Facility on the Reminder Set
Example 1: Multiple Appointments with the same Resource, different Facilities on the same day
The Patient has three Appointments with Dr. Smith on Monday.
The first Appointment is at Facility A at 8:00 AM.
The second Appointment is at Facility B at 1:00 PM.
The third Appointment is at Facility A at 4:00 PM.
Results of selecting Facility
If the Appointment Reminder is part of the Reminder Set for that Appointment Type.
A Reminder will be sent for Facility A for the 8:00 AM Appointment.
A Reminder will be sent for Facility B for the 1:00 PM Appointment.
A Reminder will not be sent for Facility A for the 4:00 PM Appointment.
Not sent because it is the same Facility as the Appointment at 8:00 AM because Group Type Facility was selected for this Reminder Set.
Example 2: Different Reminder Sets for multiple Appointments on the same day
The Patient has three Appointments with Dr. Smith on Monday.
The first Appointment is at Facility A at 8:00 AM attached to Reminder Set A.
The second Appointment is at Facility B at 1:00 PM attached to Reminder Set A.
The third Appointment is at Facility A at 4:00 PM attached to Reminder Set B.
Results of selecting Facility with multiple Reminder Sets for the Appointments
A Reminder will be sent for Facility A, Reminder Set A for the 8:00 AM Appointment.
A Reminder will be sent for Facility B, Reminder Set A for the 1:00 PM Appointment.
A Reminder will be sent for Facility A, Reminder Set B for the 4:00 PM Appointment.
This Reminder will be sent because the Appointment Type is connected to a different Reminder Set than the 8:00 AM Appointment.
Example 3: Multiple Resources with Facility chosen as the Grouping Type
The Patient has three Appointments for Dr. Smith, Dr. Roche, and Lab work on Monday.
All are attached to the same Reminder Set.
The first Appointment is at Facility A at 8:00 AM with Dr. Smith.
The second Appointment is at Facility B at 1:00 PM
The third Appointment is at Facility A at 4:00 PM
Results of selecting Facility
A Reminder will be sent for Facility A for the 8:00 AM Appointment with Dr. Smith.
A Reminder will be sent for Facility B for the 1:00 PM Appointment with Dr. Roche.
A Reminder will not be sent for Facility A for the 4:00 PM Appointment for Lab Work.
Even though the Resource is different than the 8:00 AM, the Facility is the same.
Both have the same Reminder Set with Facility being selected for the Grouping Type.
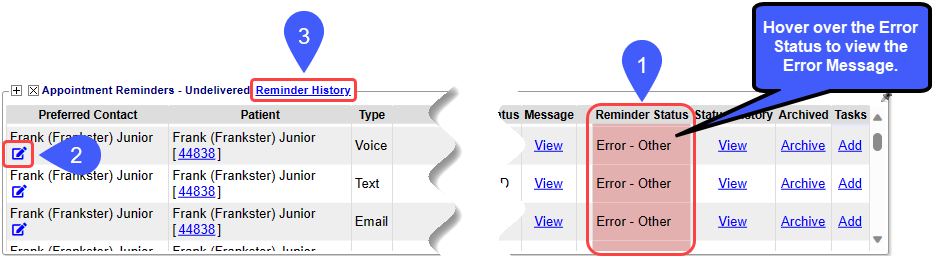
Appointment Reminders/Recalls - Undelivered
The Appointment Reminders - Undelivered panel provides an overview of all Reminders that were not delivered.
- Scheduling > Appointment Reminders - Undelivered
- Hover over the Error Status to view the Error Message.
- Select the Modify icon to correct the Patient/Guarantor Contact Information.
- Select Reminder History to view ALL Appointment Reminders.
Learn More
Message Templates for Appointment Reminders, Responses, and Recalls
Add/Modify a Text Reminder Response
Add/Register a New Patient
Opt-Out of Appointment Reminders on the Patient Dashboard
Modify a Patient's Information
Appointment Reminders System Settings
Sender Email Identities
Appointment Reminder Setup Examples
Related Articles
Appointment Reminders/Recall/Balance Notification Message Templates
This is a Premium Add-On Feature. Contact your Account Manager for more information. Appointment Reminder/Recall/Balance Notification Message Templates Overview Message Templates Overview Message Templates for Appointment Reminders, Recall, and ...Appointment Reminder Troubleshooting
Reminders Did Not Deliver Reminders may be delayed by a few minutes based on multiple factors. As long as Appointment Reminders are sent within 15 minutes of their scheduled delivery, they are working as intended. Verify the Opt In and Opt Out ...Add a Recall to a Patient
A Patient can be added to the Recall List on the Patient Dashboard in the Patient Appointment panel and on the Scheduling Appointment screen. If a Patient has one or more Open Recalls, they can be viewed while scheduling an Appointment. Add a Recall ...Appointment/Recall Reminders - Undelivered
Appointment Reminders - Undelivered The Appointment Reminders - Undelivered panel provides an overview of all Reminders that were not delivered. Scheduling > Appointment Reminders - Undelivered Hover over the Error Status to view the Error Message. ...Patient Outreach Overview
Patient Outreach serves as a hub that provides access to Appointment Reminders, Recall Reminders, and Balance Notifications. (Scheduling > Patient Outreach button) Appointment Reminders (Premium Add-On) Set up and manage SMS, Email, and Voice ...