Schedule Builds
The Schedule Builds are the backbone of your Calendar.
- Builds can be created for each Resource & Facility.
- Builds define what, when, and where Appointments can be scheduled.
Access the Schedule Builds
- From the Scheduling Dashboard, select Schedule Setup.
OR
- Select the Build tab.
- Select the Popup icon
on the tab to open the Build in a full screen, which can be helpful when creating a large build.
Schedule Builds have two views: Build View and Slot View.
- Build View: Shows all Schedule Builds with the option to expand to see all Slots.
- Slot View: When using this view, you can add individual Slots to a Schedule Build by selecting the Add Slot button.
Build View or Slot View
Many of the same features are available in both view options. In the following sections, instructions are noted if they apply to Build, Slot, or Both Views.
- In the Build View, you can modify full Schedule Builds in addition to creating a Description that groups the Builds.
- When creating a Build, you can add multiple Slots to the Build at one time.
- Select the Plus icon (+) to add a Slot.
- Select the minus icon (-) to remove a Slot.
- Up to 60 Slots can be added in the Build.
Add a Schedule Build (Build View and Slot View)
- Select the Add Build button.
- Add a Description for this Build.
- The Description will make it easier to search, modify, or copy Builds in the future.
- Copy Build: An existing Build can be copied and modified.
- Under the Criteria panel, add Resources and Facilities using the Look up icon.
- This is a multi-select field where more than one Resource and Facility can be chosen.
- To include All Resources and All Facilities, select the checkboxes.
- In the Recurrence Options panel, choose when the recurrence is to occur.
- Weekly, Monthly, or Yearly
- The Days of the week, and
- The frequency: Every X weeks, months, years
- Same Recurrences can be selected to apply the recurrence options to All Slots, Resources, and Facilities created in this Build.
- Use the Same Recurrences carefully because it will affect everything in this Build.
- Uncheck Same Recurrences to create different Recurrences for each Slot.
- Select the Slot Type from the dropdown list.
- Select the Priority.
- This determines which Slot type will be displayed on the Calendar if there is a conflict. The default is 3-Medium.
- Choose an Effective Date. An Expiration is not required but can be used if you need to expire a Slot in the future.
- Enter a Start Time and End Time.
- Additional Slots can be created by selecting the plus icon (+) to the right of the time. Add as many as 50 Slots as needed to complete the Build.
- Select Save [F2].
Using the Build View
- Select the expand icon(+) to view all the Slots contained in the Build.
- From the expanded view, Slots can be individually Added, Modified, or Deleted.
- Select the Build Description link to modify the Description or make a Build Inactive.
- Select the Modify Icon to change the Build details (such as Slots and Recurrences)
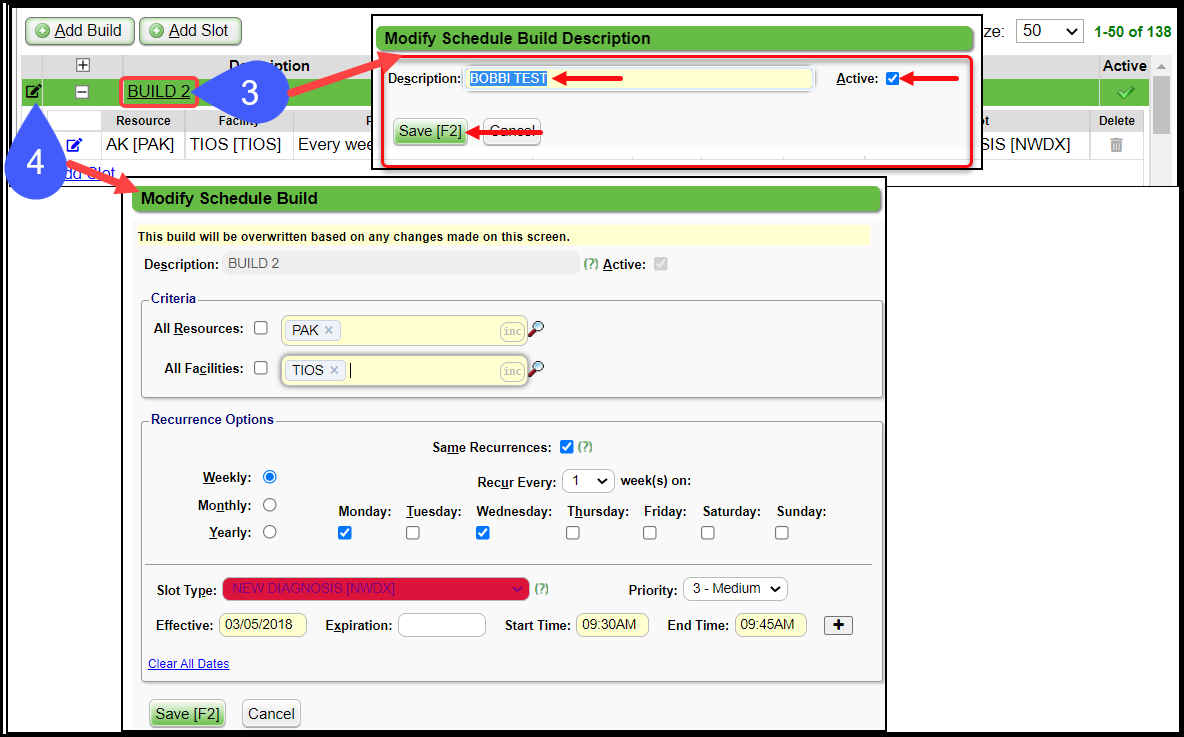
If Same Recurrences is chosen, any modifications to an existing Schedule Build are permanent and will affect the Calendar for the past and future Calendar Views.
- This affects everything including Resources, Facilities, and Recurrences.
- See the following figure for an example of the differences between Same Recurrences being selected or not selected.
Add a Slot in Build View
A Slot can be added multiple ways when in the Build View.
- Select the Add Slot button to the right of the Add Build button.
- On the Popup, select the Build where you want the Slot added.
- Complete the Slot Information as explained above starting with Step 6.

- Select the plus
 icon to expand a Build.
- At the bottom of the Build, select the Add Slot link.
- This defaults the new Slot as a part of the Build you expanded.

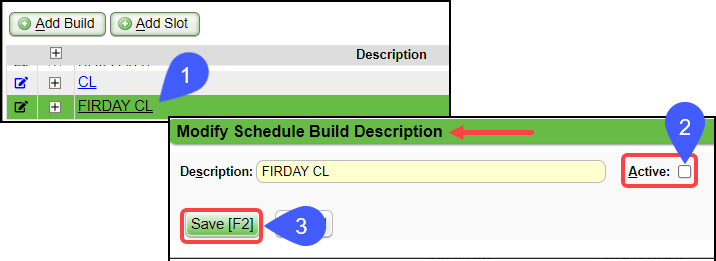
Make a Build Inactive
A Schedule Build can be made Inactive if it is no longer needed.
- Select the Description.
- Uncheck the Active box.
- Select Save [F2].
Using Slot View
Use the Add Slot Button to Add a Slot
- Use the "radio button" to select Slot View.
- Select the Add Slot button.
- Choose the Build where you want the Slot added.
- Complete the Slot information and Save.

Use the Modify Icon to add A Slot
- Select the Modify Icon on an existing Slot.
- Select the Plus icon to add a new Slot.

Modify a Slot in the Slot View
- Choose Slot View.
- To change an individual Slot in the list, select the Modify icon on the Slot.

- Modify any fields that need to be changed.
- Additional Slots can be added or removed by selecting the plus (+) icon or minus (—) icon beside the time.

Override an Existing Slot using Priority
Slots can be overridden temporarily or permanently.
- To override an existing Slot, give the new Slot a higher priority with a new effective date.
- The old Slot can be expired, if necessary.
Use Override to Change a Single Event
Example: Dr CL's Schedule is M-F 8:00 to 4:30. She wants to change her schedule for a specific Wednesday as a single event. Instead of a whole day of patients, the doctor only wants to do a half day.
- Select the Build tab on the Scheduling Setup screen.
- Using the Lookup icon, select the Resource (and the Facility, if applicable).
- Select the Search button.
- Select the Plus icon on the Build you want to change.

- Select the Add Slot button.

- Uncheck Same Recurrences.
- Choose Wednesday only.
- Select the Build and the Resource (and Facility, if applicable).
- Choose the Block Slot Type.
- Priority: Select 2 - High. (Priority higher than the original.)
- Effective and Expiration Dates: Enter the Wednesday's date that you want to override for both.
- Start & End Times: Enter afternoon times (12:00PM to 4:00PM) that the Resource wants to block.
- Select Save [F2].

- A Validation Warning will display to show the Slots that are being overridden.

Use Override to Change a Day on a Schedule Permanently
Example: Dr. CL wants to change her Wednesday afternoon schedule permanently starting September 4, 2020.
- Follow the steps above with the exception of the following:
- Effective Date: 09/04/2024
- Expiration Date: Leave blank.

Use Priority Override to Block a Holiday
Using a higher Priority, a Holiday can be blocked for all Resources simultaneously.
Example: The doctor's office will be closed on December 25 every year. All Resources and Facilities need that day blocked.
Create a Holiday Build
- Select the Add Build button.
- Add a Description.
- Resource: Select the All Resources checkbox, or select individual Resources.
- Facility: Select the All Facilities checkbox, or select individual Facilities.
- Deselect the Same Recurrences checkbox.
- Select Yearly to have this reoccur every year.
- On: Select December 25.
- Select a Block Slot Type from the dropdown.
- Priority: Select a Priority higher than the other Builds.
- Effective Date: Enter the date for this to be Effective.
- Expiration Date: Leave blank to change for every year in the future or choose a year in the future.
- Enter the Start and End Times.
- Select Save [F2].

Block Appointment Slots from the Calendar
Appointment Slots can be blocked using the Calendar. If a doctor wants the afternoon appointments on Friday cancelled and the slots blocked so appointments cannot be made, it can be done on the Calendar.
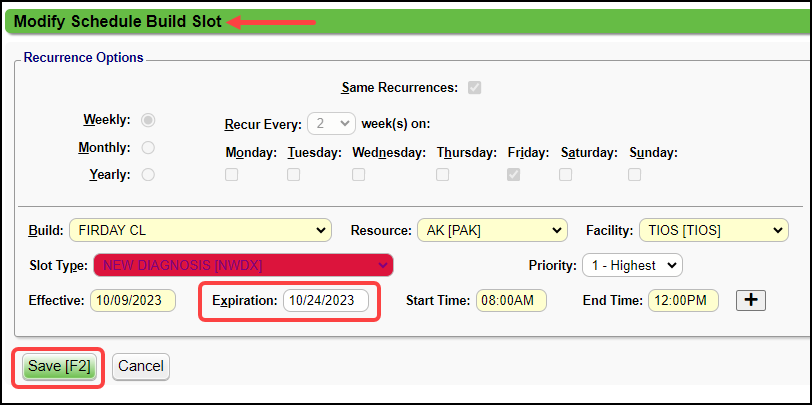
Expire a Slot
If a Slot is no longer needed, it can be expired. This can be used when you want to block a specific slot for a short period of time. By using the Expiration Date, the schedule will go back to the normal view after the Expiration Date.
Open the Build that contains the Slot or expand the Build to see each slot.
- On the Slot, enter an Expiration Date.
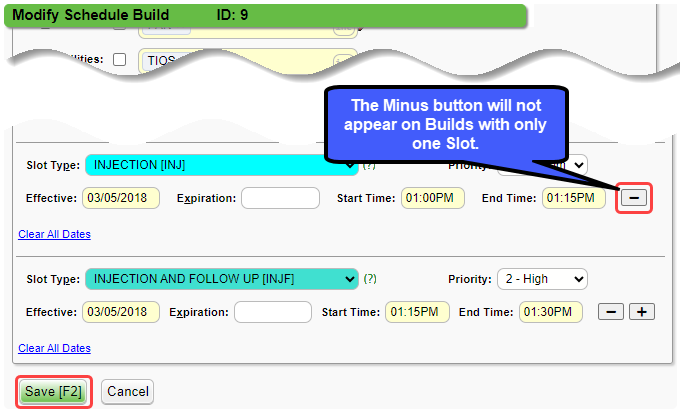
Delete a Slot from a Build
If a Slot has any previous associated Appointments, the Slot should be expired instead of deleted.
Slots can also be deleted from a Build. There are two ways to delete a Slot from a Build:
- Select the Modify icon to change the Schedule Build.
- Select the Minus button on the Slot.
- Note: The Slot will be deleted immediately. To recover the Slot, select Cancel instead of Save [F2]. Any other progress that was made will be lost.
- One Slot must be left on the Build when deleting from this screen.
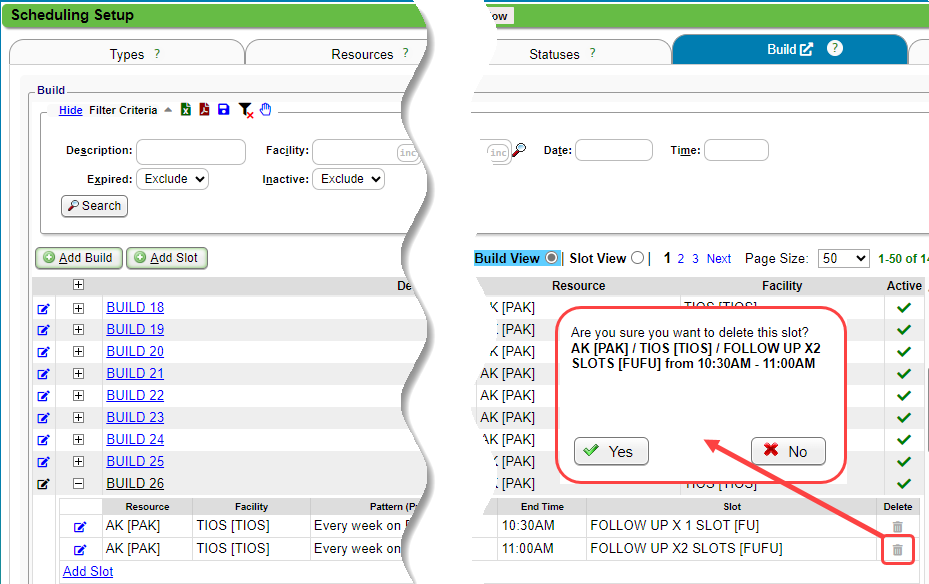
- Select the Plus icon to expand a quick view of the Slots.
- Select the Delete button next to the Slot.
- A Validation Warning will ask you to confirm your selection.
- If all Slots are deleted from this screen, the Build will be deleted.
Rename a Build
- To rename a Build, select the Build Description and enter a new Description.
- This will change the Build Description on all of the listed Slots.
- The Build can be made Inactive on this screen as well.


Related Articles
Schedule Build Splash Page
Schedule Build Types Resources Slots Build Appointment Rules Select the Tabs below for instructions how to setup your Calendar. Types Resources Slots Statuses Build Rules Types Create an Appointment Type Add a Group Appointment Type Expire/Delete an ...Schedule Setup and Build Overview
Schedule Setup and Build Scheduling Setup is the backbone of your Calendar. The setup drives the options you have when making an Appointment and the column options that can be displayed. Schedule Build Length If the Expiration Date is left blank on ...Schedule Builds (Table of Contents)
Contents Schedule Builds Scheduling Build TroubleshootingCreate Slot Types
Slots are defined by types of appointments and how many (max concurrency) can be scheduled in a specific slot. Create Scheduling Slot Types On the Scheduling Setup screen, select the Slots tab. Select Add. Type Code: The Type Code displays in the ...Fee/RVU Schedule FAQs
Fee/RVU Schedule FAQs Fee Schedule How do I know which Fee Schedule is being used? Which Fee Schedule should I use? Logic for Effective/Expiration Dates Logic for Procedure Codes and Modifiers