Fee/RVU Management
Add Charge Fee, Allowed Fee, and RVU Schedules
 If the Items Number is 0, there is a problem with the file that was uploaded. Reference the File Formatting Guidelines to ensure a successful upload.
The Procedure Code must exist in the Procedure Code Library for it to be updated when uploading a new Fee/RVU Schedule.
- If the Procedure Code does not exist in the Procedure Code Library, it will not be added by adding it to the Default Fee Schedule Library.
- If the Procedure Code does exist in the Procedure Code Library, the fee will be updated when changed in the Default Fee Schedule Library.
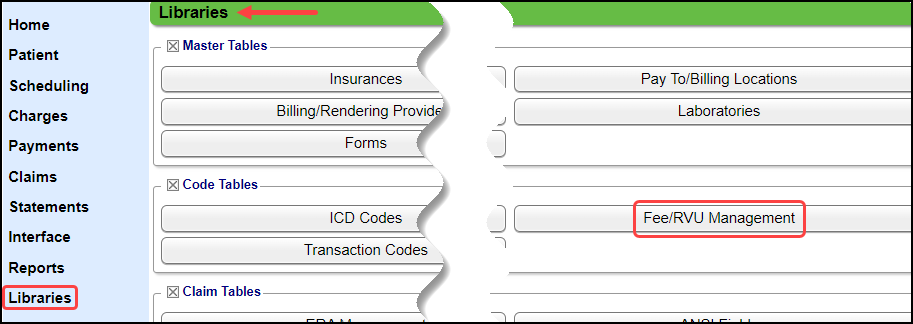
All Charge Fee, Allowed Fee, and RVU Schedules are housed in Fee/RVU Management.
- Libraries > Fee/RVU Management
Fee Schedule Panel
- Select one of the four Types of Fee/RVU Schedules. Each of these are added and modified basically the same with a few nuances for Allowed Fees and RVUs.
- Charge Fees
- Allowed Fees
- Work RVUs
- Facility RVUs
- Description: Enter a description for the Allowed Fee Schedule you are creating, for example: Medicare 2022 Allowed Fees
- Effective/Expiration Dates: Enter the Date that the Fee Schedule becomes effective or expires.
- Default: For Charge Fee Schedules only.
- All Providers, Facilities, Insurances, and Plans must be selected for a Default Fee Schedule.
- The Default Fee schedule will also be used if the Procedure is not in another Fee Schedule or the Fee is $0.00 in another Fee Schedule.
- Example: You have a BCBS Fee Schedule.
- The Procedure is either not in or has a $0.00 Fee in the BCBS Fee Schedule.
- The System will automatically use the Fee in the Default Fee Schedule.
- Self Pay: If this Fee Schedule will be a Self-Pay Fee Schedule, check the box.
- A Self-Pay Fee schedule can be created just to be Self-Pay by selecting the checkbox and deselecting all Insurances and all Plans.
- Another Fee Schedule can also serve as a Self-Pay Fee Schedule.
- Example: A BCBS Fee Schedule is created, and you want this BCBS Fee Schedule to also be the Self-Pay Fee Schedule. The box should be checked.
- There can be multiple Self Pay Fee Schedules.

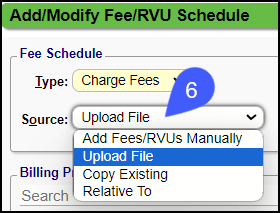
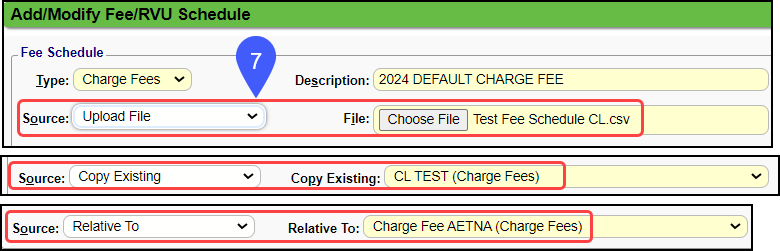
- Source
- Add Fees/RVUs Manually
- Used mainly by Practices that use only a limited number of Procedure Codes.
- If a Procedure code and Fee are added in the Procedure Code Library, and there is not an existing Default Fee Schedule, the System will create a Default Fee Schedule automatically.
- Skip to Step 10 if you chose this Add Fees/RVUs Manually as the Source.
- Upload File: The file must be in csv format.
- Choose File: Select the csv file that you saved to your computer.
- Copy Existing: An existing Fee Schedule can be copied. This Fee Schedule can be changed without affecting the one which was copied.
- Select the Charge Fee Schedule to copy.
- Expired Fee Schedules can also be copied and appear at the bottom of the list in red font.
- Relative To: This does not apply to RVU Schedules.
- If a change is made to the Fee Schedule that you chose as relative to, the Fee Schedule being created will be changed as well.
- File/Copy Existing/Relative To
- File: If Upload File was chosen for the Source, choose the csv file that you saved to your desktop.
- Copy Existing: If Copy Existing was chosen for the Source, select the Fee/RVU schedule you want to copy.
- Relative To: If Relative To was chosen for the Source, select the Fee Schedule you want to this Fee Schedule to be Relative To (does not apply to RVU schedules).
- Increase By: A Fee Schedule can be increased or decreased by a Dollar amount or a Percentage.
- Example of Use: You are using the National Medicare Charge Fee Schedule, and you want to increase your Fees by 75% because the Fees in your locality are higher than the National Fee Schedule
- Calculation: Base Fee + (Base Fee x Percentage) = Fee
- Base Fee = $200; Increase by 75%
- Increase By Calculation:
- $200 + ($200 x .75)
- $200 + $150
- $350
- Base Fee = $200; 75% of $200 (Percentage of Base Fee)
- Your fee is less than the National Fee, and you want to decrease the Base Fee to have an end fee of $150, which is 75% of $200. In effect, you are decreasing the Base Fee by 25%.
- System Calculation to achieve your end result of $150.:
- $200 + ($200 x (.75 -1.00))
- $200 + ($200 x (-.25))
- $200 - $50
- $150
- Round Up: If Increase By is chosen, this field becomes available.
- Round to the Nearest Dollar, Nearest Dime, or None.
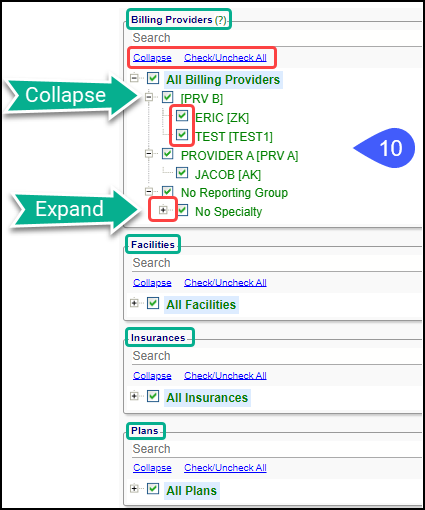
- Choose the Providers, Facilities, Insurances, and Plans where this Fee Schedule applies.
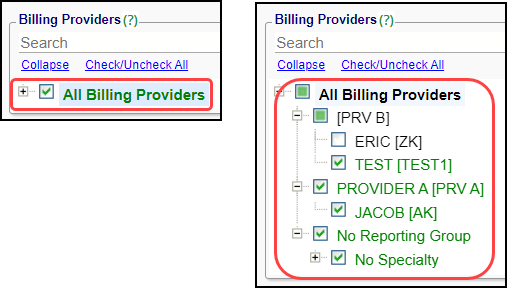 Use the Plus/Minus icons and the Collapse to expand or collapse each section.
- Use the check boxes and the Check/Unselect link to select or deselect Billing Providers, Facilities, Insurances, and Plans.
Update Existing Values
- Update Existing Values: For Allowed Fee Schedules and Work RVUs Only
When uploading new values with a potential impact on existing Encounters, choose whether to update existing Encounters or only to update new Encounters.
- Select how you want to update existing values.
- No Update: Does not update any existing Encounter Allowed amounts.
- Open Period Only: Updates the Contracted Allowed Values for Encounters in the Period that is currently open.
- Open & Closed Periods: Updates all Contracted Allowed amount values for all Encounters even if the Period is closed.
- Select Save [F2].

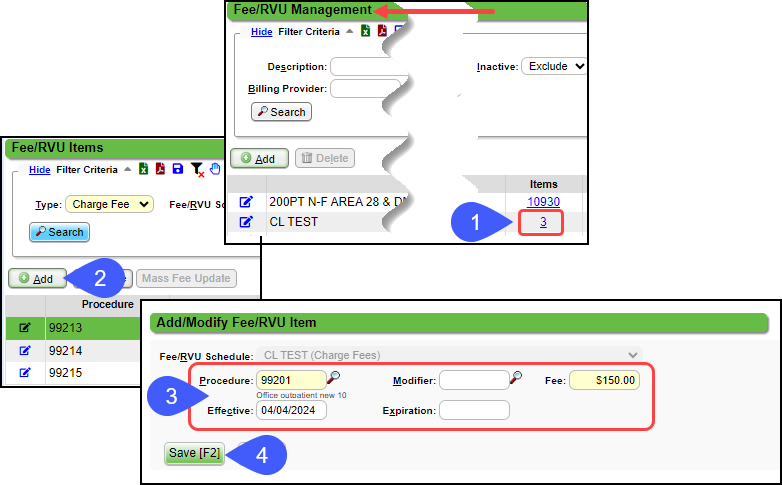
Add a Procedure to an Existing Fee/RVU Schedule
- Select the Fee/RVU Schedule Items number.
- Select the Add button.
- Enter the Procedure Code information and Fee.
- Select Save [F2].
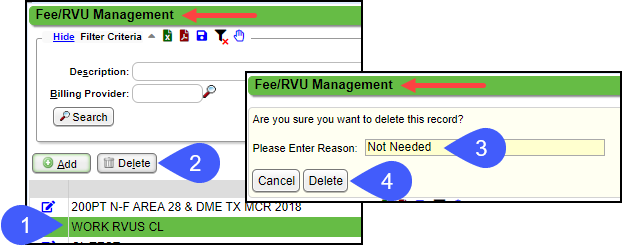
Delete/Expire a Fee/RVU Schedule
- A Fee/RVU Schedule can only be deleted if it has not been used.
- Highlight the Fee/RVU Schedule.
- Select the Delete button.
- Enter a Reason.
- Select Save [F2].
- If the Schedule has been used, enter an Expiration Date instead.
- Highlight the Fee/RVU Schedule.
- The Delete button is grayed out.
- Select the Modify icon.
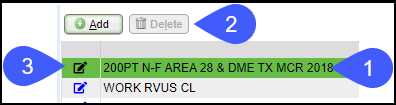
- Enter an Expiration Date.
- Select Save [F2].

- The Fee-RVU will disappear from the list.
- To see it again, select Include Inactive in the Filter Criteria.
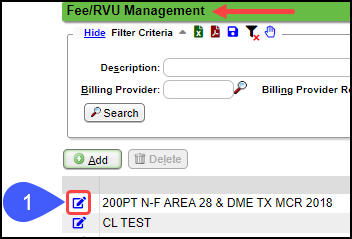
Modify a Fee/RVU Schedule
- On the Fee/RVU Management screen, select the Modify icon.
- Make necessary changes and Save.
- Relative To Fee Schedules cannot be modified.
- All changes are made on the File that was chosen to be Relative To.
Modify Individual Items in a Fee/RVU Schedule
- Select the Items number on the Fee/RVU Schedule that you want to change.
- Use the Filters to narrow your search, if applicable.
- The Search function auto filters on the Key Word entered.
- Select the Modify icon on the left to modify the Modifier, Procedure Fee, Effective Date, and/or Expiration Date for an individual Procedure Code.
- Select Save [F2].
Modify the Fee/RVU Schedule on an Individual Item
- Select the Modify Icon on the right to make changes to the Fee-RVU Schedule.
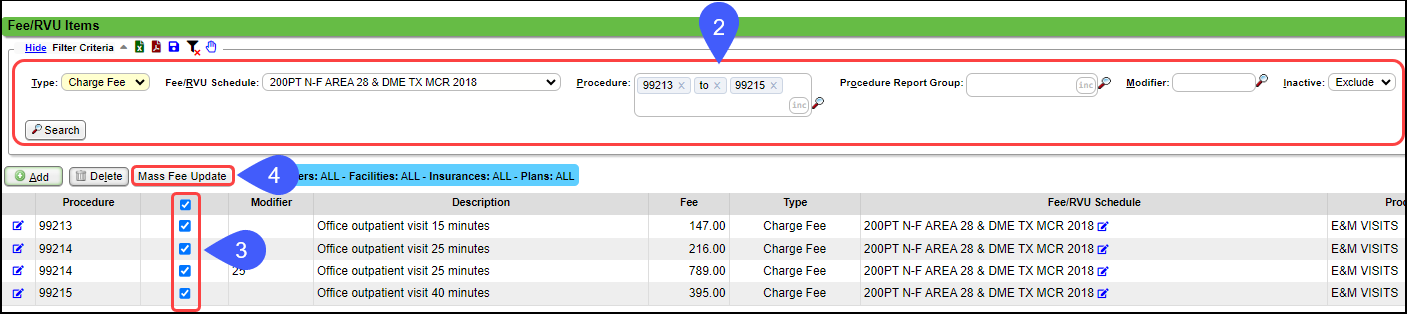
Mass Fee/RVU Edits
Multiple Fees/RVUs can be updated at once.
On the Fee/RVU Management screen:
- Select the Items number on the Fee/RVU Schedule you want to update.
- Use the Filters to narrow your Search.
- Procedure: Multiple Procedures can be entered or a Range of Procedures
- Procedure Report Group: Multiple or a range of Report Groups can be selected.
- Use the check boxes to select the Procedures to update.
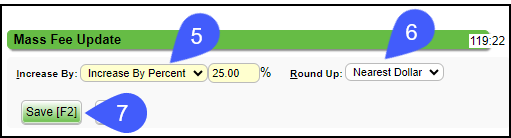
- Select the Mass Fee button.
- Increase By: Select Increase by Percent or Increase by Dollar.
- The percentages and amounts can be increased (using a positive number) or decreased (using a negative number).
- Round Up: Select one of the following:
- Nearest Dollar
- Nearest Dime
- None
- Select Save [F2].
Upload a File to Overwrite or Add to a Fee/RVU Schedule
An Existing Fee/RVU Schedule can be overwritten or added to by uploading a new file.
- Select the Modify icon on Fee/RVU Schedule.
- Source: Select Upload File.
- File: Select the New File.
- Overwrite:
- Select the check box to Overwrite the existing file.
- Leave unchecked to add to the existing file.
- Additional Procedures/Fees can be added to the existing file.
- If the Procedure Code already exists, the Procedure will be duplicated.
- Be sure the Procedure Code does not already exist on the Fee/RVU Schedule before saving.
- Increase By: Select Dollar or Percent.
- Enter Percent or Dollar Amount.
- Round Up: Nearest Dollar, Nearest Dime, or None.
- Select Save [F2].
- This cannot be undone after it is saved.

Fee/RVU Schedules in the Procedure Code Library
The Fee/RVU Schedules can be seen on the Procedure Code in the Procedure Code Library.
"Relative To" Charge or Allowed Fee Schedules
The Relative To Charge or Allowed Fee Schedule mimics the associated Charge or Allowed Fee Schedule with the option to increase or decrease the Fee by a Percentage of Dollar Amount on the Relative To Fee Schedule.
- Using Relative To Fee Schedules can save time when creating new Fee Schedules for a new year.
- Creating a Relative To Fee Schedule copies the Charge Fee Schedule.
- A percentage or dollar amount can be added to increase or decrease the Relative To Fee Schedule.
- Changes made on the Charge or Allowed Fee Schedule are also reflected on the Relative To Fee Schedule.
"Relative To" Charge Fee Schedule Setup
Libraries > Fee/RVU Management
- Type: Select Charge Fee or Allowed Fee.
- Description: Enter a Description
- Source: Relative To
- Relative To: Select the Charge or Allowed Fee Schedule that you want this Fee Schedule associated with.
- Multiplier %: Enter the percentage or dollar amount that you want to increase or decrease the Fees that are on the associated Fee Schedule.
- This will increase the Fee on the Relative To Charge Fee Schedule by the chosen percentage or dollar amount.
- Example: To increase the Fees by 150%, enter 150.
- When the associated Fee Schedule is updated, the Relative To Fee Schedule will also be updated using the percentage or dollar amount that was selected.
Example of a Relative To Fee Schedule
- The Medicare Charge Fee already exists.
- A Relative To Fee Schedule is being created called BCBS Charge Fee Schedule.
- Percentage to increase: 100
- The BCBS Charge Fee Schedule is mapped to the Insurance where you want the Relative To Fee Schedule to be used.
- 99213 is entered on a BCBS claim.
- On the associated Medicare Charge Fee Schedule, the Fee is $150.00.
- On the Relative To, BCBS Charge Fee Schedule, the Fee is changed automatically to $300.00 because it has been increased by 100%.
Changes are made to the Associated Charge Fee Schedule
- 99213 is changed on the Medicare Charge Fee Schedule from $150.00 to $175.00.
- The Fee will be changed automatically on the Relative To, BCBS Charge Fee Schedule to $350.00.
Fee Schedule Priority Logic
The logic to determine which Fee Schedule is used is based on the importance of the fields on the Fee Schedule:
- The System tries to find the Fee Schedule with the most specific criteria selections (Insurance, Provider, and Facility).
- If some (but not all) of the criteria matches, the System will prioritize the criteria in the order Insurance, Provider, and then Facility.
- If the criteria matches, the System will look for the most recent Effective Date.
- If there are no matches for criteria or effective date (excluding Default Fee Schedules), the System will use the Default Fee Schedule as a last resort.
Criteria Priority Logic
The System prioritizes the Fee Schedule that is the more specific to the Insurance, Provider, and/or Facility.
- Example 1: Fee Schedule A is for All Insurances. Fee Schedule B is only for Aetna.
- A charge has Aetna as the Primary Insurance.
- The System will use Fee Schedule B because the criteria is more specific and matches the charge.
- Example 2: Fee Schedule A is for All Insurances and Facility A. Fee Schedule B is for Aetna and Facility A.
- A charge has Aetna as the Primary Insurance and Facility A as the Facility.
- The System will use Fee Schedule B because the criteria is more specific and matches the charge.
- Example 3: Fee Schedule A is for All Insurances and Facility A. Fee Schedule B is for BCBS and All Facilities.
- A charge has BCBS as the Primary Insurance and Facility A as the Facility.
- The System will use Fee Schedule B because Insurance is prioritized as the most important criteria.
Effective/Expiration Dates Priority Logic
If criteria on the Fee Schedules matches, the System will choose the Fee Schedule with the most recent Effective Date that is not expired.
- Example 1: Default Fee Schedule A has Effective and Expiration Dates of 01/01/23 to 12/31/23, and Default Fee Schedule B has an Effective Date of 01/01/24 with all else being the same except the Fees.
- A charge has a Date of Service of 06/15/24.
- The Fee Schedule the System will use is Schedule B because Fee Schedule A has an expiration date of 12/31/23, which is before the DOS of 06/15/24.
- A charge has a Date of Service of 11/21/23.
- The System will use Schedule A because the DOS falls between the Effective and Expirations dates of 01/01/23 and 12/31/23.
- Example 2: The same scenario exists as above, but there is another Fee Schedule C that is not the Default and is more specific than the Default.
- Schedule B & C have the same Effective Date of 01/01/24.
- Schedule C also has BCBS specified as the Insurance where as, Schedule B has ALL Insurances selected.
- Since the Insurance on the Charge is BCBS, the System will use Schedule C because it has Insurance specificity.
- Example 3: Schedule C has an Effective Date of 01/01/24, and Schedule D has an Effective date of 06/01/24.
- Schedule C has BCBS chosen as the Insurance. Schedule D is for All Insurances.
- A charge has a Date of Service of 07/01/24.
- The System will use Schedule C because it is the most specific (even though Schedule D has the more recent Effective Date).
Default Schedule Priority Logic
If the System does not find a match based on criteria or effective date (excluding Default Fee Schedules), it will use the Default Fee Schedule as a last resort.
Logic for Procedure Codes and Modifiers
- If a Charge includes a Modifier, the System first looks for an exact match in the Fee Schedule (Procedure Code with the Modifier).
- If no exact match is found, it then looks for the base Procedure Code without the Modifier.
- If neither exists, the fee is set to 0.00.
- The Charge has a Modifier on the Procedure Code > The Charge Fee Schedule contains the Modifier on the Procedure Code
- The Fee will pull from the Charge Fee Schedule if the Charge matches exactly.
- The Charge has a Modifier on the Procedure Code > One Charge Fee Schedule does not contain the Modifier, and one Charge Fee Schedule has the Modifier and matches the Charge exactly.
- Considering all else is equal, the Fee will pull from the Charge Fee Schedule that has the Modifier.
Fee Added to a Procedure Code with no Default Fee Schedule
When you add a Fee to a Procedure Code in the Procedure Code Library for the first time, the System checks for a Default Fee Schedule.
If one has never been set up, the System automatically creates on and saves the Fee there.
Fee/RVU Management Table
The table shows all the Fee/RVU Schedules with the following columns.
- Description
- Type: This is the Type of Fee Schedule that was chosen when the Fee Schedule was created.
- Charge Fees
- Allowed Fees
- Work RVUs
- Facility RVUs
- Source: What was the source that was used to create the Fee/RVU Schedule?
- Hover over the blue entries to see the name of the File that was uploaded, copied, or is relative to.
- This is for informational purposes only. The original csv file is not stored in the System.
- Items: The number of items in the Fee/RVU Schedule.
- Billing Provider, Facility, Insurance, and Plan: Select the View link to see the included Providers, Facilities, Insurances, and Plans.
- Effective: Date the Fee/RVU Schedule started.
- Expiration: Date the Fee/RVU Schedule ended.
- Self Pay: A green check mark indicates if the Fee Schedule is being used for Self Pay.
- Default: The check mark indicates the Fee/RVU Schedule is the Default.
Validate a Procedure in Fee/RVU Management
If you want to see which Fee Schedule is being used for a specific Procedure Code, you can use the Validate feature in Fee/RVU Management.
Libraries > Fee/RVU Management button
- On the Fee/RVU Management screen: All 5 of the fields below must be selected.
- Select the Procedure Code.
- Select Type: Charge Fees
- Select a Billing Provider
- Select a Facility
- Select an Insurance
- The Fee Schedule listed in the blue banner will be the System's choice based on the Fee Schedule Priority logic.
Learn More
Fee/RVU File Formatting Resources
Self-Pay Fee Schedule
Relative Value Units
Fee/RVU Schedule FAQs
Related Articles
Fee/RVU File Formatting and Resources
All Fee and RVU Schedules can be created in the Fee/RVU Management Library. The following resources can be found on the CMS website. Physicians Fee Schedule: https://www.cms.gov/apps/physician-fee-schedule/license-agreement.aspx#TopOfPage ...Allowed Fee Exception Report
To find underpayments, this report compares posted allowed amounts to contractual allowed amounts. The Allowed Fee Exceptions Report shows discrepancies on Posted Allowed amounts against the Allowed Fee Schedule. It does not report on CO's and ...Fee/RVU Schedule FAQs
Fee/RVU Schedule FAQs Fee Schedule How do I know which Fee Schedule is being used? Which Fee Schedule should I use? Logic for Effective/Expiration Dates Logic for Procedure Codes and ModifiersCharge/Claim FAQs
Charge/Claim FAQs Attachments How do I indicate there is attached paperwork? Attached Paperwork Attending Physician What is an Attending Physician? Attending Physician An Attending Physician is the one who is responsible for the overall care of a ...Self-Pay Fee Schedule
Release 4.7 A Self-Pay Fee Schedule(s) can be used as Self-Pay only, or you can use another Fee Schedule, such as an Insurance Fee Schedule, as your Self-Pay Fee Schedule. There can be multiple Self-Pay Fee Schedules. Add a Self-Pay Fee Schedule From ...