Self-Pay Fee Schedule
Release 4.7
A Self-Pay Fee Schedule(s) can be used as Self-Pay only, or you can use another Fee Schedule, such as an Insurance Fee Schedule, as your Self-Pay Fee Schedule.
- There can be multiple Self-Pay Fee Schedules.
Add a Self-Pay Fee Schedule
- From Libraries, select the Fee/RVU Management button.
- On the Fee/RVU Management screen, select the Add button.
- Type: Select Charge Fees.
- Enter a Description, such as: Self-Pay Fee Schedule
- If you have more than one Self-Pay Fee Schedule, the Description will appear when selecting a Fee Schedule on a Charge.
- Enter an Effective Date.
- Select the checkbox for Self Pay.
- This allows for the Fee Schedule to be used for Self-Pay and adds the ability to select it on the Charge Entry screen.
- If you want this Fee Schedule to be used for Self Pay only, deselect all Insurances.
- If you want this Fee Schedule to also be the Default Fee Schedule, select the Default checkbox.
- Source:
- Add Fees/RVUs Manually: Add the Fees manually.
- This is used when there are a limited number of Procedure Codes being used.
- Upload File: You can upload your own csv file.
- Copy Existing: You can copy an existing Fee Schedule.
- Relative To: Make a Self-Pay Fee Schedule that is Relative To an existing Charge Fee Schedule.
- If the Fees on the Charge Fee Schedule are changed, the Self-Pay Fee Schedule will change accordingly.
- Copy Existing or Relative To: Select the Charge Fee Schedule to copy or link to.
- Increase By: Increase or Decrease the Fee by a Percentage or Dollar Amount.
- Enter the percentage or dollar amount to increase or decrease the Fee.
Percentage Note: 100% is the base amount for the Fee Schedule.
Example 1: To increase a Fee Schedule by 10%, enter 10%.
Example 2: To increase a Fee Schedule by 250%, enter 150% (100% + 150% = 250%).
Learn More: "Increase by" Examples
- Round Up: None, Nearest Dollar, or Nearest Dime.

- Select the Billing Providers and Facilities this Self-Pay Fee Schedule applies to.
- Uncheck all Insurances unless you are using this Fee Schedule for Insurances as well.
- Uncheck All Plans.
- Select Save [F2].
 For the Self-Pay Fee schedule to work, Self-Pay must be added as a Profile in Insurance Management on the Patient.
Use an Existing Charge Fee Schedule as a Self-Pay Fee Schedule
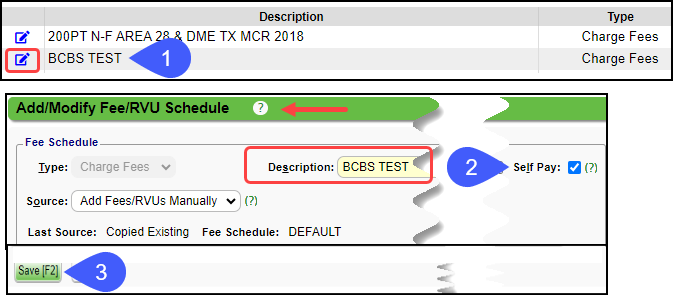
Select an existing Charge Fee Schedule to also use as a Self-Pay Fee Schedule.
- Select the Modify icon on an Existing Charge Fee Schedule.
- Select the Self-Pay checkbox.
- Select Save [F2[.
Related Articles
Fee/RVU File Formatting and Resources
All Fee and RVU Schedules can be created in the Fee/RVU Management Library. The following resources can be found on the CMS website. Physicians Fee Schedule: https://www.cms.gov/apps/physician-fee-schedule/license-agreement.aspx#TopOfPage ...Fee/RVU Management
Add Charge Fee, Allowed Fee, and RVU Schedules If the Items Number is 0, there is a problem with the file that was uploaded. Reference the File Formatting Guidelines to ensure a successful upload. The Procedure Code must exist in the Procedure Code ...Self Pay Profile
Self-Pay Profile The Guarantor is the Responsible Party for all balances that are in the status of Patient Responsibility. The System defaults to Self Pay when there is no Insurance Profile. The Self-Pay Profile is System delivered, which makes it ...Fee "Increase By" Examples
Increase By Percentage Calculation: Base Fee + (Base Fee x Increase By Percentage)= Fee Base Fee: $200 Increase By 150% Example 1 Increase the Base Fee by a Percentage: Increase the Base Fee of $200 by 150% with the end result being $500. In effect, ...Reports Criteria Overview
Most Reports default to the Post Date which is controlled by the date used in the Reference Batch. My Reports Panel: The Reports that the User has run are shown in this Panel. You can choose to see Unread reports only. Report History: This is the ...