Copay and Payment on Account Balance
Enter Copay from the Appointment Dashboard
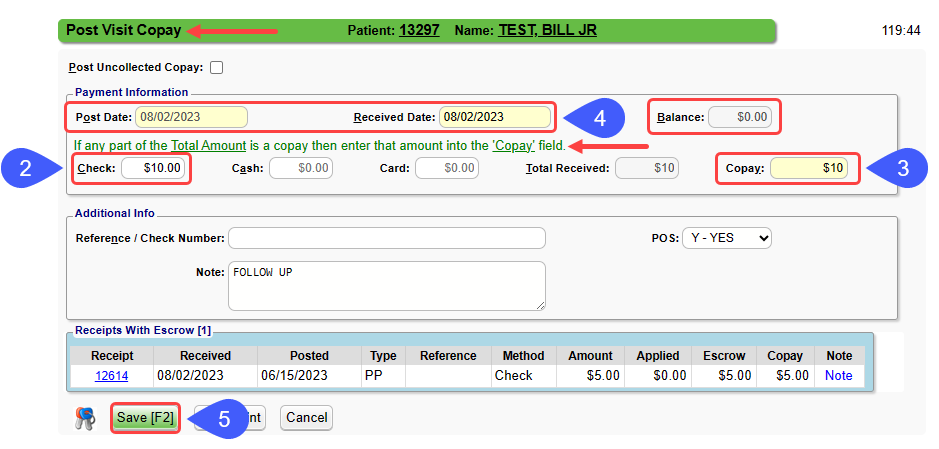
- On the Patient's Appointment, select Enter Payment.
- In the Check, Cash, or Card fields enter the full amount received.
- In the Copay field, enter only the Copay amount.
- If this contains a Payment on Account, do not include that amount in the Copay field.
- Complete any other applicable fields.
- Select Save [F2].

Enter Copay on the Appointment from the Patient Dashboard
- Select the Appointment Date link in the Patient Appointments panel.
- On the Calendar, select the Patient's Appointment (flashing).

- Follow the Appointment Dashboard instructions above.
Enter Copay from the Patient Dashboard
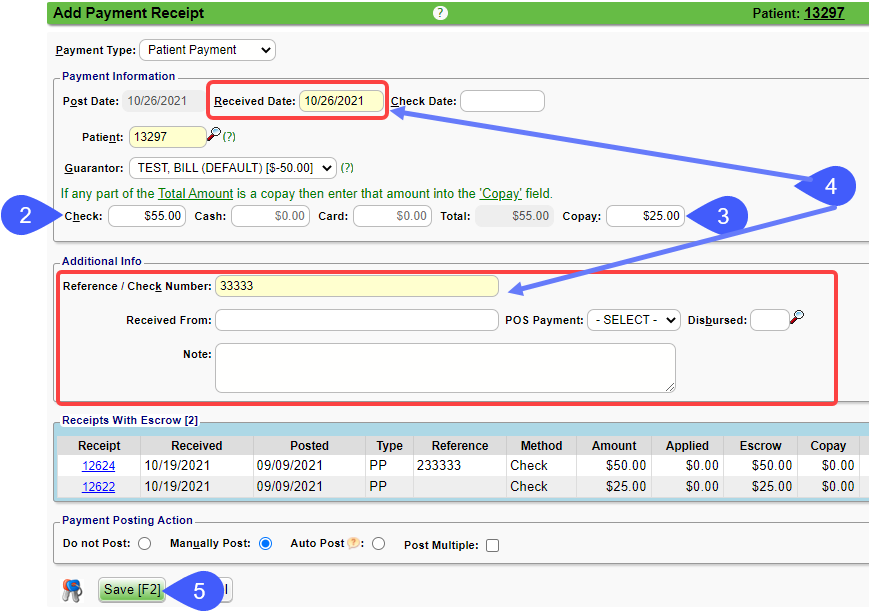
- On the Patient Dashboard, select the Post Payment link.
- In the Check, Cash, or Card fields enter the full amount received.
- In the Copay field, enter only the copay amount.
- If this contains a Payment on Account, do not include that amount in the Copay field.
- Complete any other applicable fields.
- Select Save [F2].

Enter Copay from the Encounter Dashboard
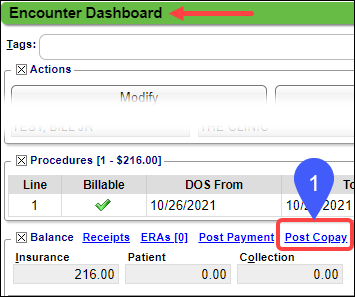
- If an Encounter has already been created, select Post Copay on the Encounter Dashboard.

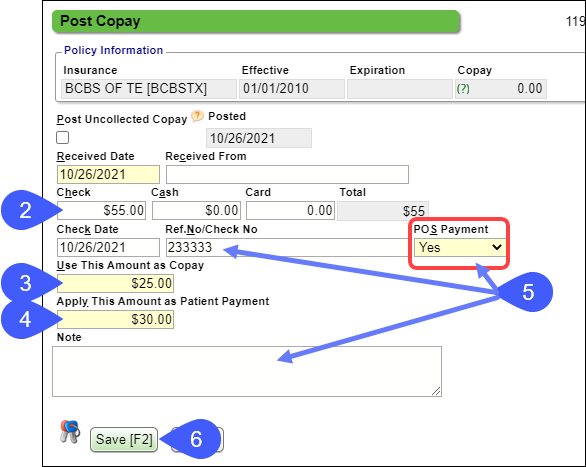
- Enter the full received amount in the Check, Cash, or Card fields.
- Use This Amount as Copay: Enter the amount of the Copay only.
- Apply This Amount as Patient Payment: Enter the amount to apply to the Patient's Account.
- The sum of the copay and the payment on the account should equal the total receipt amount.
- Complete any applicable other fields.
- Select Save [F2].

Learn More
Related Articles
Create a Patient Receipt/Post Payment Manually
Patient Receipt Creation If the Copay was not entered during the Check-in/Check-out workflow or if your Practice does not use the Calendar: Enter NR in the Navigation box (Go-Cuts) shortcut; Use the Post Payment link on the Patient Dashboard; Use the ...
Apply Payments from a Receipt with Escrow Amounts
Apply Payments from a Receipt with Escrow Amounts There are several ways to apply receipts with escrow amounts. Before posting, attach to the original Reference Batch if it is not in a closed period. If the period is closed, create a new Reference ...
Payment/Receipt FAQs
Adjustments/CARC Codes How can I post additional Adjustments? Post an Adjustment from: Payment Dashboard Patient Dashboard Encounter Dashboard Learn More Multiple Adjustment Lines Rebill the Claim from the Adjustment screen Adjustment Transaction ...
Patient Copay/Account Payment from Appointment
The payment could be a Copay only or a combination of a Copay and Payment on Account. Patient Copay entered on the Appointment Screen Select the Appointment from the Calendar. On the Appointment screen, select the Copay link. If a Copay amount is ...
Payment Posters New Employee Training
Welcome, New User!This Payment Posters Users' page will guide you to Articles that will help you navigate and get started in the System, specifically focusing on Payment Posting. Select the links in the order that they are listed for a comprehensive ...
