Patient Note Panel
Types of Notes
- Alert: An alert displays as a pop-up on the selected screen that must be closed to proceed.
- Billing Note: A Billing Note displays in the Note Panel on the Patient and/or the Encounter Dashboard.
- Contact Log: Use the Contact Log option for communication with Patients. The note only displays in the Note panel on the Patient Dashboard.
- Header Message: The Header Message displays in red font at the top left of the selected screen.
Add a Note
Select Add in the Notes Panel, or select Notes and then select Add.

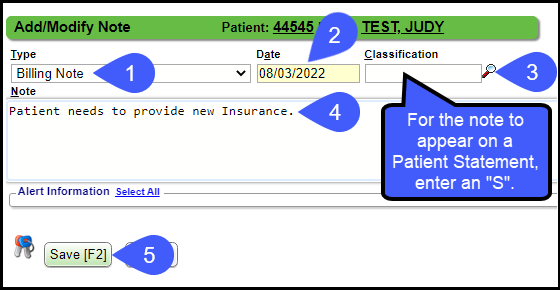
Add a Billing Note
- Type: From the dropdown list, select Billing or Contact Log.
- Date: Defaults to today's date but can be changed.
- Classification: Optional and can be left blank.
- Enter the Note.
- Select Save [F2].
Add an Alert
- Type: From the dropdown list, select Alert.
- Date: Defaults to today's date but can be changed.
- Enter the Note. In the following example, it is an Alert to the Front Desk person to obtain new Insurance information from the patient.
- Alert Information: Select where this note will pop-up as an Alert. Scheduling is chosen in the example which will prompt this Alert to pop-up if this patient is selected on the Calendar.
- Select Save [F2].
In this example, there is an Alert pop-up when adding a patient appointment and when the appointment is selected from the Calendar.
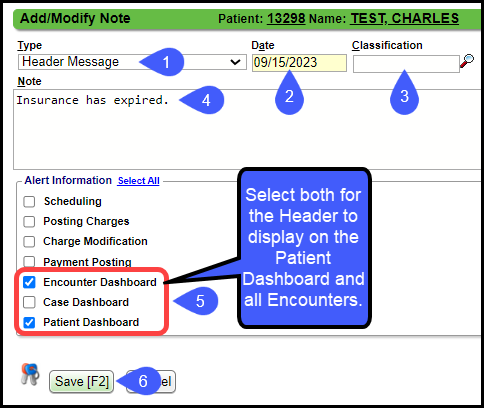
Add a Header Message Note
The Header Message displays in red on the Dashboard in the upper left corner.
.
- Type: From the dropdown list, select Header Message.
- Date: Defaults to today's date but can be changed.
- Classification: Optional
- Enter the Note.
- Alert Information: select where this note will display as a Header.
- Select Save [F2].
Header Message on Patient Dashboard and Encounter Dashboards
Select Encounter Dashboard and Patient Dashboard checkboxes.
- The Header message will display on the top left of the Patient Dashboard and all of the Patient's Encounter Dashboards.
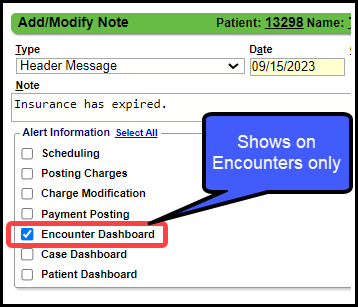
Header Message on Encounters Only
Select the Encounters checkbox only.
- The Header Message will display on all of the Patient's Encounter Dashboards.
- If you want the Header to display on a specific Encounter, create the Note on the Encounter Dashboard.
- Even though it is being created on the Patient Dashboard, the Header Message will not display on the Patient Dashboard unless Patient Dashboard is checked.
Example of a Header Message on the Encounter and Patient Dashboard.
View All Notes for a Patient
To see all Notes for a patient regardless of where they were added, select the plus symbol (+) or Notes. The list shows all Notes with the Encounter, Type Note, Classification of Note, and the Note entered by the user.
Print Patient Notes
Print all Patient Notes for a Specific Patient from the Patient Dashboard
- In the Notes Panel on the Patient Dashboard, select the Notes link.
- Select the PDF icon
.
- Select your Print icon (Yours may be different than the screenshot below.)
- Follow your printer's dialogue instructions, which may be different than below.
Print Patient Notes from the Custom Patient Query Report
Patient Notes can also be printed using the Custom Patient Query Report for a specific Patient for specific dates.
- A Date Range can be used to pull specific notes for a specific date(s).
- The Patient ID can be used to pull a specific Patient.
- Select Column, Patient > Notes
- Use the PDF
icon to export.
Removing an Alert or Header
It is not recommended that Notes be deleted. Instead, you can remove an Alert or Header. You will no longer get the pop-up for the Alert and the Header will not be shown at the top of the screen, but the note remains in the Notes List for history purposes.
- Select Notes. You can see the Types of Notes: H for Header and A for Alert.
- Select the Date of the Alert or Header Message you want to remove.
- Deselect the checkboxes in the Alert Information panel.
- Select Save [F2].
Delete a Note
It is not recommended to delete Notes unless it was entered by mistake. The notes should be a history of what has occurred on this patient.
- Select the Note to highlight it.
- Select Delete.
- Enter a Reason.
- Select Delete.

Learn More
Patient Dashboard Overview
Add A Customized Note to a Statement
Add an Encounter Note
Custom Patient Query (CPQ)
Related Articles
Encounter Notes Panel
Encounter Notes Panel Encounter Notes can be added on the Encounter Dashboard in the Notes Panel. Types of Notes Alert: An alert displays as a pop-up on the selected screen that must be closed to proceed. Billing Note: A Billing Note displays in the ...Patient Dashboard: Balance Panel
Balance Panel Features Navigation Links Post Charge Opens the Post Charge screen to add a new Charge for the Patient. ERAs Shows the number of ERAs, and the link opens the existing ERA List that is associated with the Patient. Cases Shows the number ...Patient FAQs
Alert/Header How do I remove an Alert or Header? Remove an Alert or Header Cases How do I add a Case? How do I add a Case? Charges How do I post a new Charge? How do I post a new Charge? Deceased How do I indicate that a Patient is deceased? Mark a ...Add/Register a New Patient
A new Patient can be registered from: Patient Lookup The Scheduling Dashboard > Patient Registration button The Calendar. The Navigation Search Box (Go-Box) You can determine which fields you want to be mandatory when adding a Patient from Patient ...Add a Recall to a Patient
A Patient can be added to the Recall List on the Patient Dashboard in the Patient Appointment panel and on the Scheduling Appointment screen. If a Patient has one or more Open Recalls, they can be viewed while scheduling an Appointment. Add a Recall ...