Partial Insurance Takebacks/Refunds
Use these methods when the insurance takes back only a portion of the money originally paid. This can be in the form of a physical check or a Payment that is automatically deposited in the bank (EFT).
- Manually Posting a Partial Takeback from a Paper Remit.
- ERA Posting a Partial Takeback not contained in the body of the Remit.
Manually Post a Partial Takeback on a Paper Remit
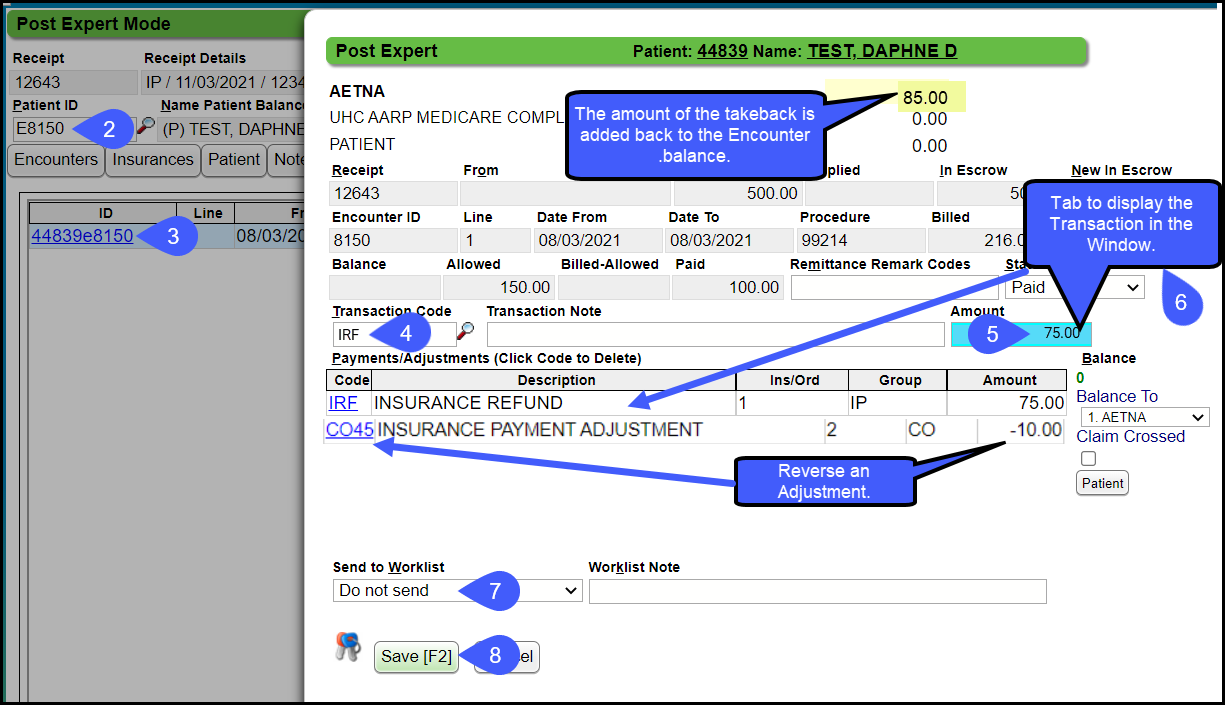
When manually posting an Insurance Payment with a Takeback, always post the Takeback first.
- From the Receipt, select Post (Expert Mode).
- Enter the Patient ID number or use the Lookup icon or enter the Encounter number preceded by an E (e1234) and press the Tab key.
- Select the ID.
- Transaction Code: Enter IRF.
- Amount: Enter the Amount of the Partial Takeback. Since the IRF Transaction Code negates the amount, enter the Takeback amount as a positive number.
- Press Tab to display the Transaction in the Window.
- If the Remit defines the adjustments to be reversed, you can enter the adjustments here, such as a CO45 which would be entered as a negative amount. Add any necessary adjustments. However, you may not know which Adjustments to reverse until the Payer takes the full Takeback.
- Send to Worklist: The Encounter can be sent to a Worklist for follow up.
- Select Save [F2].
- Continue to Post the remaining Payments on the paper Remit.
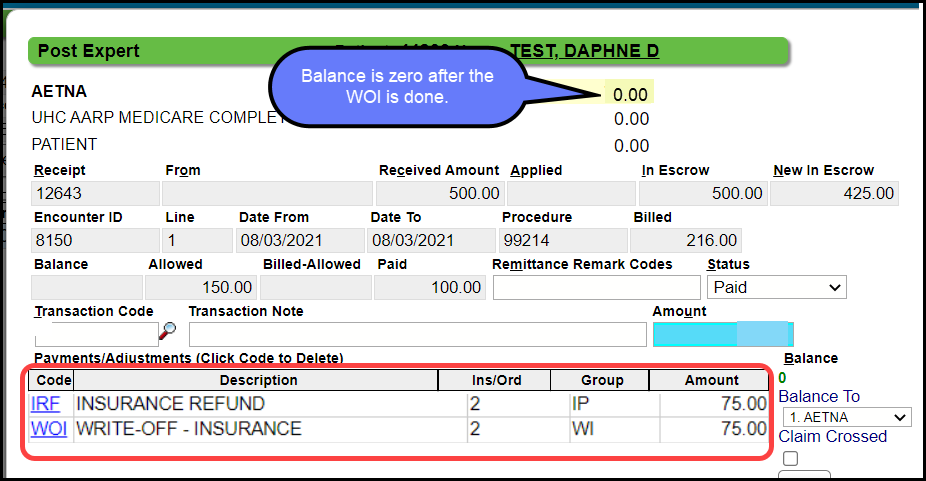
Write-Off Balance on the Post Expert Screen
If you want to write off the balance before leaving the Post Expert screen, add a WOI (Insurance Write off) for the amount of the Takeback.
Post a Partial Refund sent to the Payer by Check
Scenario: You have received a letter from a Payer for a Partial Refund.
- Most of the time, the Payer will take the refund from a future Remit.
- However, you may need to send the refund by check. (Be careful that the refund is not taken twice: by check and taken from a remit.)
Create the Receipt for Partial Refund by Check
- Select the Post Refund link on the Encounter.
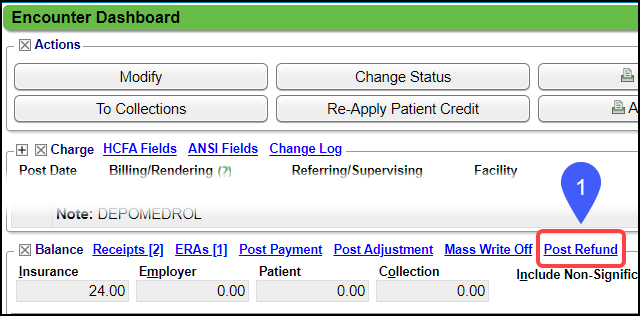
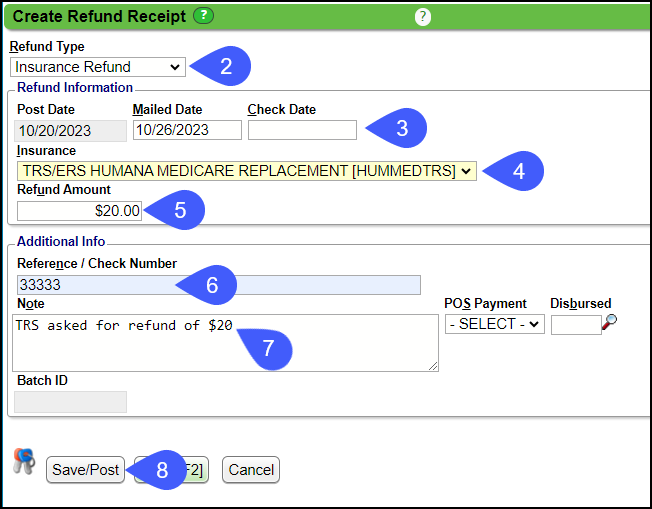
- Refund Type: Select Insurance Refund.
- Enter the Mailed Date/Check Date.
- Select the Insurance to be refunded.
- Enter the Refund Amount (Positive number)
- Enter the Check Number.
- Notes: Enter applicable notation.
- Select Save [F2].
Post the Partial Refund
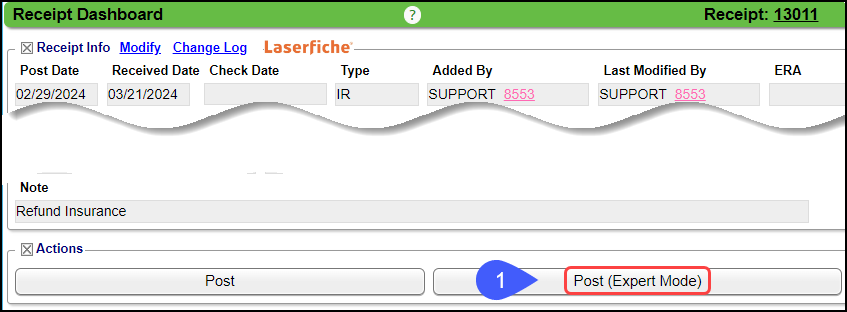
- Select the Post [Expert Mode] button on the Insurance Refund Receipt Dashboard.
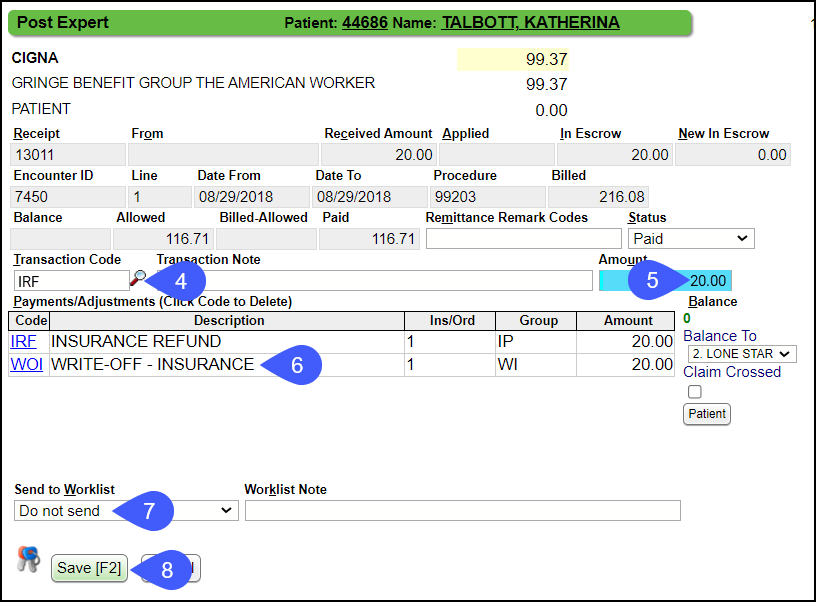
- Select or enter Patient/Encounter ID.
- Encounter ID must be preceded by an E (e12345).
- Select the Encounter Line Item to refund.

- Transaction Code: Enter IRF.
- Refund Amount: Enter the amount as a positive number
- Press Tab to display the Transaction in the Window.
- Applicable Adjustments can be added here also.
- Send to Worklist: The Encounter can be sent to a Worklist for follow up.
- Select Save [F2].
ERA Partial Takeback as a Provider Level Adjustment
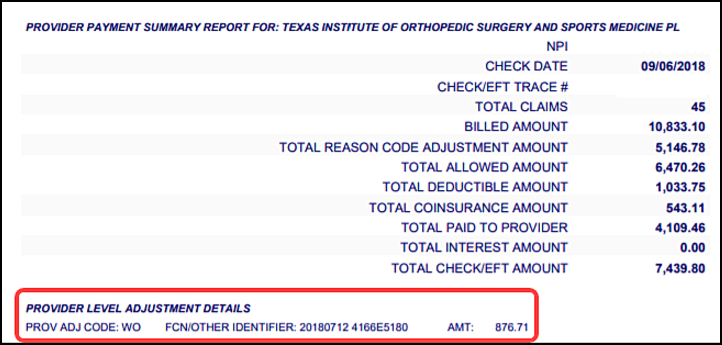
A Partial Takeback on an ERA is can be found at the end of the Remit listed under Provider Level Adjustment Details or in the body of the Remit.
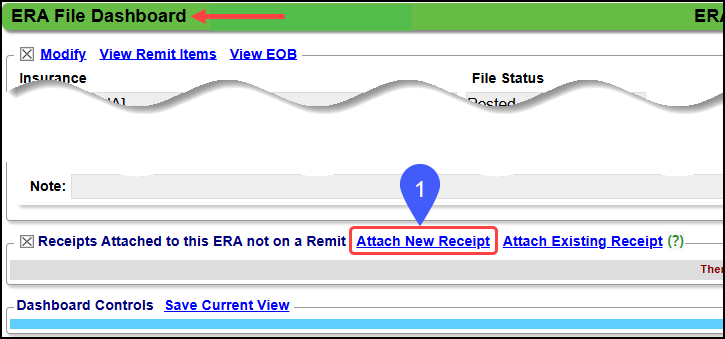
- If it is at the bottom of the Remit, there will be a message in red on the ERA File Dashboard that notifies you that there is a Provider Level Adjustment.
Attach a New Receipt and Post with Post Expert
- On the ERA File Dashboard, select Attach New Receipt.
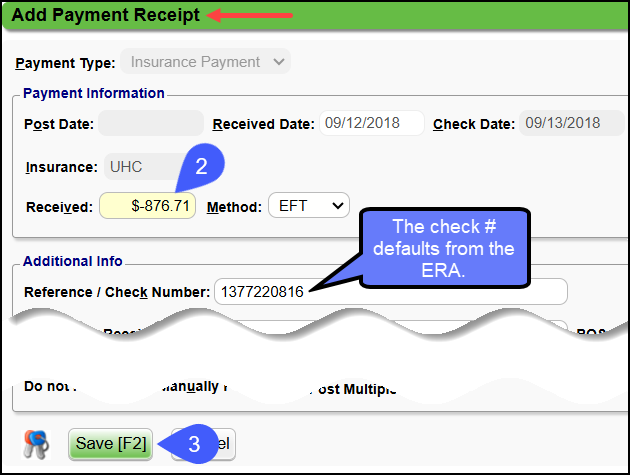
- Received: Enter as a negative the Amount of the Takeback.
- Select Save [F2].
- On the ERA File Dashboard, select the Receipt that was created.
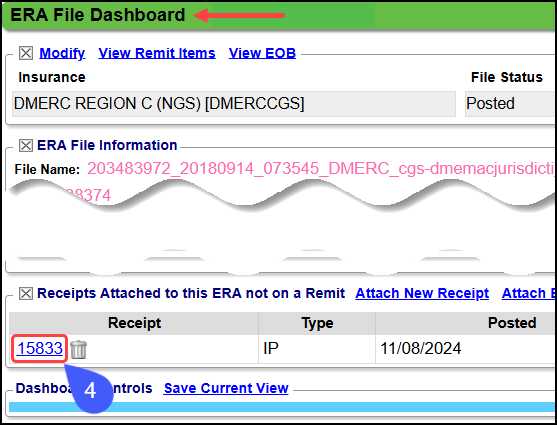
- Select the Post (Expert Mode) button.

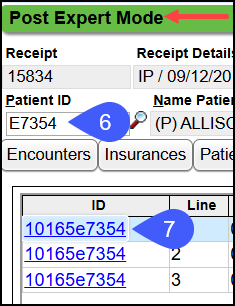
- Enter the Patient ID number or use the Lookup icon or enter the Encounter number preceded by an e (e1234).
- Select the ID.
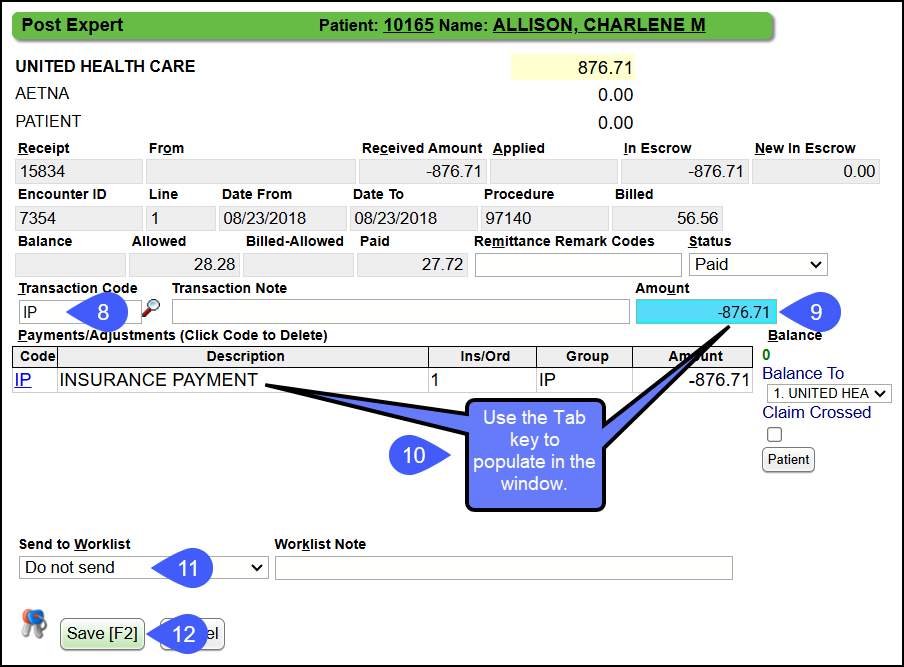
- Transaction Code: Enter IP
- Amount: Enter the Amount of the Takeback using a negative number.
- Press Tab to display the Transaction in the Window.
- Add any necessary Adjustments. You may not know what the Adjustments are until the Payer takes the full Takeback.
- Send to Worklist: The Encounter can be sent to a Worklist for follow-up.
- Select Save [F2].
ERA Partial Takeback in the body of the Remit
If the Partial Takeback is on a Patient in the body of the Remit, use Post Expert to post the partial Takeback. The Remit most likely went on Hold.
Use Post Expert on the ERA Remit screen to post it manually
- Select the Remit number on the ERA Remit Items screen.

- Select the Post Expert Button on the Manage Electronic Remittance Item screen.

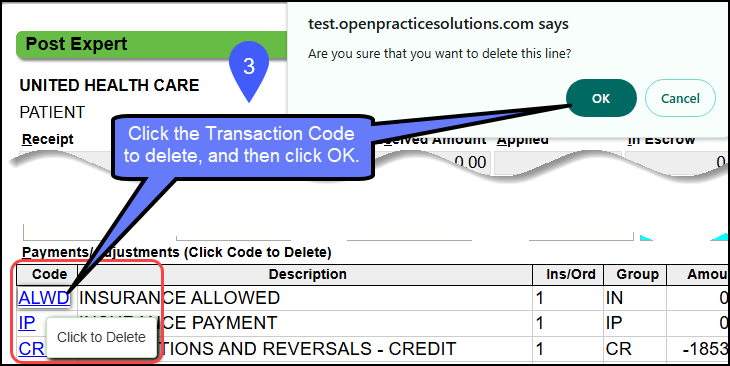
- If the Partial Takeback posted incorrectly, delete the lines that are incorrect.
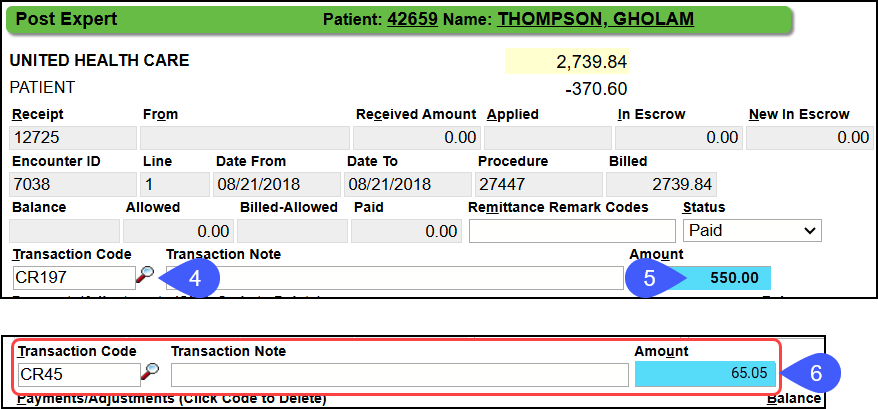
- Enter a Transaction Code for the Payment Reversal, such as CR197.
- Enter the Amount of the Partial Refund for this line item.
- Add Adjustments that need to be reversed.
- Many times, this is done when the full reversal is done.
- If this is the entirety of the Reversal, reverse the necessary adjustments using a Transaction Code, such as CR45, and enter the amount of the adjustment to be Reversed.
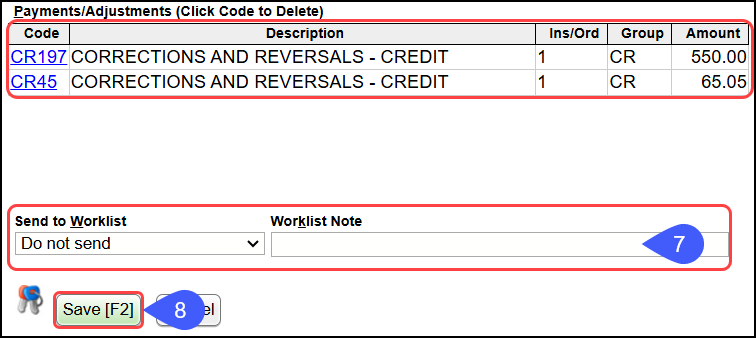
- Send to a Worklist with a note, if applicable.
- Select Save [F2].
Learn More
Partial Invoice Refund
Related Articles
Patient Refunds
Patient Refunds The following steps show the process of refunding Patient Credit Balances. If any part of the money is currently in escrow it needs to be posted in full before proceeding. A Patient credit balance is necessary to post a Patient ...Insurance Takebacks/Reversals Overview
Sometimes a Payer will retract (Takeback) a Payment that has been previously paid. Example: The Payer may have discovered that the Patient was not eligible on that Date of Service. The retraction may be a Partial Takeback or a Full Takeback. If the ...Invoice Refunds
Post an Encounter Invoice Refund See Credit Memo to correct an Invoice that was billed incorrectly. If an Encounter was on an Invoice that should not have been billed to that Employer, use the Credit Memo process to notify the Employer of the error. ...Full Insurance Refunds & Takebacks Posted Manually
There is a specific workflow for manually posting Insurance Refunds. If there are other Payments on the Remit, the Refund(s) must be posted before the Payments are posted. Attach to a Reference Batch before beginning the Refund process. It is ...ERA Takeback/Refund/Reversal
Post as Remitted vs. Using the Takeback Process Using Post as Remitted on the ERA completes a Takeback exactly as the Remit dictates in the ERA. In some cases, the Manual Post button will be used to do the Takeback when the ERA does not calculate ...

