Pair your Device and Process a Credit Card Test Payment
Virtual Credit Card Device
- You can use a stored card or physically enter the credit card information.
- Pairing is not needed to use the Virtual Credit Card Device.
- The credit card vendor charges a larger percentage per transaction when entering a credit card manually.

Physical Card Reader
A physical card reader is a device that resides in your office where the credit cards can be swiped, tapped, or inserted.
- This device needs to be paired.
- Multiple Users can access and utilize the same Card Reader/Terminal.
Pair your Device
Enter yourself as a Patient in the System.
Create a Receipt from the Patient Dashboard.
- Payment Type: Patient Payment
- Card Amount: Enter $1.00 in the Card field and the Copay field (without the dollar sign).
- Choose the Card Type from the dropdown list.
- Select Save [F2].
Pop-up Widget
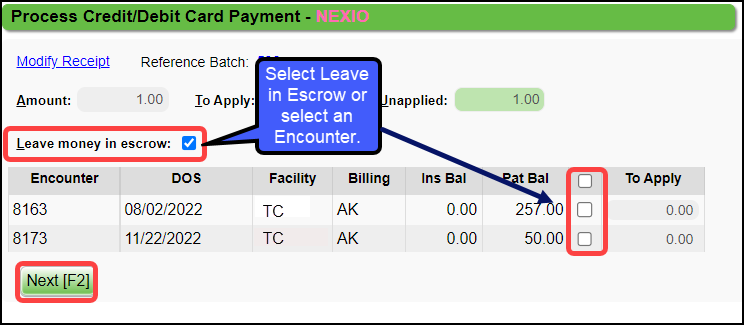
Select Leave Money in Escrow checkbox or select an Encounter.
Select Next.
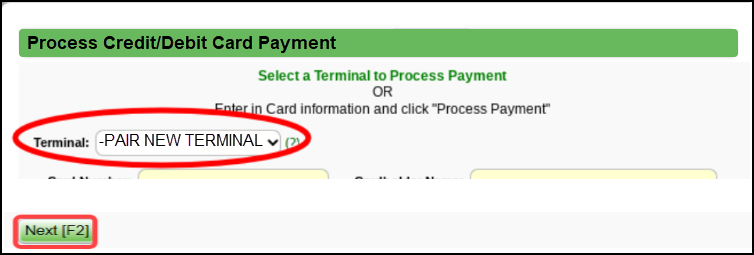
Terminal: From the dropdown menu, select -PAIR NEW TERMINAL-.
Select the Next button.
Terminal Name: Enter a name for your Terminal.
Select the Generate Pairing Code [F2] button.
A pop-up with a Pairing Code will display. Enter the Pairing Code into the card reader.
Your terminal/card reader must be connected and powered on.
The card reader will indicate that it will accept a pairing code at this time.
Process a Credit Card Test Payment
- You can use your own credit card for the amount of $1.00.
- Once you have confirmed the Payment, you can do a Refund on the Credit Card Payment
- You can now start processing live Transactions.
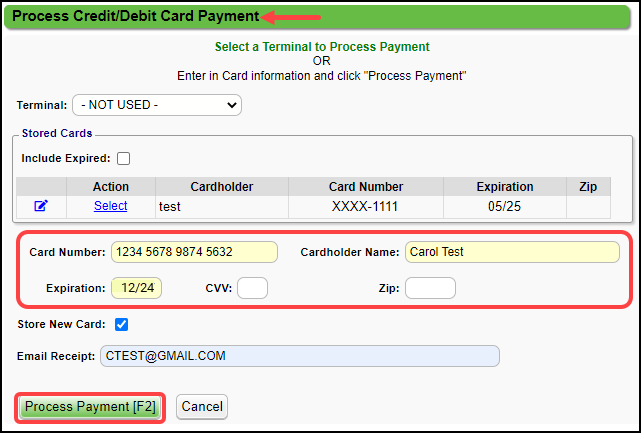
Select the Process Payment [F2] button.
Enter the Credit Card Information.
*****Wait for the card to finish processing before closing the screen.*****
A Confirmation number will display on the Receipt in the Confirmation field and in the Note field.
Prior to Go-Live, you will be asked to confirm that the Credit Card Payment was received in the bank account.
After Payment confirmation, you can begin processing live Transactions.Refund the $1.00 Payment
Use the Refund button on the Receipt screen to refund the $1.00 Payment.
Use this link for Documentation on how to do a Refund: Patient Refunds.
Deactivate the Patient that you Created
If you do not want to keep yourself in the System as a Patient, you can deactivate it. See this link for documentation on how to deactivate a Patient.
Learn More
Related Articles
Credit Card Services Overview
This feature is only available for clients that have System merchant service integration in place. Credit Cards can be used for Patient Payments and Insurance Payments. Credit Card Setup System Setting for Electronic Processing Checkbox If you are ...Add/Process a Credit Card Payment
A Receipt can be created for a Patient or an Insurance Credit Card Payment. You must have merchant (credit card) service integration in place for this feature to be available. If you are not using one of the System Merchant Services, you will not see ...Process an Insurance Virtual Card Payment
Posting an ERA Virtual Credit Card Payment In order to receive the funds, the information must be processed with a Credit Card Processor. There are multiple ways the Virtual Card can be processed depending on the order that the ERAs and Virtual ...Refund or Void a Credit Card Payment
What is the difference between Voiding and Refunding Credit Card Payments? If the Payment is stopped the same day that the Receipt was created and processed, the Void button will be available to use. If the Payment needs to be stopped anytime after ...Wind River Lane Terminal Setup
Initial Setup To set up the credit card device successfully, an internet connection is required, either through an Ethernet cable or Wi-Fi, depending on the chosen device. Verify that an Ethernet port or nearby router is accessible from your ...

