On-Demand Statements/Print or Upload
On-Demand Statements
The On-Demand Statement option gives you the ability to produce a Statement outside of Cycle Billing.
Create an On-Demand Statement
- Choose Statements on the Left Sidebar menu.
- On the Statements Management Dashboard, select the Create On-Demand Batch button.
- On the Batch Statements: On-Demand Batch pop-up, select Statements or Invoices from the Batch dropdown.
- Enter the Patient ID or Guarantor ID or use the Lookup icon.
- If you want to include all patients with this Guarantor, select the checkbox.
- Enter other Filter Criteria if applicable.
- Select Create Batch [F2].
Upload or Print/Preview a Single Statement
An On-Demand Statement can be Uploaded or Printed.
- If the On-Demand Statement is marked as mailed, the Dunning Message count increases by 1 as it would with a Cycle Batch.
Upload a Single Statement
- Uploading a single Statement is the same as uploading a Statement Batch containing multiple statements.
Print/Preview a Single Statement
- On the Statements Management Dashboard, select the Statement Batch number in the Statements Batches to be Sent/Processed panel.
- Select Preview/Print.
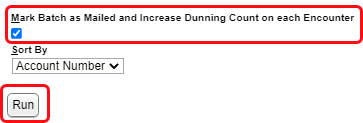
- Mark the Batch as Mailed and Increase Dunning Count: Select the box for batch status to be updated to mailed and to increase the Dunning Count.
- Sort by is not applicable for On-Demand Billing.
- Select Run.

- Choose the Print icon to print the PDF view that is displayed. The format for locally printed statements is not the same as the Uploaded Statements.
![]()
Learn More
Print/Preview a Statement Batch Locally
Related Articles
Statements/Invoices Management Dashboard
The Statement Management Dashboard provides breakdowns of the batch counts, dollar values associated with the batches, and the status of the batches. Before Statements/Invoices can be sent, Profiles must be set up. Learn More: Statements/Invoice ...Manually Batch and Upload Statements
If you created a Test Statement and/or Invoice Batch, delete it before creating your first Statement or Invoice Batch to mail. Visit this link for documentation: Delete a Statement/Invoice Batch. From Statements on the Left Side Menu, select Create ...Statements/Invoices Overview
Statements/Invoices Overview Statement and Invoice Profiles must be set up before Statements can be sent. Statements and Invoices must be set up separately. Both require Proofs to be approved. Statement Profiles Setup Statement/Invoice Test Batch and ...Print/Preview a Statement Batch Locally
If the Statement Services feature is not being used, a Statement Batch can be printed locally. Locally printed Statements cannot be custom formatted Statements can only be custom formatted if the Statement Services feature is being used, which allows ...Statements/Invoices Troubleshooting
Troubleshoot Statements/Invoices Check the Statement Batch Status Created: The Batch has been created, but not uploaded. Uploading: The Batch is in the process of Uploading to the Statement Department. Accepted: The Statement was received by the ...