Keep Active, Deactivate, and Reactivate User IDs
As a security measure, a User who has not logged in for 30 days will be unable to log in until their User ID has been reactivated.
- Activation, Reactivation, and Deactivation can be done from the alert on the Home Dashboard and from User Maintenance.
- If a User with Support access is Deactivated, their Support access will also be Deactivated.
Keep Active or Deactivate on the Home Dashboard
The site administrator will be alerted on the Home Dashboard in the Manage User section when a User has not logged into the system in one month or more.
- Select Keep Active to allow the User ID to keep the ability to log in.
- Select Deactivate to remove log in privileges from the User ID. The User name will be retained in the System but cannot log in.

If a User is Deactivated while that User is logged into the System, the User will still be able to work in the System until they log out. The User will not be kicked out of their current session.
Reactivate a User ID in User Maintenance
From the Admin Dashboard, select User Maintenance.
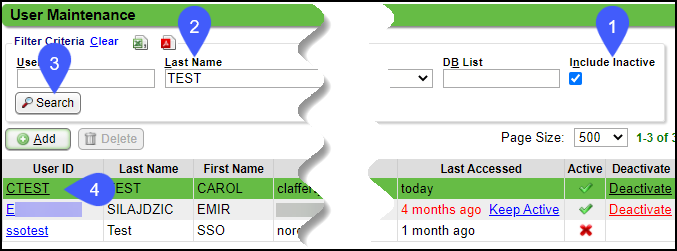
- Select Include Inactive in the Filter Criteria.
- Use the Filter Criteria to find the User to reactivate or use the list of Users.
- You can search by User ID, Last or First name. In the following figure, the Last Name, Test, is used for the search.
- Select Search.
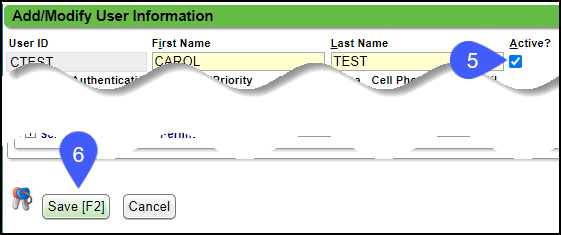
- Select the User ID for the User you want to reactivate.
- Select Active to Reactivate the User.
- Select Save [F2].
Deactivate a User in User Maintenance
When a User is no longer with your Organization, the User can be deactivated.
- The User Name is retained in the database, but the User will be unable to log in.
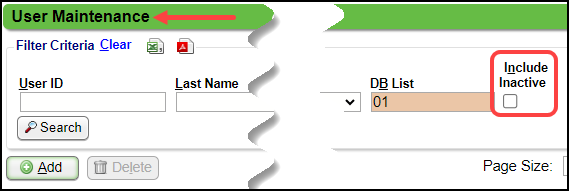
- To view Inactive Users, select the Include Inactive checkbox in the Filter Criteria.
You will be prompted to enter your Password when accessing or creating Users.
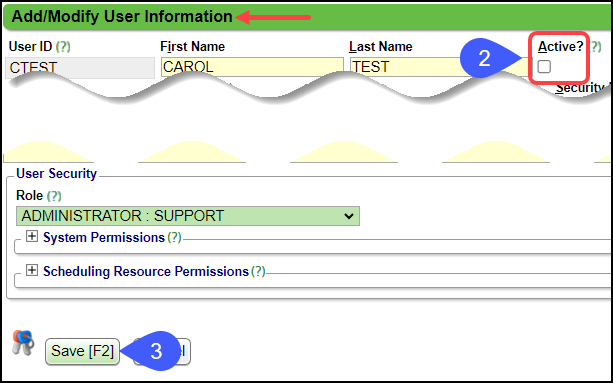
Make a User Inactive in User Maintenance
From the Admin on the left menu, select the User Maintenance button.
- Select the User ID.
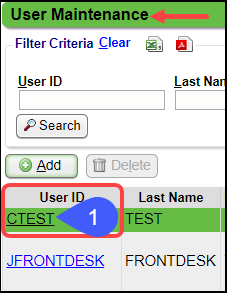
- Deselect the Active checkbox.
- Select Save [F2].
Learn More
Login Security
User Account Lock and Login Notifications
Two-Factor Authentication
Password Reset
Related Articles
Add or Modify a User
A Site Administrator is the only one authorized to create and modify Users. User Maintenance From Admin on the Left Side Menu, select User Maintenance. Search for existing Users by using the Filter Criteria. You will be prompted to enter your ...Support Ticket Portal FAQs
Ticket Button Why does the View Ticket button not work in my email? The View Ticket button does not work in my email When I select the View Ticket button, I get this message: It looks like your user has not been authenticated to access the ticket ...User Account Lock and Login Notifications
A User will receive an email if: A User has too many unsuccessful login attempts, which will lock the User's account; The User is logging in on a computer that you have not used to log into the System previously; or The User has not logged into the ...Login Security (Table of Contents)
Contents Keep Active, Deactivate, and Reactivate User IDs Login Security User Account Lock, Failed Login, and Login Notifications Two-Factor Authentication Password ResetTakeback or Refund No Longer on an Active Profile
In some instances, a Takeback is requested from a Patient's original Insurance after it has been updated or rebilled to a new or corrected insurance. If the old Profile has been deactivated by unchecking the Active box, the original Profile should be ...