Import an ANSI 835 (ERA) File
 To successfully import an ANSI, the file must be an 835 File from the Payer. Other file types (such as Excel files) will not be imported. You may incur a charge per Remit.
After the initial ERA setup, ANSI ERA (835) files are imported automatically into the System with no User intervention needed.
- However, when first implementing, it is common for ERAs to be routed to your old Clearinghouse.
- Files from the old (legacy) System can be imported manually into the new System, which means Payments do not need to be manually posted.
 This feature can be activated in System Settings. (System Settings > Payments > IMPORTERA - Manually Import 835 > Y)
Note: To import an 835 file, it must be saved to your local computer.
- A single 835 can contain multiple ERAs/Checks.
- All of the ERAs/checks will be imported when using the 835 manual import function.
- Each ERA/Check will be listed separately.
Import an ERA 835
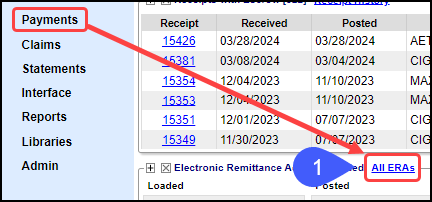
- From Payments on the Left Side Menu, select All ERAS.
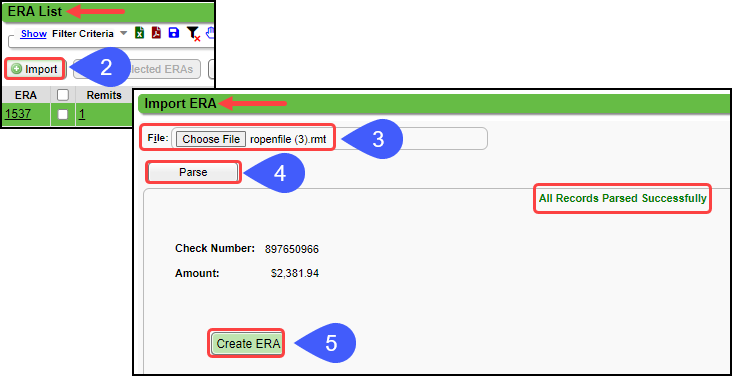
- Select the Import button.
- Choose File: Select the 835 File that was saved to your computer.
- Select the Parse button.
- If the 835 File was parsed successfully, the button to Create ERA will display.
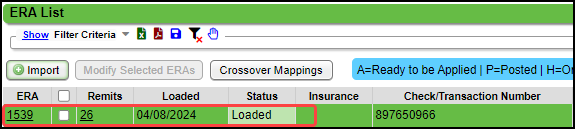
835 File Imported
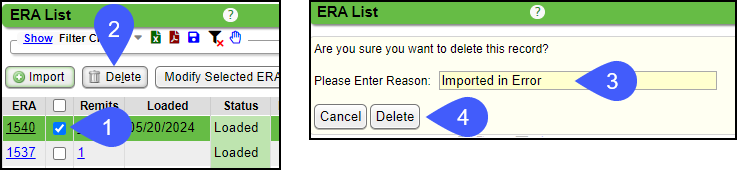
Delete an Imported ERA
Imported ERAs can be deleted if you do not need the file or it was created in error.
If the Imported ERA has been applied (posted), it must be unapplied before it can be deleted.- On the ERA List, select the checkbox on the Imported ERA File to be delete.
- Select the Delete button.
- Enter a Reason for the deletion.
- Select the Delete button.
Mixed ERAs
The initial ERAs often contain a mix of Payments belonging to the new System and the old (legacy) System.
- The Payments associated with the new System are automatically posted in the new System.
- Payments linked to the legacy system are automatically flagged for posting in your old System.
Related Articles
Post/Apply an ERA
Reference Batch Received Date By default, the Received Date is populated by the Paid Date on the ERA File. If you want the Received Date to be a different Date, there is a System Setting to allow the entry of a Received Date on the Reference Batch ...CSV Upload/Import Tool
To activate this functionality, submit a Manage Services Ticket. The Import Tool can import Demographics, Charges, Balances, and Appointments into the PM System. The imported file must be a .csv or .txt file. Upload the CSV File It is strongly ...ERA File Dashboard
ERA File Dashboard The ERA File Dashboard is an overview of: The ERA information Breakdown of the Status of each Remit Breakdown of Check Amount, Applied Payments and Takebacks, Disbursed, and Unapplied. Attach a new and existing Receipts ERA File ...Provider Import Tool
The Provider Import Tool can be used to Import: Billing/Rendering/Referring Providers Provider Credentials Provider IDs Provider Linked Facilities Use the Import button to Import the Providers into the respective Libraries, and use the Modify Import ...ERA is a Duplicate
ERA is a Duplicate ERA is a Duplicate At times Payers send the Clearinghouse duplicate files. These are forwarded into the System for your review. The figure below shows a message for you to confirm if this is actually a duplicate. CLICK HERE opens ...