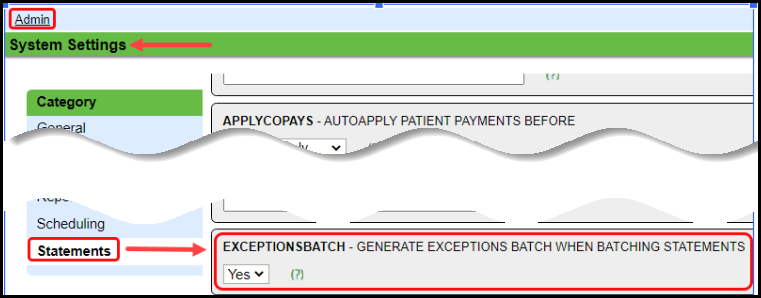
Statement Exception Batches
For the System to create Exception Batches, the System Setting must be set to Yes which is the Default. (To change: Admin > System Settings > Statements > EXCEPTIONSBATCH)
The Exception split option provides easy accessibility to Statements that need attention before they are sent. The ability to review Exceptions in a Statement Batch allows you to Remove a Guarantor or an Encounter from the Batch or to Modify an Encounter or Guarantor before sending the Statements.
- Exception Batches will be created per Statement Profile for the following:
- A Patient has money in Escrow or has a credit balance.
- Multiple Patients are linked to the same Guarantor, and one or more of these patients have funds in escrow or have a credit balance.
- All Patients of that Guarantor will be included in the Exception batch even if only one has the issue.
- However, If filtered by Separated by Encounter, the ones that you do not want to send can be removed.
- The Encounter is missing a Guarantor.
- A Patient is deceased.
- If you want to continue sending Statements to the Guarantor of the deceased or the Estate, an Exception Batch for Deceased Patients can still be uploaded manually without any further action being taken.
- Missing Statement Addresses
- Missing Contact Information (Notifications)
An Exception Batch for missing Contact Information (Notifications) is only created when all of the following are true:
A Notification method exists on the Statement Profile.
The Guarantor is opted in for that Notification method.
The Contact Information for that method is missing.
Note: These actions are only available for statement batches that have not been uploaded.
Why Was a Statement Put in an Exceptions Batch?
When a Statement is suppressed and not mailed, it will be separated into an Exception Batch on the Statements/Invoices Management Dashboard in the Batches To Be Sent/Processed panel.
Batches to be Sent/Processed
- To see why the Statement was split into an Exceptions Batch and was not sent, select the number in the Items column.
- The banner at the top left of the screen, shows why the Statement(s) is in an Exceptions Batch.
Statement History
- Select the History link on the Statements/Invoices Management Dashboard.
- Select the number in the Statements column.
Remove or Modify Selected Items in Clean Batches or Exception Batches
On the Exception Batch, select the number in the Statements column.
Filter Criteria
See: Statement Batch Items Filters
Remove Selected Items
- If the filter option "Separate by Encounter" is selected, each Encounter will display on a separate line, allowing you to remove individual Encounters from a Statement Batch.
- Guarantor: If selected, all Patients and Encounters on the Statement will be affected.
- Patient: If selected, each Patient on the Statement will display, and all Encounters on the Statement for that Patient will be affected.
- Choose the checkbox(es) of the items to be removed.
- If the filter option "Separate by Encounter" is selected, each Encounter will display on a separate line, allowing you to remove individual Encounters from a Statement Batch.
- Select the Remove Selected Items button.
- Select the OK button.
Modify Selected Items
Modifying selected items allows you to write off the balance easily or reset the Dunning Count for Guarantors or Encounters.
Write-Off Balance
- Separate by: Guarantor
- Write-Off Balance: This will write-off all Patient Balances under this Guarantor.
- Use Case: The Patient is the Guarantor and is now deceased.
- There is a small Patient Balance on several Encounters.
- All Encounter Balances can be written off by Guarantor.
- Separate By: Encounter
- Write-Off Balance: Written-off by Encounter.
- Use Case: There are Encounter Balances less than $2.00.
- Those small balances can be written off by Encounter.
- Separate By: Patient
- Write-Off Balance: Written-off by Patient.
- Use Case: Patient is a friend of the doctor, and he does not want to balance bill his friend.
Write-Off by Guarantor Example
- Filters: Separate By: Guarantor
- Select the checkbox(es) by the Guarantor(s) to write-off balances.
- All of the Encounters listed for Guarantor 94 will be written off.
- Select the Modify Selected Items button.
- Action: Write-Off Balance
- Adjustment Code: Write-Off Code of your choice.
- Change Status: Select the Status that will show on each Encounter.
- Remove from Batch: Select the checkbox.
- Note: Enter a Note (Mandatory).
- The Write-Off Notes are added to the Receipt that is created by System to hold the Write-Off Transactions.
- Select Save [F2].
Reset Dunning Count
Reset the Dunning Count for all Encounters with a Patient Balance under the Guarantor.
- Separate by:
- Guarantor: Select the Guarantors whose Dunning Count you want to change.
- The Dunning Count will be reset for all Encounters with the same Guarantor that have a Patient Balance.
- Patient: Select the Patients where you want to Reset the Dunning Count.
- The Dunning Count will change for all Encounters with a Patient Balance for the Patients who were selected regardless of who the Guarantor is.
- Encounter: Select the Encounters to set back the Dunning Count.
- The Dunning Count will be reset the Individual Encounters that were selected.
Reset Dunning Count Example
- Separate By: Encounter
- Select the checkbox(es) for the Encounters to Reset Dunning Count.
- Select the Modify Select Items button.
- Action: Select Reset Dunning Count
- Dunning Count: Select the Dunning Count to change to.
- Note: Enter a Note.
- The Reset Dunning note is saved in the Notes section of the applicable Encounter.
- Select Save [F2].
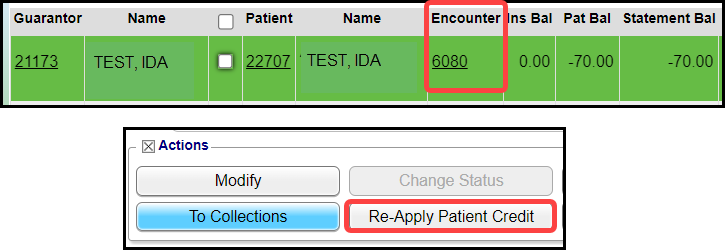
Move a Credit Balance
A Patient Credit Balance can be moved to another Encounter that has a Patient Balance for the same Guarantor.
- Select the Encounter ID from the Exceptions List.
- Select Re-Apply Patient Credit.
Apply Receipts in Escrow
- Select the Patient ID or Encounter ID.
- Choose the Receipts link.

Resolved Exceptions
When the Exceptions are resolved or removed, the Batch can be uploaded as is.
- The Batch does not need to be recreated or rerun.
- When the Exceptions Batch is uploaded, the Statement balances will reflect any Payments/Credits that were applied.
- The removed Statements/Encounters will not be included in the Batch.
Job Scheduler Change
- Batch: Choose one of these Options:
- Statements/Invoices: Batches both Statements and Invoices
- Statements: Batches Statements Only
- Invoices: Batches Invoices Only
- Upload after Batching: Select one of the following Options:
- None
- Clean Batch
- Clean and Exception Batch.
Related Articles
Access Statement/Invoice Batches
Access Statement/Invoice Batches Use the Navigation Search field Enter stb in the Navigation Search field and enter The Statement Batch History screen displays If you know the Statement Batch number, enter stb space and the statement batch number ...Statement/Invoice Exceptions Batches Table of Contents
Content Statement Exception Batches Invoice Exception BatchesStatement Batch Overview
Statement Processing Statement files are processed after 1:00 PM Eastern. Any Statement files received after this time will be processed the following workday. Statement Files are NOT processed over the weekend. Statement Batch Dashboard Details: ...Allowed Fee Exception Report
To find underpayments, this report compares posted allowed amounts to contractual allowed amounts. The Allowed Fee Exceptions Report shows discrepancies on Posted Allowed amounts against the Allowed Fee Schedule. It does not report on CO's and ...Statement/Invoice FAQs
Statement/Invoice FAQs Balance Forward on Statements/Invoices How do I show/exclude Balance Forward on Statements? How do I show/exclude Balance Forward on Invoices? Batch Why did a Statement not Batch? Statements/Invoices Troubleshooting Delete a ...