Add a Recall to a Patient
A Patient can be added to the Recall List on the Patient Dashboard in the Patient Appointment panel and on the Scheduling Appointment screen.
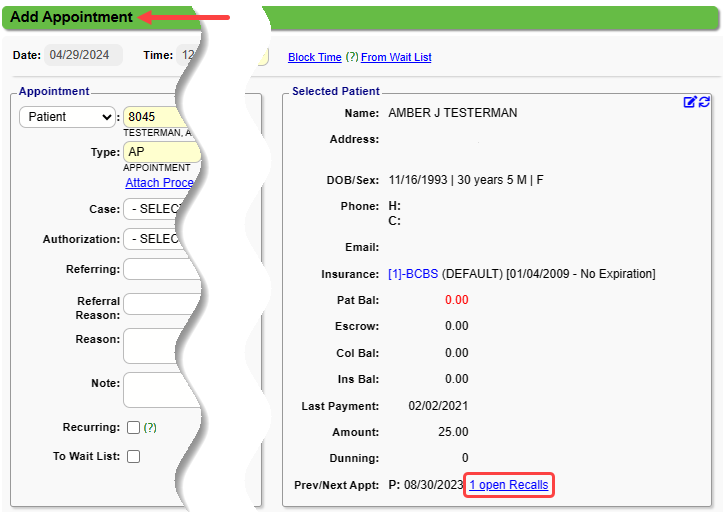
If a Patient has one or more Open Recalls, they can be viewed while scheduling an Appointment.
Add a Recall
On the Recalls screen:
- Select Add.
- Add a Recall Date.
- Appointment Type: Use the dropdown to choose the Appointment Type. This is useful when running a Recall report for a specific Appointment Type. (Optional)
- Ordering Provider: (Optional)
- Facility: (Optional)
- Resource: (Optional)
- Note: Add specifics about the Recall.
- Select Save [F2].
Delete a Recall
A Recall can be deleted if it is no longer needed.
- Open the Recalls screen using the link on the Patient Dashboard.
- Select the line to highlight it.
- Select the Delete button.
- Add a Reason for deleting.
- Select Delete.
Indicate an Appointment Completes a Recall List Appointment
- When creating a new Appointment, you are presented with a Validation Warning popup window.
- If the new Appointment completes the Recall, select the checkbox which will remove the Patient from the Recall list.
- Select Save and Continue.
Recall Query Report
The Recall Query Report Is found on the Scheduling Dashboard.
If the Recall is resolved while scheduling an appointment, the recall is removed and is no longer on the report.
Automate Recall Reminders
Recall Reminders are a Premium Add-On Feature. Contact Support or your Account Manager for more information.
Recalls can be automated in Patient Outreach.
- Create Recall Templates to send Recall Reminders to Patients automatically.
- If the Recall Criteria on the Patient matches the Recall Criteria in the Recall Template, the Recall Reminder will be sent.
-
Learn More
Print Labels/Mail Merge
Related Articles
Custom Appointment Query (CAQ)
The Custom Appointment Query (CAQ) report can be customized to query Appointment information. This report can be used for: A Scheduling List for the day, which gives more detail than the Appointment List Report; and A Custom Query can be used to ...Custom Query Reports Hub
Custom Query Reports (CQR) Custom Encounter Query = CEQ Custom Receipt Query = CRQ Custom Transaction Query = CTQ Custom Patient Query = CPQ Custom Appointment Query = CAQ Overview Filters and Criteria Create a CQR CEQ CRQ CTQ CPQ CAQ Overview Custom ...Patient Appointment Screen
When you select a Patient's Appointment on the Calendar, it opens the Patient's Appointment screen which displays: Banner Patient's name DOB/Age Appointment Type Additional Patient Information Phone Numbers Address Patient's Insurance Appointment ...Appointment Reminders/Recall/Balance Notification Message Templates
This is a Premium Add-On Feature. Contact your Account Manager for more information. Appointment Reminder/Recall/Balance Notification Message Templates Overview Message Templates Overview Message Templates for Appointment Reminders, Recall, and ...Appointment/Recall Reminder Sets
This is a Premium Add-On feature. Contact your Account Manager for more information. Before creating the Appointment Reminder Set or a Recall Set, create the basic Reminder Texts, Emails, and/or Voice Message Templates. Automate Appointment and ...