Print One or Multiple Paper Claims
Print One Claim at a Time from the Encounter Dashboard
From the Encounter Dashboard, select the Print Claim button.
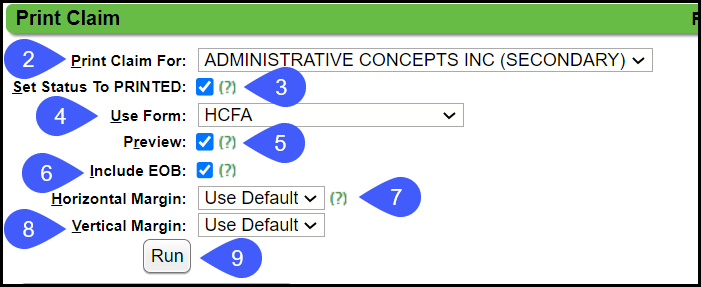
Set Status to Printed: If selected when you Run to generate this claim, the Encounter Status will be updated to PRINTED.
Print Claim for: Choose the Payer from the dropdown.
- The default is the Insurance that has a balance.
- If the selection is a Secondary/Tertiary Payer, the Include EOB field displays.
Use Form: Choose the form you are using, such as HCFA or UB04.
Preview: When selected, the HCFA Claim form (red font) will show on the Preview along with the Claim data, and will print as well.
- Select the Preview checkbox if printing the Claim on Plain Paper or just viewing the Claim.
- Leave the Preview box unchecked if printing on a pre-printed claim form, such as, HCFA/UB04 Form. If Preview is NOT selected, only the claim data will display and print (without the form).
Include EOB: This field only displays if the Secondary/Tertiary Payer is chosen for Print Claim For field.
Select the checkbox to print the EOB along with the Secondary/Tertiary Claim.
Horizontal Margin: Use Default
Vertical Margin: Use Default.
Select the Run button.
Print Claims for Multiple Encounters from the Patient Dashboard
- On the Patient Dashboard in the Balance panel, choose Print Claim in the Select Action dropdown.
- Select the Claims to print.
- Select the Apply button.
- On Print Claim pop-up, choose your options and select Run to print.
- A PDF will be created for printing.
Preview a Claim on a HCFA
Paper Claim
- Select the Print Claim button on the Encounter Dashboard.
- Select the Insurance.
- Use Form: HCFA
- Preview: Select the checkbox to view the claim on a HCFA form.
- If the claim is being printed on a HCFA form, the Preview will need to be unchecked before printing.
- Select Run.
Electronic Claim (ANSI)
This will not show you the exact information that is being sent on an Electronic Claim.
To view the Electronic Claim, select the ANSI Preview on the Encounter Dashboard.
An Electronic Claim is divided into Loops and Segments.
Each represents information that is being sent to the Payer electronically.
When contacting a Payer regarding an Electronic Claim, always ask what Loop and Segment the missing information should be in on the Electronic Claim.