Post an HSA/HRA Payments
When Insurance Plans send the Claim to the Secondary or Tertiary Payer electronically (Crossovers), frequently the Secondary/Tertiary Payer is not on the Insurance Profile in the PM System.
- This applies mostly to Medicare and HSA/HRA Crossovers.
- When the Claim has been forwarded by a Payer to the next Payer, it is received in the PM System as Forwarded to Secondary or Tertiary.
- When the Remit is Applied in the PM System, the balance cannot be moved to a Secondary Payer that is not on the Patient's Insurance Profile.
Map an Insurance Crossover to an Existing Insurance
Using the Mapping feature, the Crossover Insurance can be mapped once to an existing Insurance which automatically adds the Secondary/Tertiary Payer to the Insurance Profile.
- Select this link for auto-mapping: Map an Insurance Crossover.
- If you decide not to use the auto-mapping feature, the Secondary/Tertiary Payer will need to be added manually or the balance transferred manually back to the Primary Payer.
Manually add the Secondary/Tertiary for Crossovers
Always post the Primary Payment first before posting the Secondary.
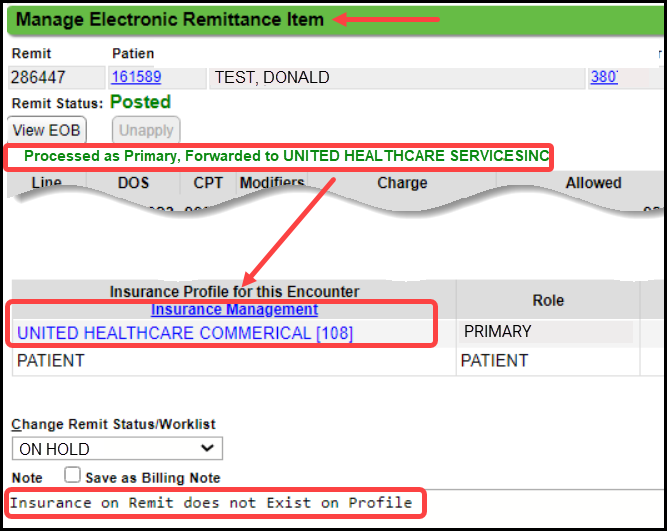
- On the Manage Electronic Remittance Item screen, look for how it was processed.
- If it appears that the Primary Payer is forwarding it to itself, it is probably an HSA Payment

Options for Handling HSA/HRA Payments
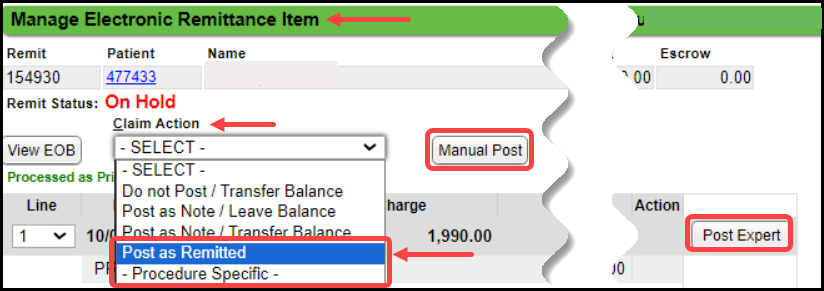
- Manually use Post as Remitted to post the Primary Payment. (Procedure Specific, Manual Post, or Post Expert can also be used.)

- When the Secondary Payment is received:
- The Secondary Insurance will need to be added to the Insurance Profile before posting it; OR
- Transfer the balance back to the Primary Insurance to post the Secondary.
- Use Post as Remitted to post the Primary Payment.
- When the Remit is Applied, the Primary Payment will go On Hold.
- Select the Remit number.
- Before using Post as Remitted for the Primary Payment:
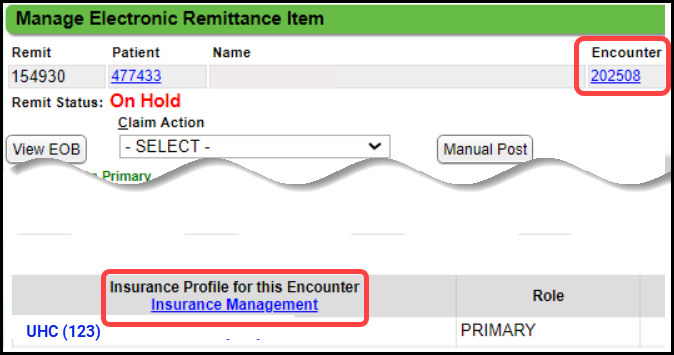
- Select the Insurance Management link which will display the Insurance Profiles.
- Add the Secondary Insurance to the Insurance Profile so it will be there when the Secondary Payment arrives; OR
- If you want to use the Primary Insurance to post the Secondary Payment (since it is the same as the Secondary),
- First post the Primary Payment using Post as Remitted.
- Before leaving the screen, use the Encounter link to navigate to the Encounter.
- Use the Balance Transfer button to transfer the balance back to the Primary Insurance so that the Primary can be used for posting the upcoming Secondary.
- Many times the Secondary HSA Payment is on the same Remit as the Primary.
- Close the Encounter screen.

- Use the ERA Management Rule, Transfer to Non-Existent Secondary/Tertiary, to auto-post the Primary Payment using Post as Remitted.
- If you receive a lot of HSA/HRA, changing this setting to Post the Primary Payment as Remitted can be a huge time saver.
- This will auto-post the Primary Payment instead of putting it On Hold.
- You will need to add the Secondary Payer or transfer the balance back to the Primary when the Secondary Payment is received.
Post a Secondary HSA Payment
- If the Primary Insurance is used to post the Secondary Payment, select Secondary for the Post as Responsibility field on the Post Insurance Payment screen.
- If the Primary Insurance was Posted as Remitted, and the Secondary was not added or the balance transferred back to the Primary, it will need to be done before posting the Secondary Payment.
If the HSA Secondary Payment is a $0 payment, Post as Note/Transfer Balance which will drop any PR codes to Patient Responsibility.
Related Articles
Post an Insurance Payment Manually
Before posting, add an Insurance Receipt for the full amount of the check. Manually Post a Primary Insurance Payment Using the Receipt that was created for this payment, select the Post button. Enter the Encounter number preceded by an e (e1234) and ...Manually Post a Secondary Payment like a Primary Payment
Post a Secondary Payment as you would a Primary Payment Normally, you would not post a CO45 on a Secondary Payment. The Secondary Payment screen does not have the option to enter a CO45. However, there may be an occasion where this is necessary to ...Post Payment as a Note on ERA
Post as Note is used when you want to capture the Remittance denial adjudication information without financially impacting the Encounter. This keeps the line item from being written off in order to resubmit the Claim after it has been worked. Do not ...Create an Invoice Receipt and Post Invoice Payments
If you intend to use Invoices or Post Invoice Payments, you must add the System Setting: Admin > System Settings > General > INVOICE = Yes. Even if you do not send Invoices, the System Setting must be set to Yes to post an Invoice Payment. Create ...Post a Pre-Payment
Post a Pre-Payment to an Incomplete Charge This workflow is for groups who choose not to leave Receipts in Escrow for prepaid services. This process works well for paying Providers before services are rendered. Create an Incomplete Charge On the Post ...