CSV Upload/Import Tool
 To activate this functionality, submit a Manage Services Ticket.
The Import Tool can import Demographics, Charges, Balances, and Appointments into the PM System.
- The imported file must be a .csv or .txt file.
Upload the CSV File
It is strongly recommended that Users pin the HL7 Interface panel to their Home Dashboard for ease of access.
- On the Interface screen, select the Upload Messages button to access the CSV Import Dashboard.
- Select the Upload File button to open the CSV Import window.
- Select the Import Profile.
- Always import Demographics before importing Charges.
- Select the .csv or .txt file.
- Select the Modify Columns button and use the Column Settings screen to adjust the mapping.
- Select Save [F2] when finished.
- Select Parse File.
- The System will check the file for errors or warnings.
- The summary will display the total number of errors.
- Select Create Charges or Create Patients to Import the data into the System.
CSV Import Dashboard
Interface > Upload Messages
The table on the CSV Import Dashboard shows a list of files that have been imported and provides the User with multiple ways to interact with the file.
- Use the Import Dashboard to Upload a File, Modify Import Profiles, or view information about a previously uploaded file.
Import Dashboard Columns:
- File: The file is available to download for 30 days.
- Log: A log file is generated if there was a problem with the SFTP import.
- The file can be downloaded to review the errors.
- Undo: The file can be undone.
- Charge Imports can only be undone if no modifications have been made to the Charge.
- Patient Imports can only be undone if no Payments, Charges, or Appointments exist for the Patient.
- Redo: Available for SFTP Imports if a new version of the file has been loaded into the SFTP for an errored file.
- Name: Displays the name of the Imported File.
- Type: Displays the Import Type.
- Patient or Charge
- Items: Opens the Upload Items screen.
- The Upload Items screen details the Patients/Charges that were imported.
- Select an underlined number to view these items.
- Status: Shows if the file is processed, unprocessed, errored, processing, or reprocessing.
- Interface: Displays the Interface that is tied to the Import.
- User: Records the User that initiated the Import.
- Added: Displays the date and time the import was uploaded.
Modify Columns
The Modify Columns button is found on the CSV Upload screen.
- Interfaces > Upload Messages button > Modify Columns button
- To activate the Modify columns button, select the Import Profile and select the file.
Modify Columns when:
- The file is unable to match the System's File Schema.
- The prefixes and values may need to be updated.
- An aspect of the file is being changed going forward.
To modify or update these values, select the Modify Columns button.
- On the Column Settings screen, the User can change the Mapping methods and assign the appropriate header values.
Modify Columns: Demographics
- Parser Information Panel: Do not use. For Internal purposes only.
- Prefixes Panel: Assigns File prefixes to allow the System to identify the Patient, Guarantor, and Policyholder data points within the file.
- The prefixes are appended before the record type in the Column header.
- Example: Patient_First_Name
- Prefix: Patient_

- Demographics Panel: Assigns the record type values.
- Record type values come after the prefix in the column header.
- Example: Patient_First_Name
- Record type: First Name
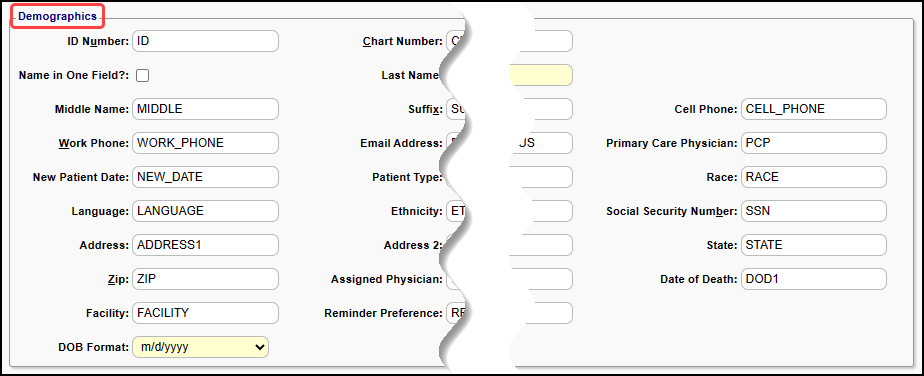
- Relationships/Insurance Panel: Assigns additional record types.
- This panel usually assigns the relationship field and policyholder information.
- Custom Field Panels: A Custom Field must be created to import custom information.
- Custom Fields can be mapped in the dropdowns.
Modify Columns: Charges
- Parser Information Panel: Do not use. For Internal purposes only.
- Mapping Methods Panel: Defines how to match to a Patient and generate Encounters.
- Map Patient ID by: Select method of matching to a Patient.
- The standard procedure is to match on First and Last Name and DOB.
- Map Charge by: Select method of creating Encounters.
- Map by Encounter ID: This method is the standard procedure.
- The System parses the rows to identify relationships within the file by using an Encounter ID value. (This is not the unique Encounter ID generated in the System.)
- Example: If 3 rows have values of "1" as an Encounter ID, then all 3 rows would generate one Encounter with 3 Procedure Lines.
- All Lines on Same Row: The Prefix information must be entered based on the file.
- This assumes that all Charge information is on one line on your data file.
- Example: Use Proc_1, Proc_2, and Proc_3 to determine the order of the Procedure Codes when the Charge is created.

- Claim Level Panel: Select and map the Encounter-level information.
- The Static Label is a system-delivered field.
- Example: Facility
- The Dropdown is a .csv field.
- Example: Service Facility
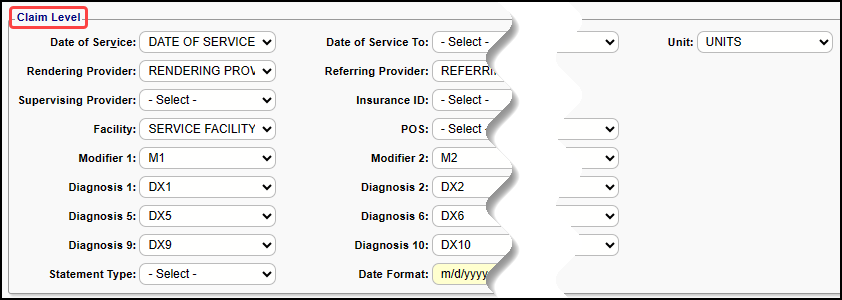
- Institutional Fields Panel: If Institutional Claims are being imported, the Bill Type is mandatory.
- Custom Field Panel: If custom information needs to be imported, a Custom Field must be created.
- This can be mapped in the custom field dropdown.

Balance Forward Imports
What does a Client do with the A/R from their old (Legacy) System?
Recommended Best Practice:
- You should focus your attention on the Insurance A/R in your Legacy System.
- The goal is to work rejections/denials/unpaid Claims and resubmit them from your Legacy System.
- Once the Claims are adjudicated, the balance transfers to Patient A/R.
- When most of the Claims have been worked in the Legacy System, a Balance Forward Import can be done to import the balances into the New System.
- Patient A/R can be imported.
- This minimizes the need to send Patient Statements out of 2 systems simultaneously, which can be costly and time-consuming.
Create the Interface for the Import
Use the documentation above with these specifics:
- Use the Template for Pat Bal Forward.
- For Patient Balance Forward, create a Procedure Code, PATBALFWD selecting the Patient for Billable.
- Create Diagnosis Code, MISC to use for DX1, or existing Diagnosis codes can be used.
Failed Message Troubleshooting
Interface > Upload Messages
- Select the underlined number to open the file that contains the failed message.
- Check for any discrepancies in the data.
- If the data appears to be correct, highlight the line and select the Recycle button.
OR go to Interface > Incoming Messages
- Status: Failed
- Type: DFT
- Select the Failed Message.
- Select the Recycle button.
Results of Recycling:
- If recycling parses the message, it is resolved.
- If recycling does not resolve the issue, contact Support.
Learn More
Referring Provider Import Tool
Related Articles
Provider Import Tool
The Provider Import Tool can be used to Import: Billing/Rendering/Referring Providers Provider Credentials Provider IDs Provider Linked Facilities Use the Import button to Import the Providers into the respective Libraries, and use the Modify Import ...Import Tool Overview
The Import Tool can be used to Import Providers, Referring Providers, Appointments, Charges, Patient Demographics, and Balances. The Import Tool can also be used as a Demographic Conversion Tool. There is a one-time setup fee and a monthly recurring ...Upload Forms
Upload Forms After a Form has been created outside of the PM, it can be uploaded to the System. From Libraries on the Left Side Menu, select Forms in the Parent Tables panel. Select Add. Form Panel (All Forms) Form Type: Determine where this form ...Import an ANSI 835 (ERA) File
To successfully import an ANSI, the file must be an 835 File from the Payer. Other file types (such as Excel files) will not be imported. You may incur a charge per Remit. After the initial ERA setup, ANSI ERA (835) files are imported automatically ...Upload Scanned Documents
Upload Scanned Documents There is a 2MB file size limit for uploads, and this cannot be increased, and TIF files are not supported. With the Direct Scanning feature (Premium Add-On), you can scan Drivier's Licenses (IDs) and Insurance Cards directly ...