Create an Insurance Receipt
Payment Posting can be accessed from several places using one receipt to post an entire check amount to multiple Encounters.
Create an Insurance Receipt
Create the Receipt using one of the following methods:
- Type 'nr' in the Navigation Box or
- Select Payments on the left menu and choose Post Payment or
- Choose the Post Payment link on the Patient Dashboard.
Payment Type: Choose Insurance Payment
Post Date: The date should automatically populate from the Reference batch. If it is blank, you are not attached to a reference batch. Stop and create and/or attach to a reference batch and return to this screen.
Received Date: Enter date payment was received.
Check Date: Optional
Insurance: Enter or search for the Insurance making the payment.
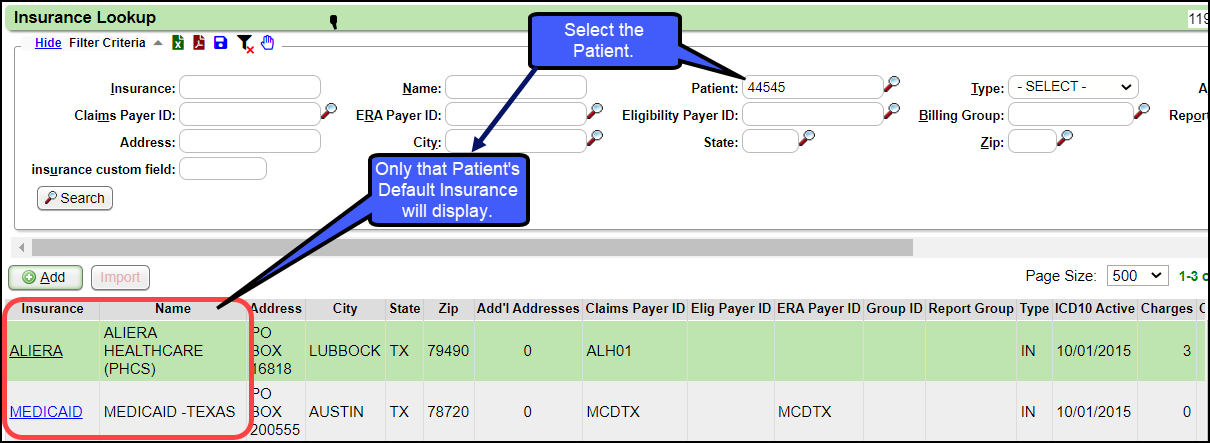
If you are unsure about which Insurance to choose, the Insurance can also be found by using a Patient on the Remit.
Use the Insurance Lookup icon.
Using the Patient field, select a Patient on the Remit and Search.
Only that Patient's Insurance will display.
Choose the appropriate Insurance.
Received: Enter the full amount of the check/payment. Payments remain in escrow until all Payments are posted in full.
If the amount of the Remit is zero, enter 0.00.
Method: Choose the payment method.
Reference/Check Number: Enter the check number or identifying payment information.
In the Payment Posting Action panel, click the button for Manually Post .
Select Save [F2].

Once the Receipt is created, post all Insurance Payments for all Encounters on the Explanation of Benefits (EOB). See Post An Insurance Payment Manually.
Related Articles
Create a Patient Receipt/Post Payment Manually
Patient Receipt Creation If the Copay was not entered during the Check-in/Check-out workflow or if your Practice does not use the Calendar: Enter NR in the Navigation box (Go-Cuts) shortcut; Use the Post Payment link on the Patient Dashboard; Use the ...Payments, Receipts, and Escrow Overview
Receipt vs. Payment information The System is an Encounter/Charge based Accounting System. Receipts and Payments are fundamentally different. The Receipt holds the details of the money received, who the Payer is, how much was deposited in the bank. A ...Collection Payments
Collection Agency Setup The Collection Agency should be set up in the Insurance Library. Learn more: Pre-Collection/Collections. Post a Collection Agency Payment Create one receipt for the Collection Agency Payment. Even if it contains multiple ...Payment/Receipt FAQs
Adjustments/CARC Codes How can I post additional Adjustments? Post an Adjustment from: Payment Dashboard Patient Dashboard Encounter Dashboard Learn More Multiple Adjustment Lines Rebill the Claim from the Adjustment screen Adjustment Transaction ...Post a Pre-Payment
Post a Pre-Payment to an Incomplete Charge This workflow is for groups who choose not to leave Receipts in Escrow for prepaid services. This process works well for paying Providers before services are rendered. Create an Incomplete Charge On the Post ...