Capitation, Bonus, and Incentive Posting
Capitation, Bonus, and Incentive Posting
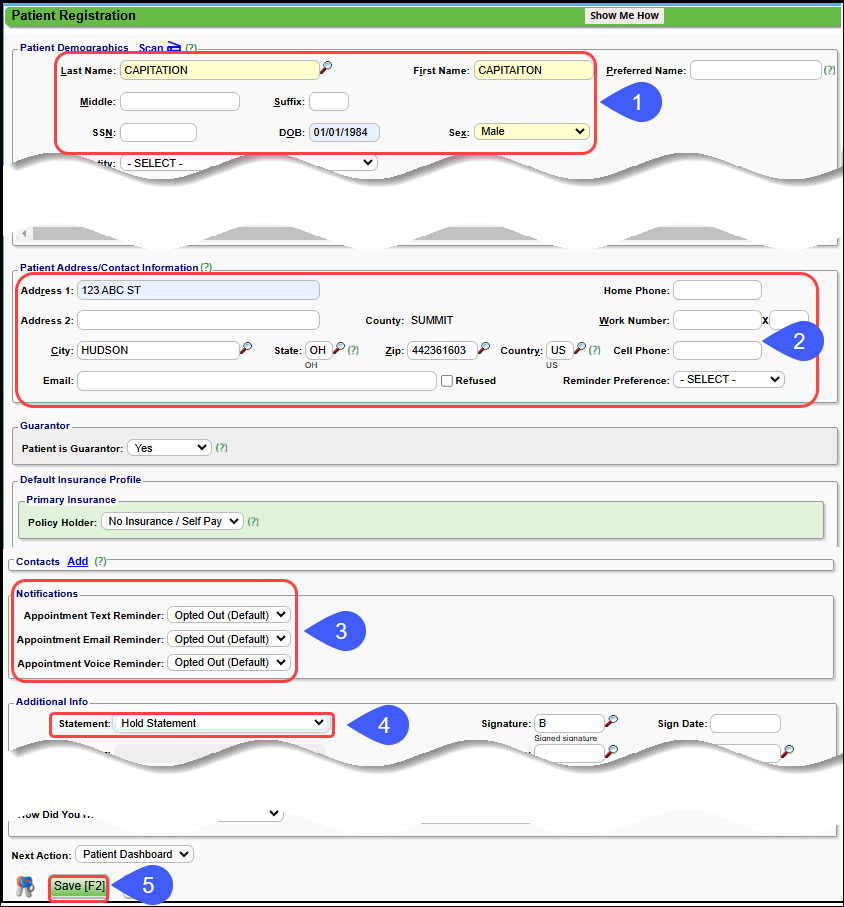
Create a Capitation Account
- Register a Miscellaneous Patient.
- Make the name recognizable (such as Bonus, or Incentive, Misc).
- Add an address, such as the office address.
- Balance Notifications: Opt Out of Paperless, Email, and Text.
- Statement: Hold Statement.
Add an Insurance Profile
Add the Insurance to the Encounter that is paying the Incentive/Bonus.
Create a Custom Transaction Code
- From Admin, select Transaction Codes.
- Example: CAP Debit Transaction Code: CAPDBT.
- Type: Debit
- Group: IC
- Responsibility: All Insurance
- Go to the Patient Dashboard of the Capitation/Incentive/Bonus Patient Account.
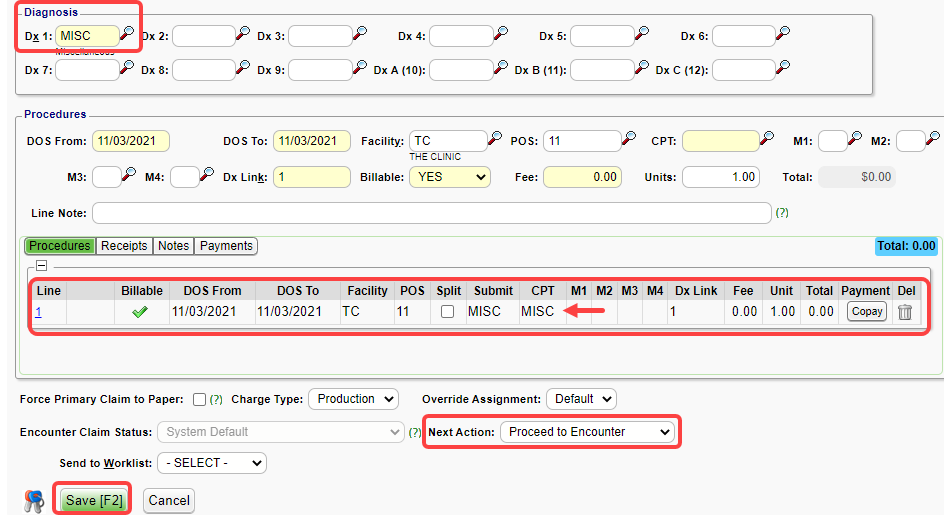
Post a Zero Charge
- On the Incentive Patient Dashboard, select Post Charge.
- Use MISC for Dx.
- Use MISC for CPT.
- Enter 0.00 for the Amount.
- Choose Proceed to Encounter
- Select Save.
- Take note of the Encounter number.
OR
Use a Charge Template
See Charge Templates to Learn More.
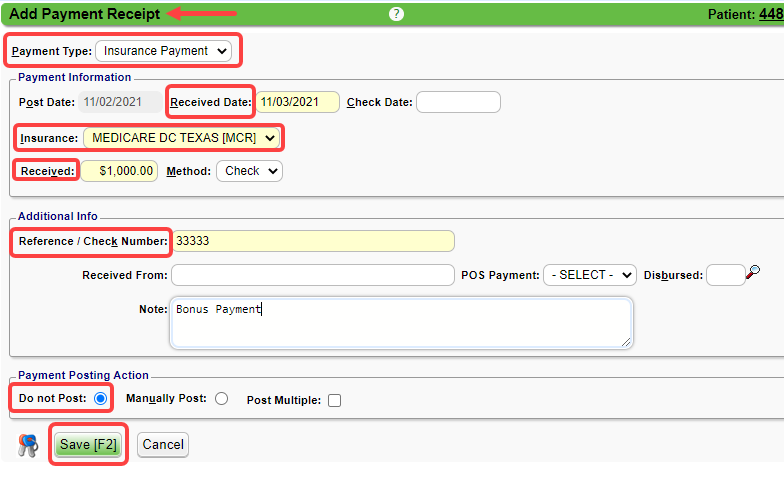
Create a Receipt
- On the Incentive Encounter Dashboard, select Post Payment. (If you do not see the Encounter on the Patient Dashboard, select the checkbox for Include Zero-Balance Encounters.)
- Payment Type: Insurance.
- Complete the Receipt.
- Select the Do Not Post button.
- If you forget to select Do Not Post, select Cancel to get back to the receipt.
- Select Save.
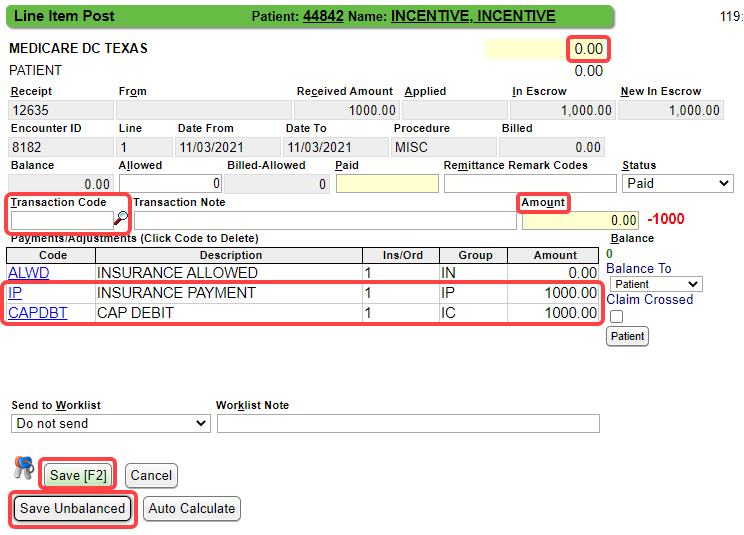
- Select the Post [Expert Mode] button.
- The Patient ID will auto-display if you were on the Encounter or Patient Dashboard. Tab out of the Patient field.
- Choose the Encounter line number In the list.
- Add Transactions:
- Transaction Code: Enter IP.
- Amount: Enter the Amount of the check.
- Tab.
- Transaction Code: Enter CAPDBT (or whatever you named your CAP Debit Transaction Code). This transaction is to write off the credit balance to zero out the Encounter.
- Amount: Enter the Amount.
- Tab.
- Select Save as Unbalanced.
- Select Save.
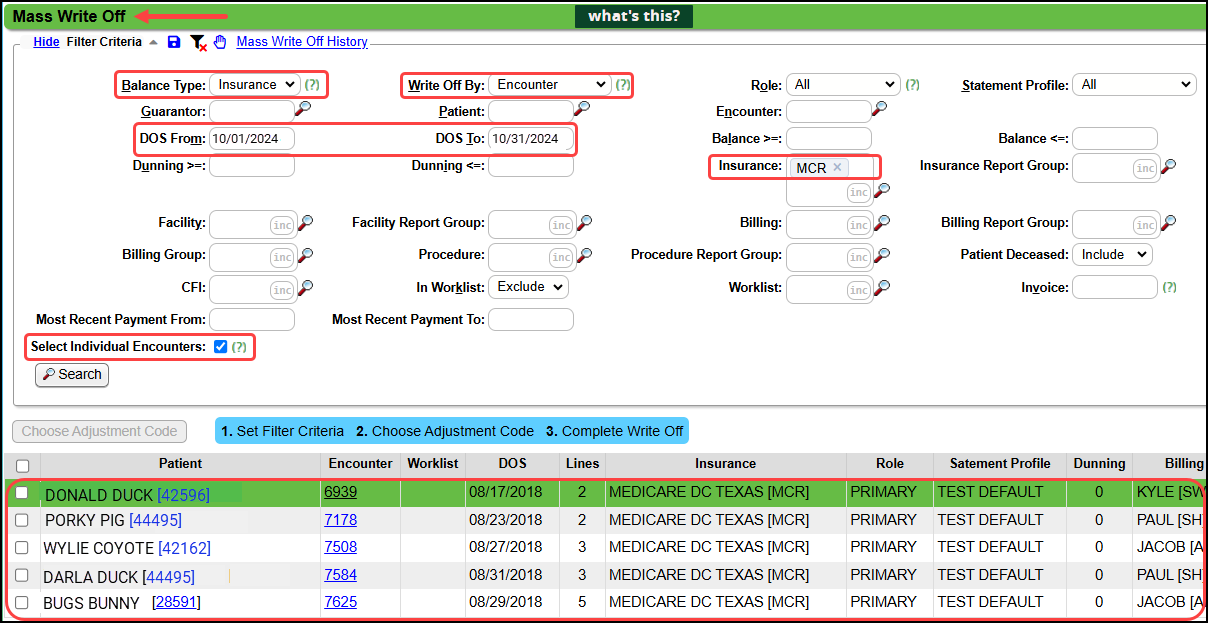
Capitation Mass Write-Offs
If there is a balance on the Patient's Encounter(s) where Capitation was paid, it will need to written off.
- The Mass Write-Off feature can be used to expedite the Encounter write-offs.
- Balance Type: Insurance
- Write-Off By: Encounter
- DOS From and To: Enter the Date of Service From and To.
- Insurance: Select the Insurance from which the Capitation Payment was received.
- Select Individual Encounters checkbox if you want to individually select them.
Bonuses and Incentives
Bonuses and Incentives can be posted the same way, but without the Mass Write-Off.
Related Articles
Charge/Claim FAQs
Charge/Claim FAQs Attachments How do I indicate there is attached paperwork? Attached Paperwork Attending Physician What is an Attending Physician? Attending Physician An Attending Physician is the one who is responsible for the overall care of a ...ERA Posting Overview
ERA Access on the Payment Dashboard All Loaded ERAs are viewable from the Payment Dashboard in the Electronic Remittance Advice - Loaded panel. From this screen, you can navigate to the ERA File Dashboard or the ERA Remit Items screen by selecting ...Charge Templates
Create and Save Charge Templates to use for frequently entered Procedures, for Explosion Codes, and for Self Pay Charges, such as products that are purchased in the office. Add a Charge Template From Libraries on the left Sidebar menu, click Charge ...Payment Posters New Employee Training
Welcome, New User!This Payment Posters Users' page will guide you to Articles that will help you navigate and get started in the System, specifically focusing on Payment Posting. Select the links in the order that they are listed for a comprehensive ...Receipt Management Report
Receipt Management The Receipt Management Report is recommended for reconciling your bank deposits and your ERA Electronic Fund Transfers (EFTs). The Receipt Management Report is most commonly run by Post Date which will tie in to the Month End ...