Add Appointment Resource in the Billing/Rendering Library
Add the Resource from the Provider Dashboard

You are unable to delete a Resource once it has been linked to an Appointment.
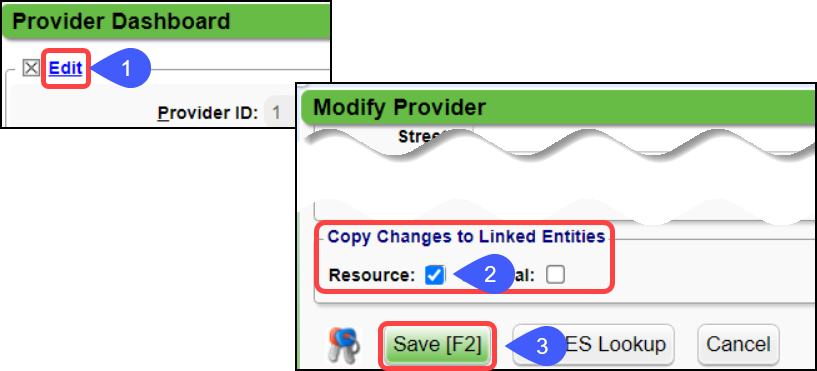
- Select Edit.
- Select the checkbox for Resource to add this Provider as a Resource on your Calendar.
- Select Save [F2].

Modify the Resource from the Provider Dashboard
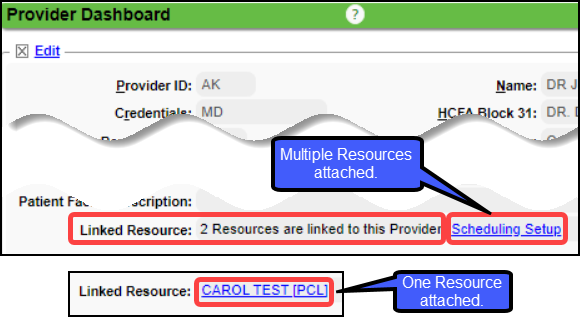
On the Provider Dashboard, select the Resource or Scheduling Setup link to Modify the Resource. This ID is the Provider ID with the prefix P for Person.
- If there is one Resource attached, the link will be the name of the Resource.
- If there are multiple Resources attached to the Provider, the link will be Scheduling Setup.
Learn More
Add/Modify/Delete Appointment Resources
Related Articles
Billing/Rendering Providers
Add Providers Providers can be added using the NPPES Import Tool that completes the Provider screen which only requires editing. If the Provider cannot be found using the NPPES tool, the Provider can be added manually from a link that displays only ...Add an Appointment
Prevent Creation of Simultaneous Appointments in the Same Slot To prevent Users from creating Appointments in the same slot, the System displays this message: Warning? User XXX is also editing this slot. Add an Appointment to the Calendar Select the ...Add Resources (Providers, Rooms, Equipment) to the Calendar
Add Resources (Providers, Rooms, Equipment) to the Calendar Calendar Resources are used to manage the availability of Providers, Rooms, Equipment, etc. The Calendar helps to manage a balanced workload, preventing the likelihood of overload or ...Tags Library
Before using Tags, set up a Tag Library. Pre-planning will be helpful before the library is created. These are some things to consider.. How can Tags improve your workflow? Plan how you want your Tags to be handled in the workflow of your billing. If ...Add Appointment Statuses
Add an Appointment Status From the Scheduling Dashboard, select Scheduling Setup. Select the Statuses tab. Select Add. Status ID. Enter a one or two digit ID. This field cannot be changed after the screen is saved. Enter a Description. Active: Leave ...
