Post a Medicare Advance Payment and Adjustment
To prevent the Payment from affecting your A/R, the Payment and Adjustment can be posted at the same time. This will bring the encounter balance to zero on the Medicare Advance "fictitious" patient.
Post to an ERA
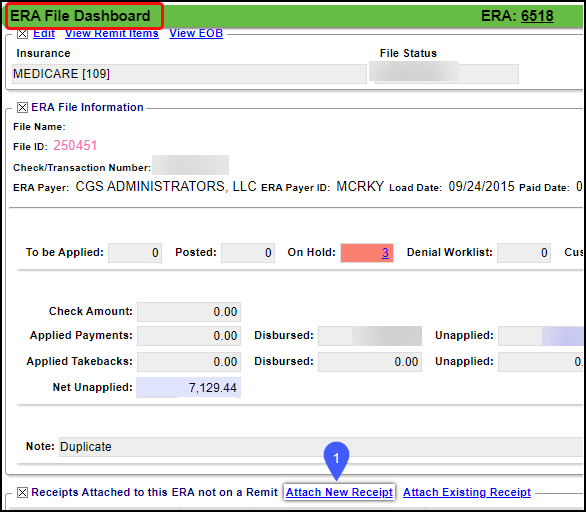
There will be a message in red letters on the ERA File Dashboard alerting you that there are transactions that could not be auto-posted.
On the ERA File Dashboard, select Attach New Receipt.
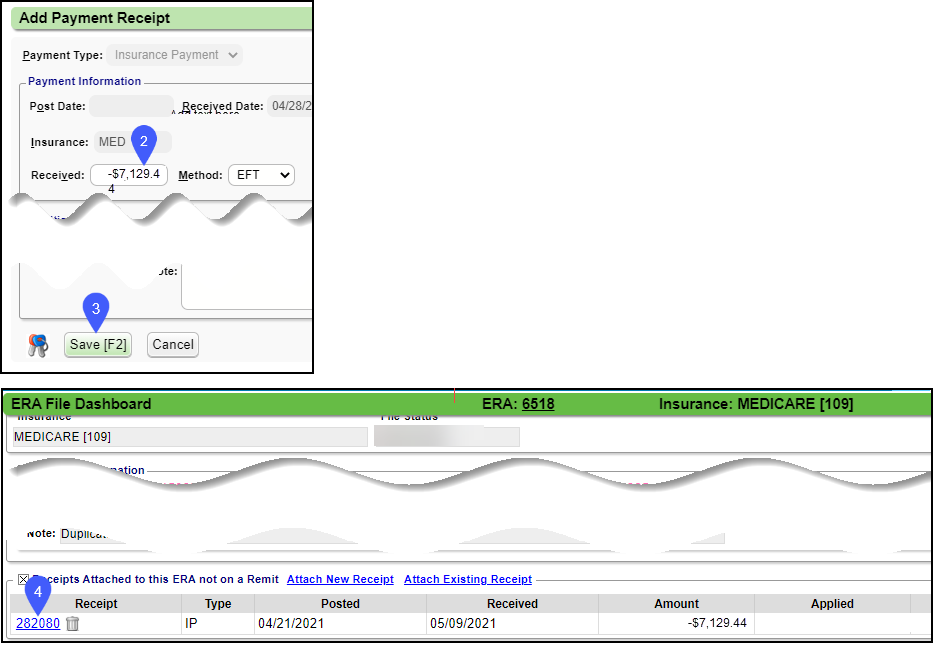
Enter the Amount of the Advance Payment.
Select Save or press F2.
Select the Receipt number.
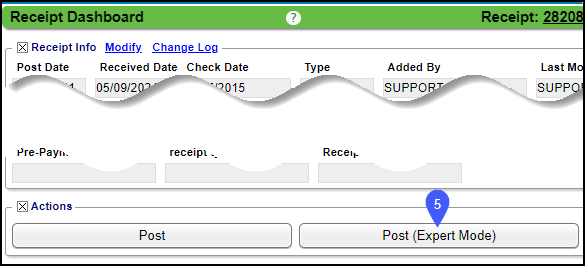
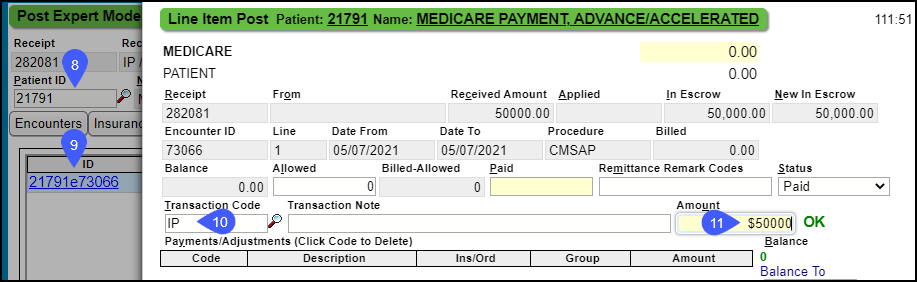
Select Post (Expert Mode).
Search for the Medicare Advance (fictitious) Patient or enter the Patient number.
Select the Encounter number.
Enter IP in the Transaction Code field.
Enter the Medicare Advance Payment amount.

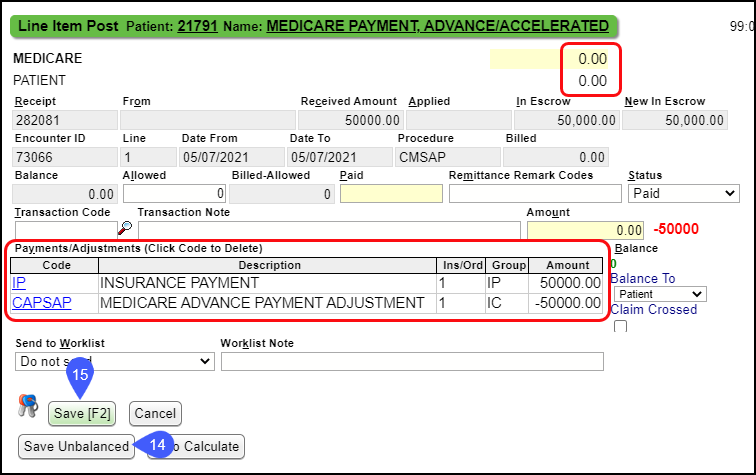
Enter the adjustment code you created. For example, CAPSAP
Enter the same amount as the Recoupment. If the adjustment code was set up as a credit, use a negative number. If it was set up as a debit, use a positive number.
The Medicare balance amount on the top right should be 0.00 after adding the payment and adjustment.Select Save Unbalanced.
Select Save [F2].

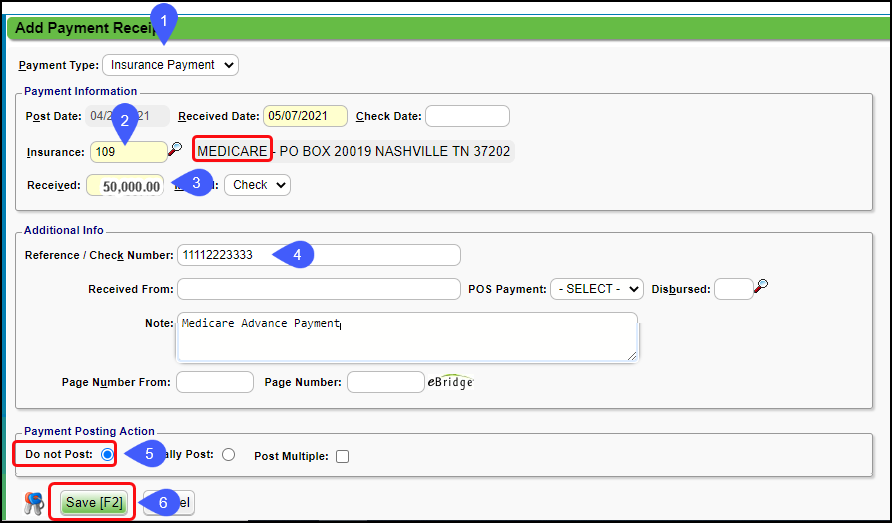
The payment posting instructions are the same as posting the ERA except the receipt will be created from the Payments Dashboard, choose Post Payment.
Payment Type: Choose Insurance Payment
Insurance: Choose Medicare
Received: Enter the check amount.
Reference/Check Number: Enter the check number (optional)
Payment Posting Action: Select Do Not Post
Select Save [F2}.
Select Post (Expert Mode).

Search for the Medicare Advance "Patient".
Select the Encounter number.
Enter IP in the Transaction Code field.
Amount: Enter the Medicare Advance Payment amount.
Transaction Code: Enter the Transaction (adjustment) code that you set up. For example: CAPSAP.
Enter the same amount as the Recoupment. If the adjustment code was set up as a credit, use a negative number. If it was set up as a debit, use a positive number.

Select Save Unbalanced.
Select Save [F2].
Related Articles
Post a Medicare Advance Payment, Recoupment, and Adjustment (Table of Contents)
Contents Post a Medicare Advance Payment and Adjustment Post a Medicare Advance RecoupmentPost a Medicare Advance Recoupment
To prevent the Recoupment from affecting your A/R, the Recoupment and Adjustment can be posted at the same time. This will bring the encounter balance to zero on the Medicare Advance "fictitious" patient. Post an ERA Recoupment There will be a ...Medicare Advance/Accelerated Payments and Recoupments
Due to practices being closed during the COVID 19 Pandemic, providers were able to request Accelerated Payments from Medicare in lieu of claims. Repayment begins one year starting from the date the accelerated or advance payment was issued. Medicare ...The Advance Payment was Posted Previously
The charge was entered with a zero dollar fee On the Encounter where the Advance Payment was posted, the charge was entered with a zero dollar amount. Post the Adjustment using the instructions for Post a Medicare Advance Payment, Recoupment, and ...Post an Insurance Payment Manually
Before posting, add an Insurance Receipt for the full amount of the check. Manually Post a Primary Insurance Payment Using the Receipt that was created for this payment, select the Post button. Enter the Encounter number preceded by an e (e1234) and ...